Since I bought my E92 335i back in May 2024, I’ve completed a number of repairs and maintenance items. I gave a brief summary of these in a recent post where I wrote about buying it:
There were a few small things that needed to be done when I first bought the car, and a few other repair items came up over the following 8 months and ~5,000 miles (~8,000 km).
Here I’ll write about my process and experience of carrying out these repairs and a couple of additional maintenance items I chose to do.
Pre-existing Repair Items#
If you read my first post on the 335i, you’ll remember that I identified three existing issues when I first bought the car:
- Offside front lower suspension arm. This was noted on the MOTThe UK’s mandatory annual vehicle safety inspection.
- Offside front wheel bearing.
- A small oil leak from the oil cooler. It is a BMW, after all — I wouldn’t trust it if it weren’t leaking a bit of oil.
These are all pretty simple fixes and great haggling material, so I wasn’t too fussed. I bought the car and got stuck in to the repairs within a couple of days.
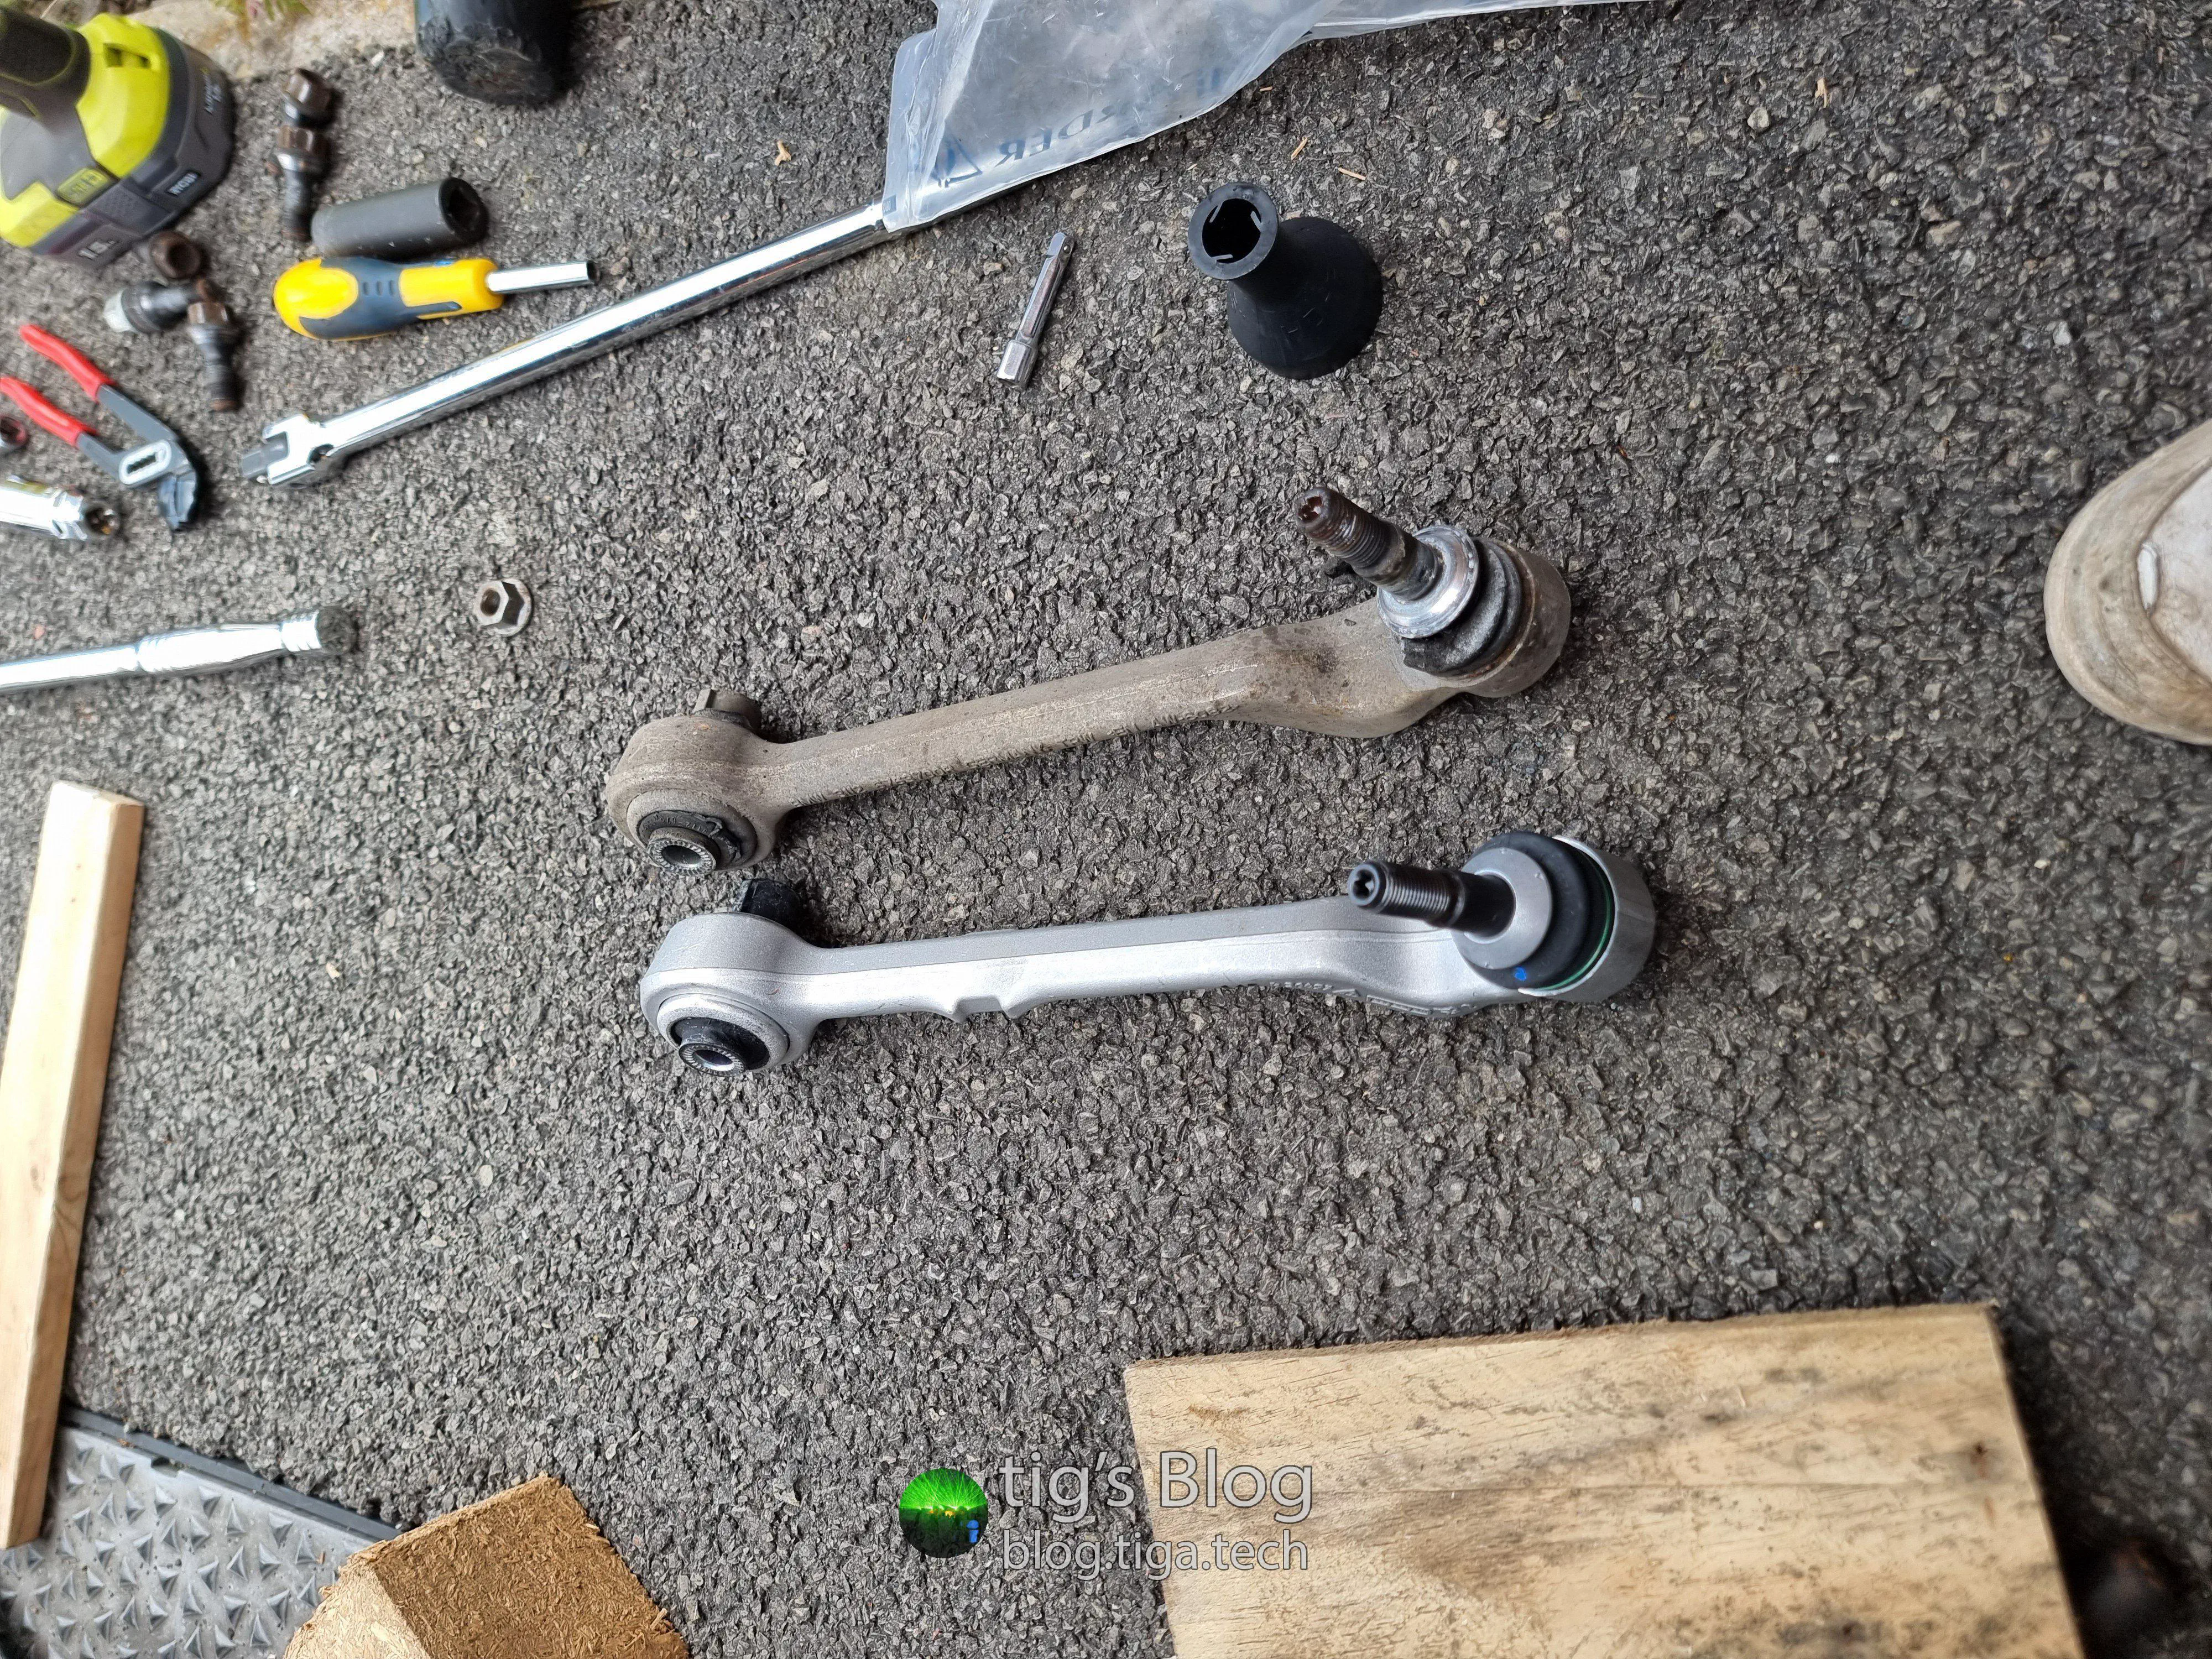
Offside Front Control Arm#
18/05/2024
As I mentioned in my previous post about the 335i, these cars have a pretty interesting suspension setup1 that I hadn’t seen before. It’s not exactly rare or unique, but it was new to me, so I was intrigued by it nonetheless.
Each front corner has two lower arms: the thrust arm and the control arm. These are complemented by the usual coil-over spring strut and track rod, as is typical on almost every other car.
- The thrust arm connects the upper, front part of the hub carrier to the front crossmember.
- The control arm connects the lower, rear part of the hub carrier to the centre crossmember.
- The spring strut serves to locate the upper part of the suspension.
- The track rod connects the hub carrier to the steering rack and facilitates… steering.
In this case, the repair item noted on the MOTThe UK’s mandatory annual vehicle safety inspection for the “offside front lower suspension arm” was referring to the control arm1.
Replacement is a simple procedure, albeit a little time-consuming and mildly irritating, as should be expected when dealing with running gear on older cars.

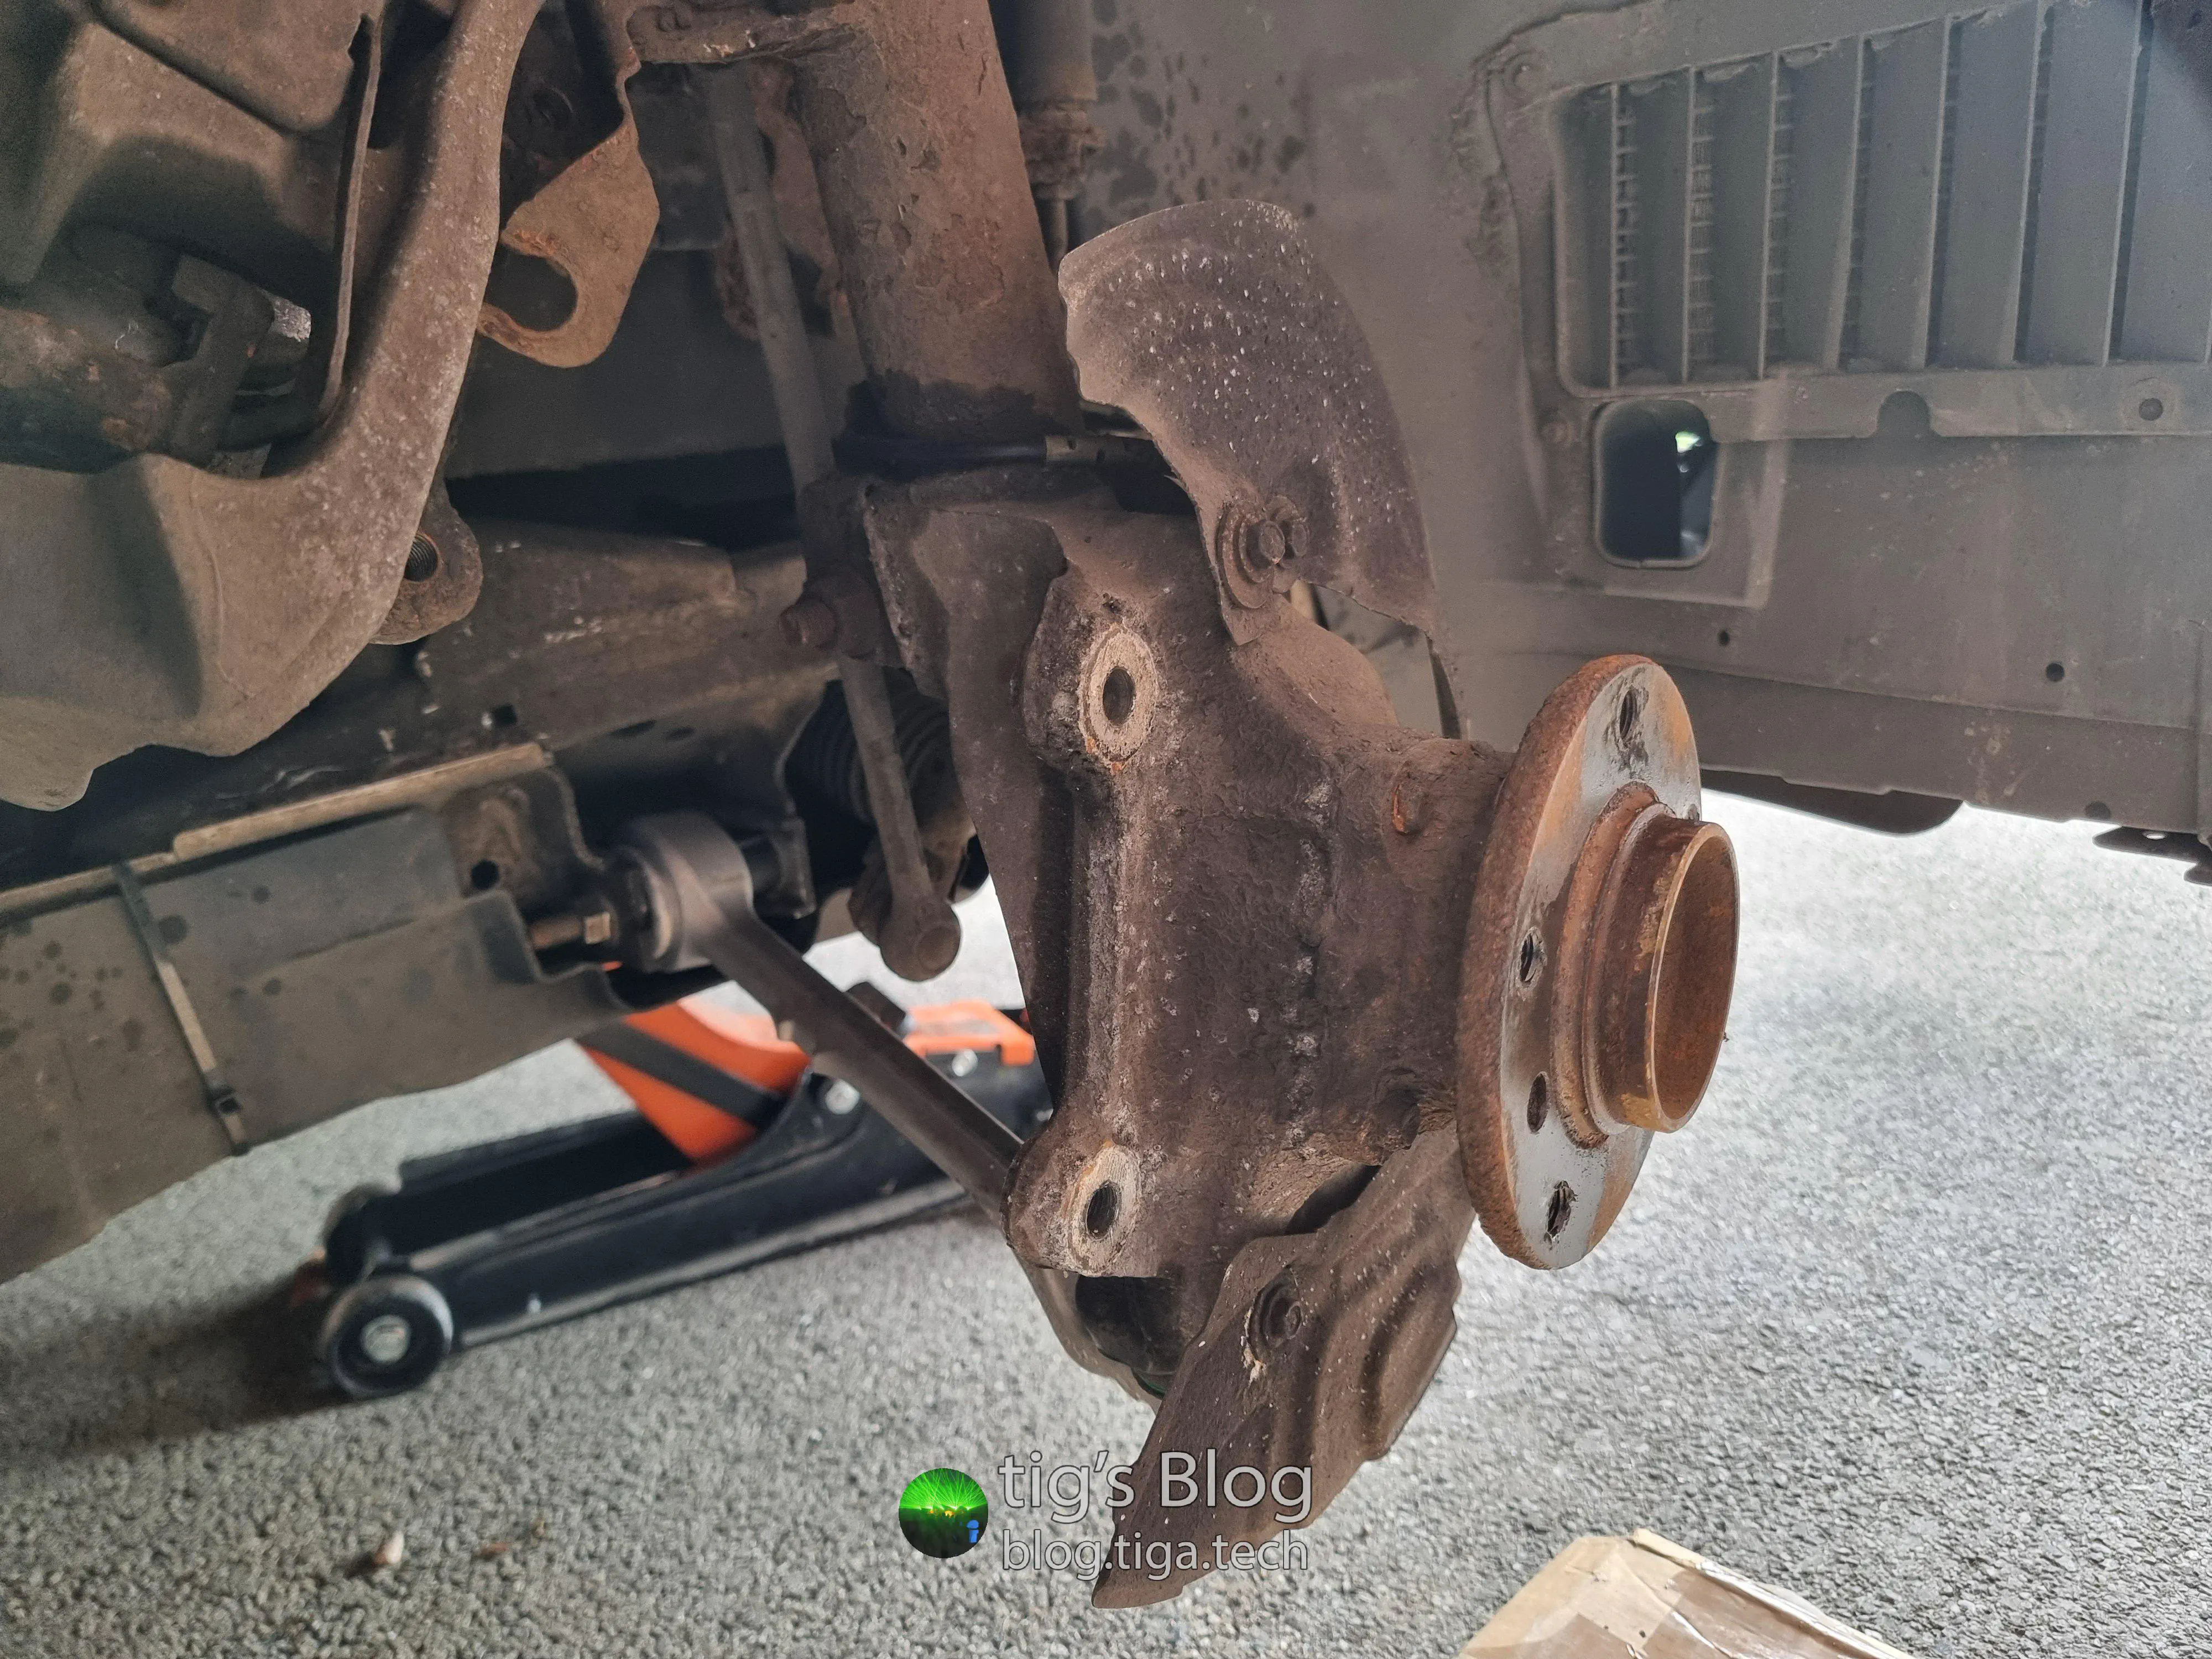
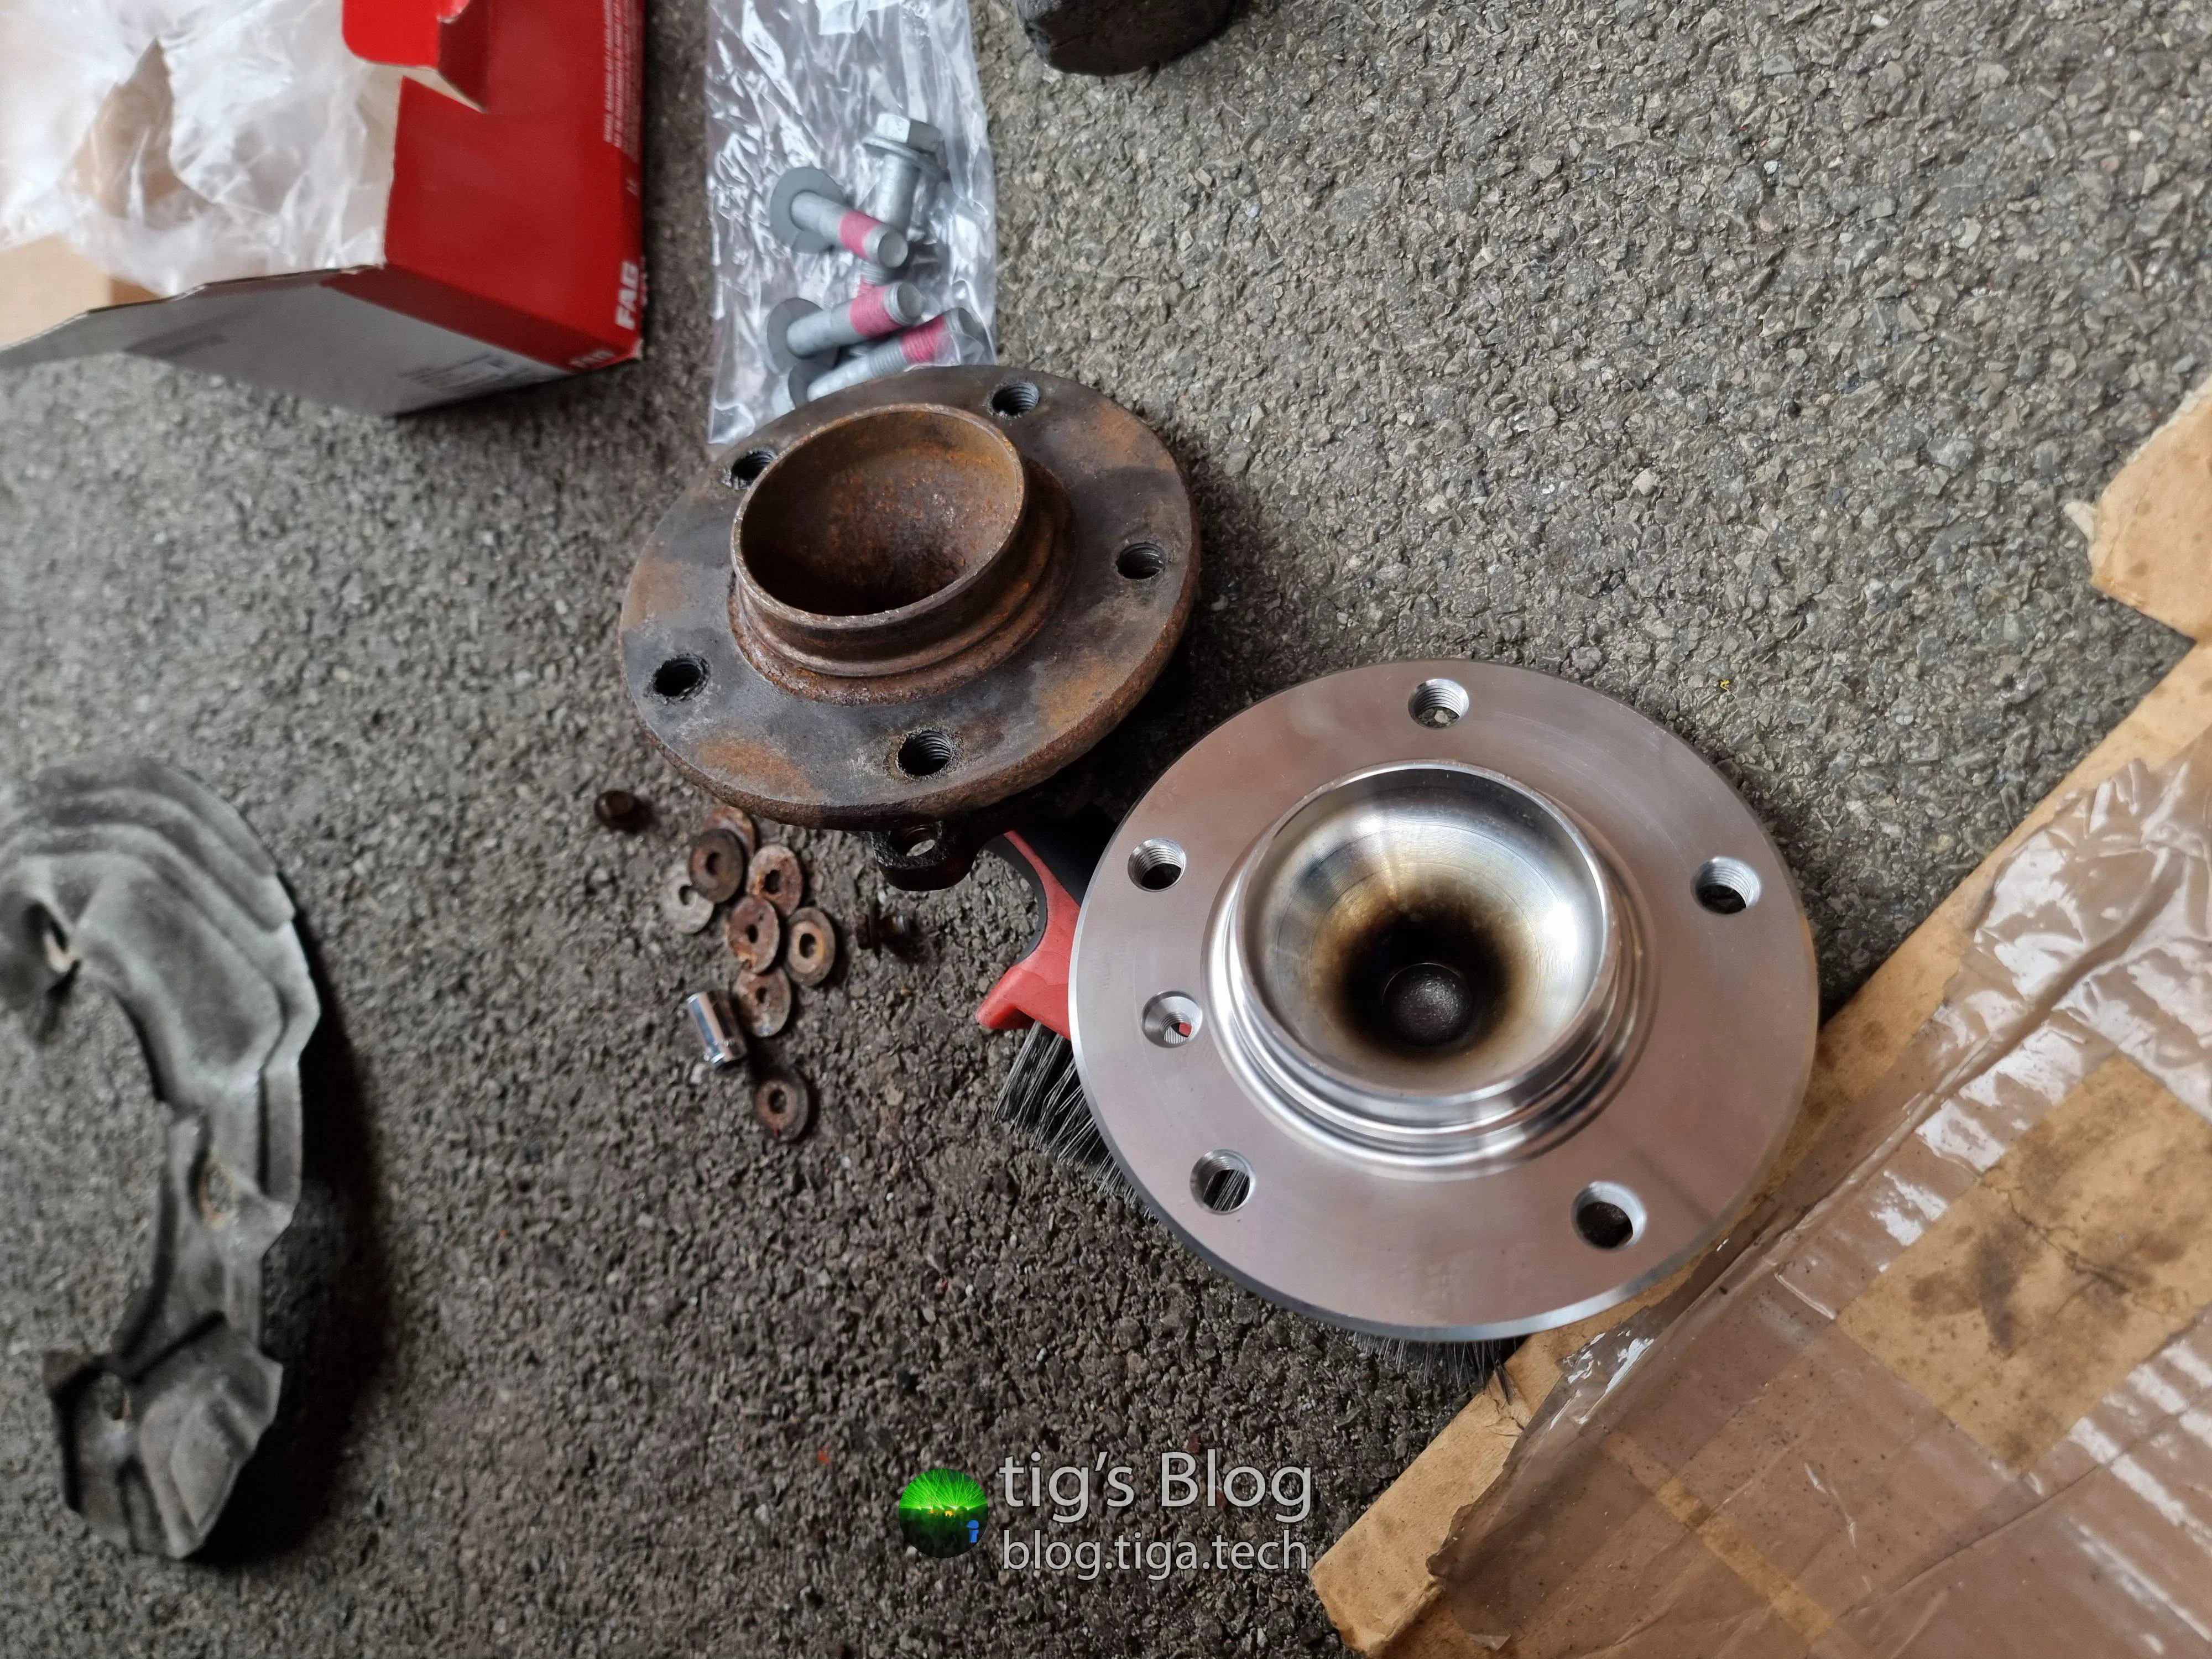
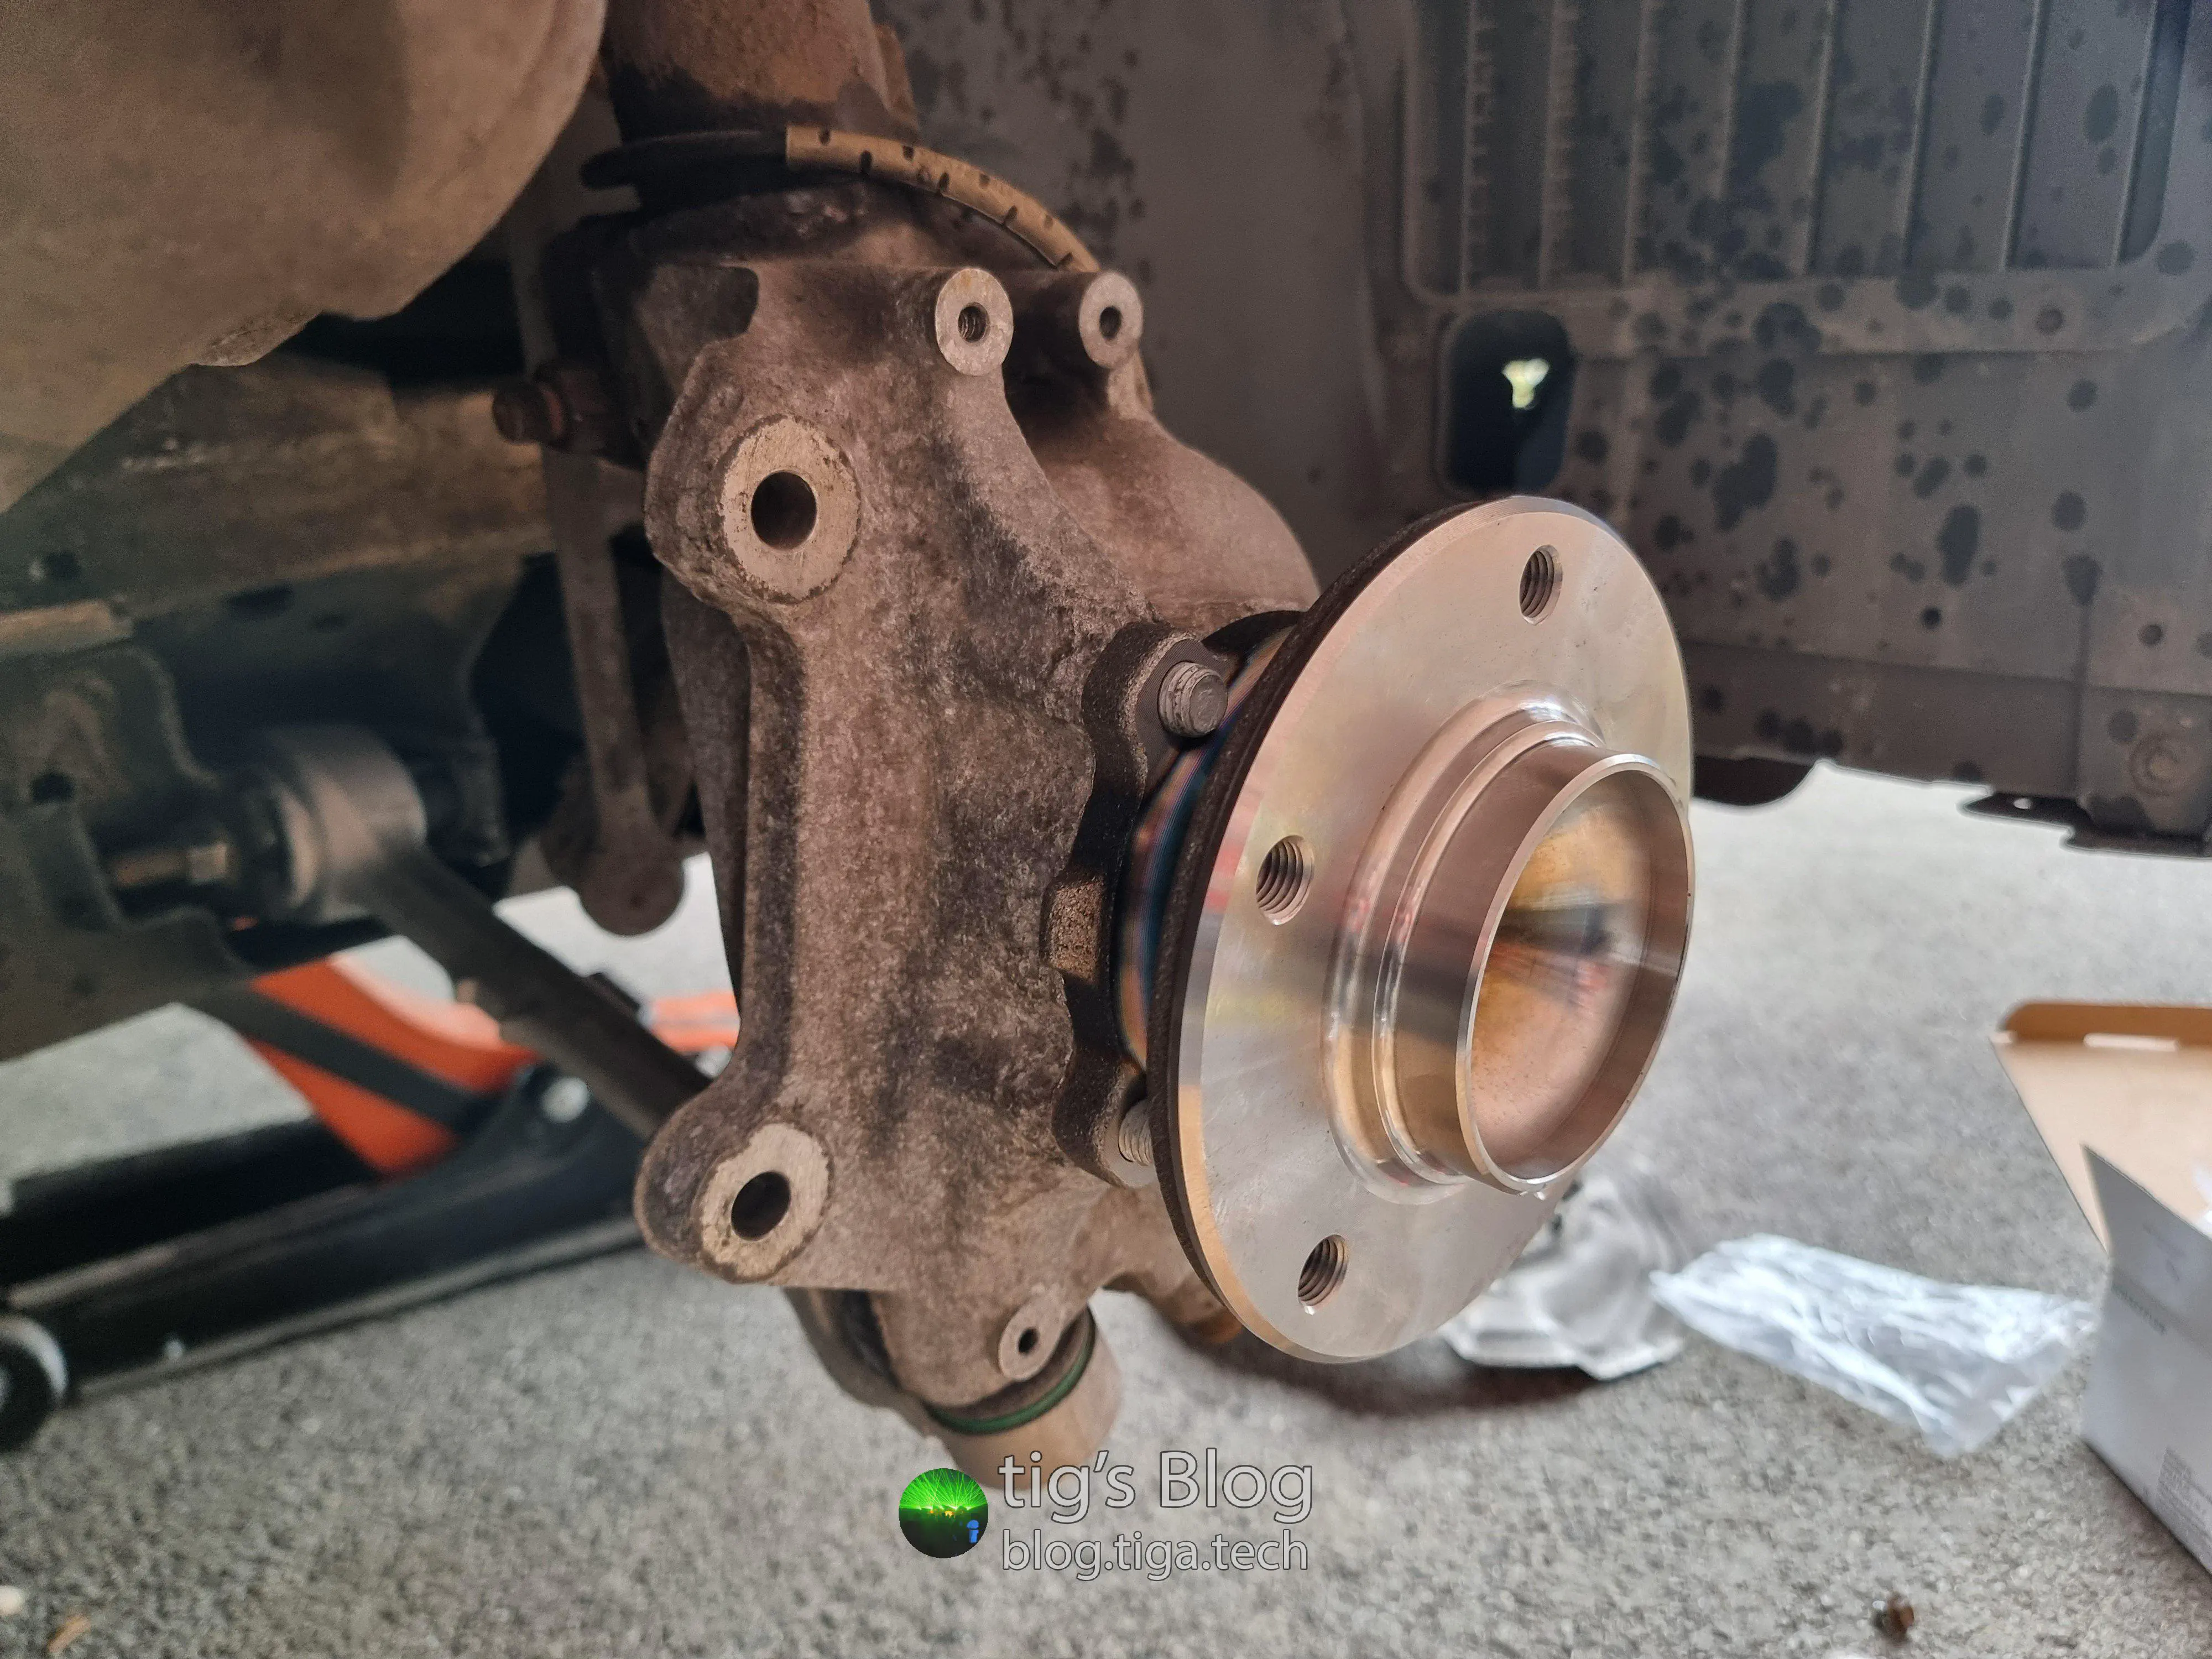
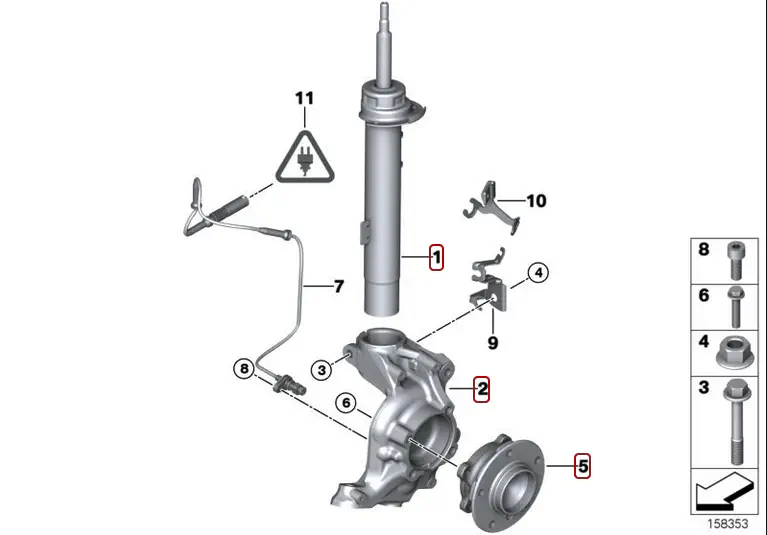
Offside Front Wheel Bearing#
23/05/2024
This was a super simple job, made even easier by the fact that the wheel bearing is captured in the hub1. I’m sure there are mixed feelings on this design choice, given that it essentially forces replacement of two components when only one may be necessary. I agree with this, but to be honest I was glad of it in this case as it made the job a lot easier (albeit a little more expensive).
One of the bolts holding the hub to the carrier is obscured by the bottom end of the damper strut, so I picked up a set of wobble sockets for this job.
I didn’t strictly need the wobble sockets; I could’ve loosened the damper strut collar on the hub carrier, sprung it open with a special tool (I forget the name) and shifted the strut up a little to clear the bolt head, but:
- I imagined it would be useful to have a set of wobble sockets, having been in many situations in the past where it would’ve helped me out.
- It was a lot easier than shifting a damper strut that’s been moulded into place by years worth of driving and road dirt.
Newer Repair & Maintenance Items#
The Might As Well While I’m In There™ Saga#
The next few repairs got a little out of hand thanks to my might as well while I’m in there™ approach. Y’know, the classic. This became a recurring theme.
On a short drive home from town with some friends, one of the plastic flanges on the radiator top hose2 split in half. I had little choice but to call for roadside recovery, being too far from home to risk the drive with no coolant.
They got me going again by repairing the broken flange with some form of plastic glue. Whilst this allowed me to get home, it also littered my cooling system with small flakes of the hardened glue. Gross.
Naturally, this necessitated a full flush of the system.
As these things so often go, this quite quickly spiralled into several more jobs. We’ll look at the radiator hoses first3 and the rest will follow.
Radiator Hoses#
01/06/2024 – 17/06/2024
This was the easy one; simple stuff and satisfying to get done.
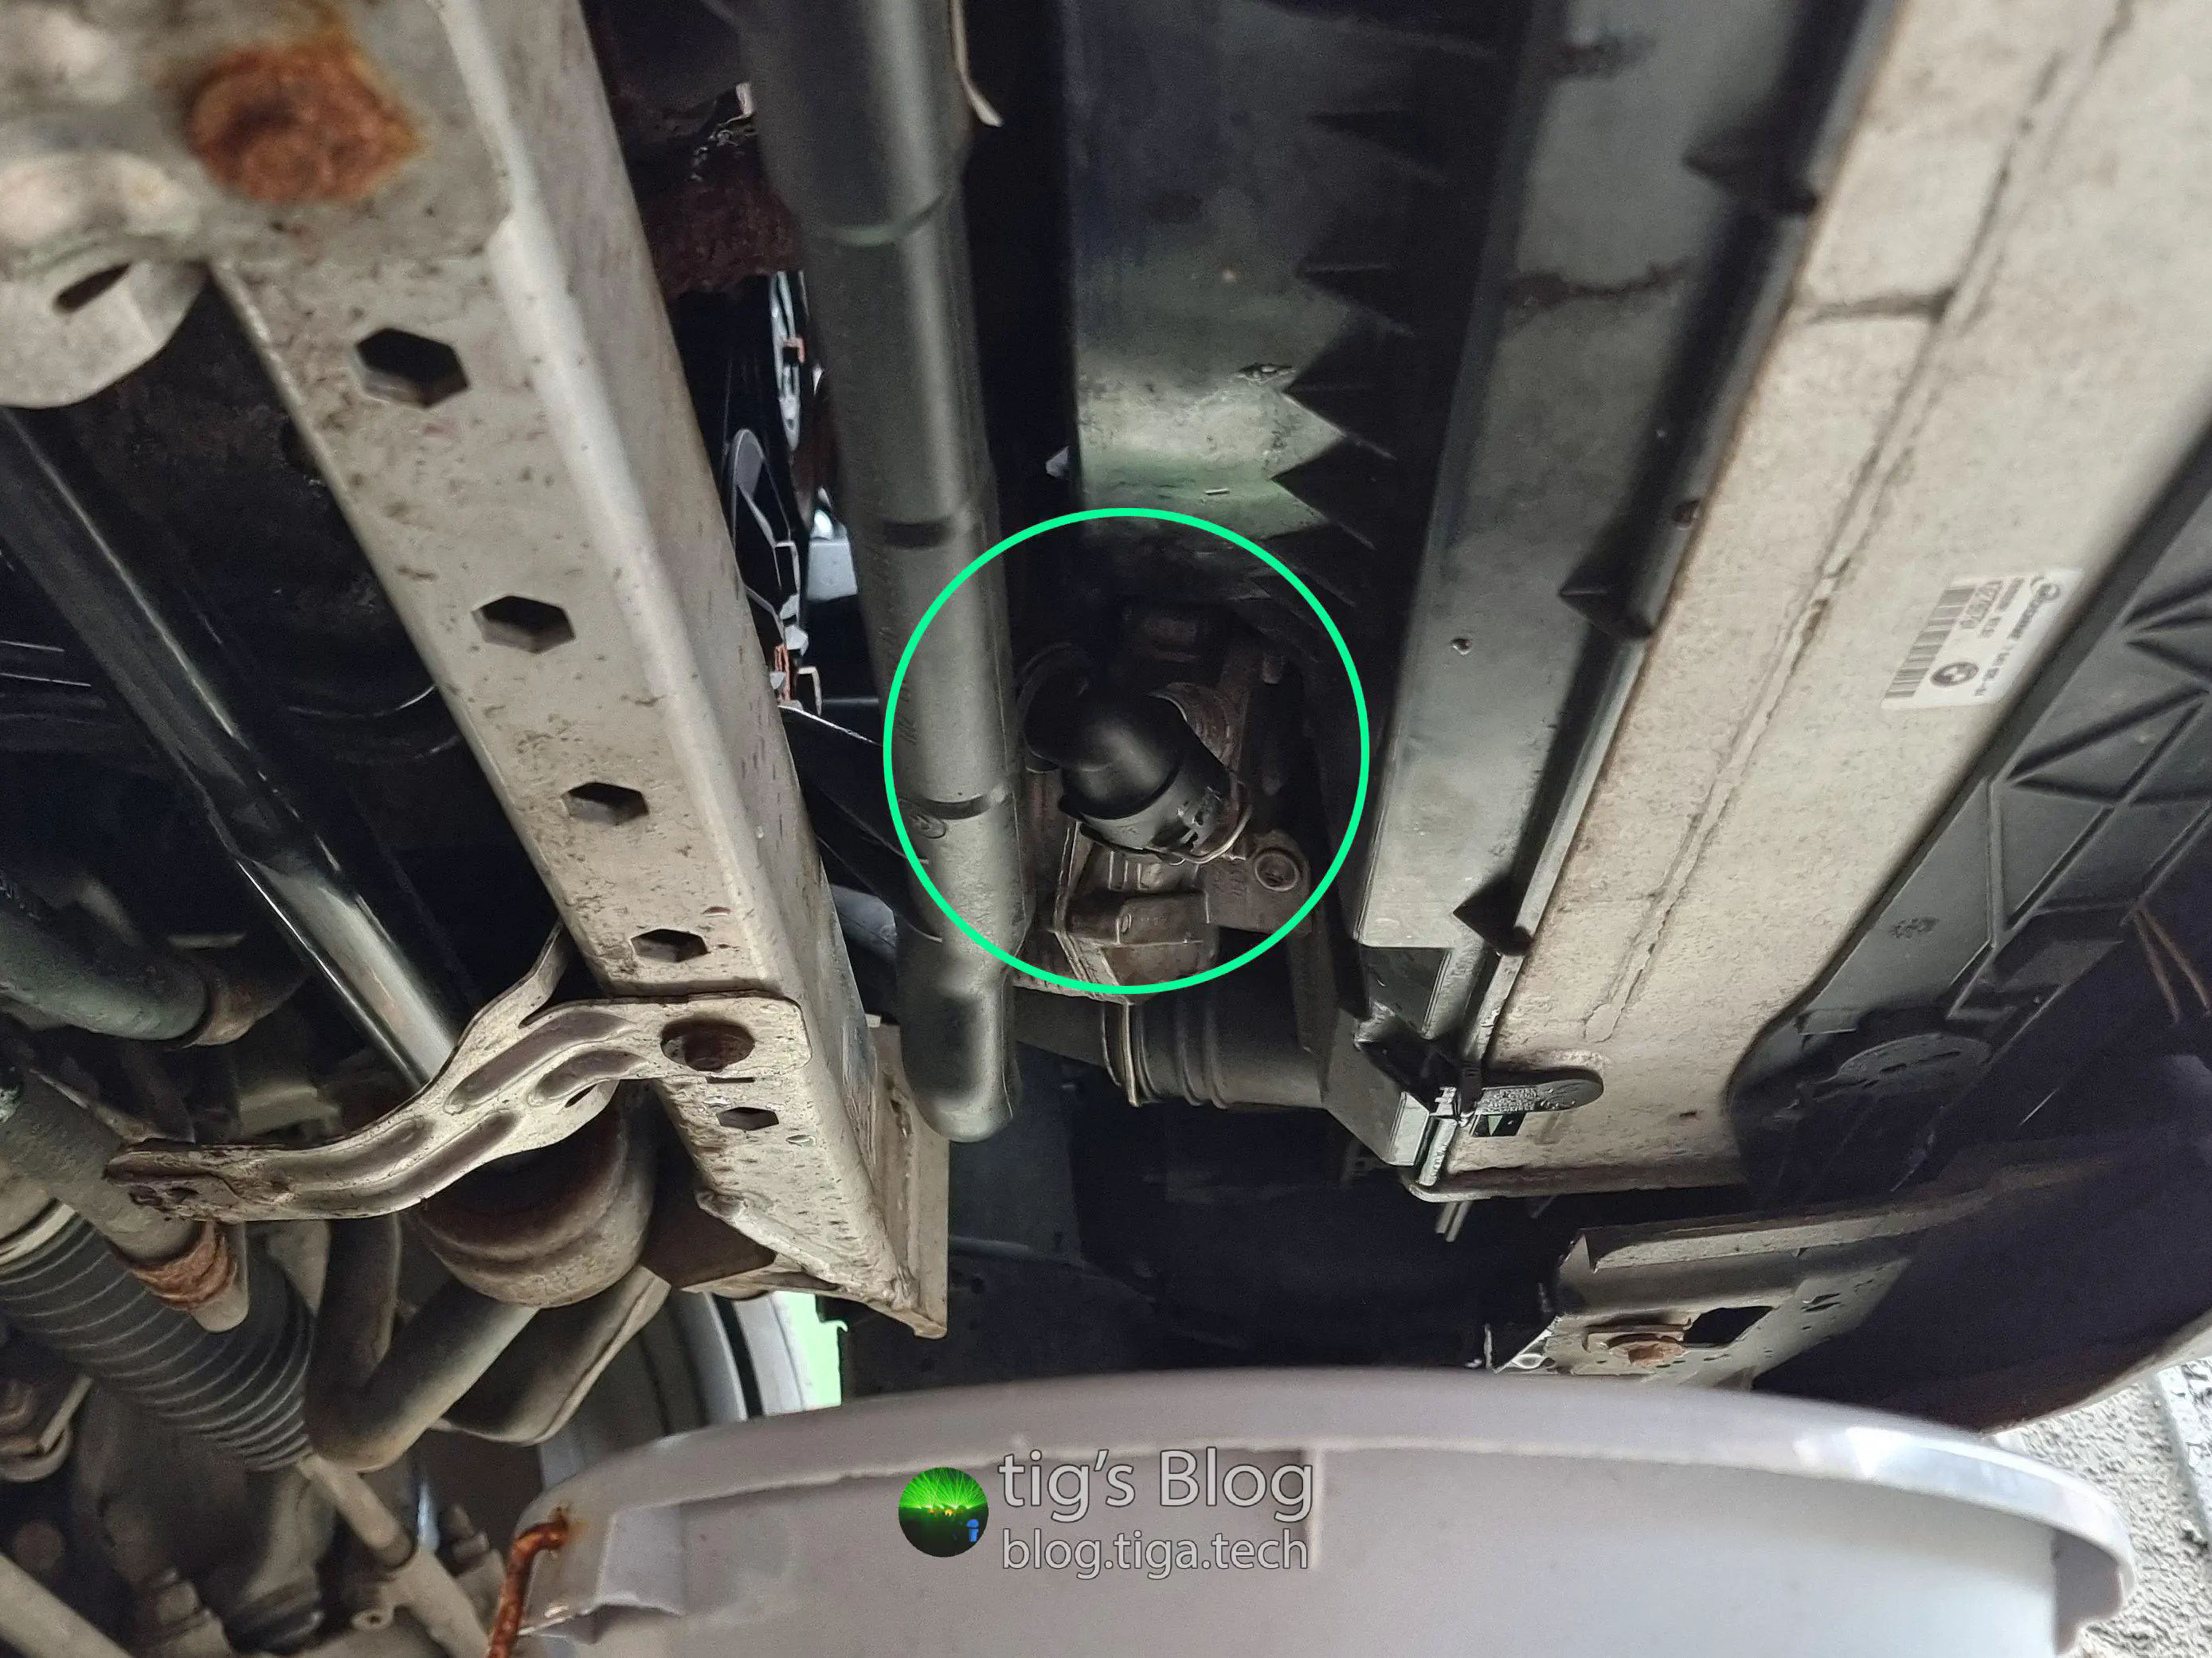
I drained all the coolant via the ATAutomatic Transmission oil cooler2. It’s one of the lowest points of the cooling system, being fed off the “heater return to thermostat” hose under the engine. Generally, and with plumbing intricacies aside, you will be able to drain more coolant at physically lower points in the system.
During one of the other tasks that span off this one, the radiator vent hose2 split. This is an even smaller, even crappier, even more plasticy-er (definitely a word) pipe running over the top of the radiator between the expansion tank and the top radiator hose:

While a repair or replacement could quite easily be DIY’d4 for this, I was already buying quite a few other parts, so I just threw in an OEMOriginal Equipment Manufacturer — A company that makes the OE (Original Equipment, i.e. genuine BMW) parts, just without the BMW logo on them. replacement.
After receiving both replacement hoses and completing the other tasks below, I fitted them and did several flushes of the cooling system to remove all traces of the aforementioned flakes of glue.
During all the other tasks below, I ended up removing and re-fitting the thermostat to cylinder head (engine feed) coolant hose2 a number of times. The hose flange’s O-ring on the cylinder head side wasn’t so happy after all that and sprung a small leak after the first run. This is the sort of thing I’m happy to get from a dealer as the markup isn’t usually vastly more than you’ll find elsewhere, and it’s incredibly convenient.
As an aside, I later learned that this hose’s original plastic flange, colloquially known as the “Mickey Mouse flange” due to its shape, is somewhat famous for breaking. It fits directly into the cylinder head, therefore experiencing quite extreme heat cycles. Since the OEMOriginal Equipment Manufacturer — A company that makes the OE (Original Equipment, i.e. genuine BMW) parts, just without the BMW logo on them. flange is plastic (WTF?!), it deteriorates fast compared to most other flanges in the cooling system. As a result, an aftermarket, aluminium version of the flange is one of the most common preventative maintenance items recommended for the N54The engine found in the E9x 335i, E8x 135i, E6x 535i, etc.. Thankfully, a previous owner had already done this. Love to see it.
Anyway, a trip to the dealer, £3.42, and 5-minutes with a ratchet later, the hose fitting was watertight.
Oil Filter Housing & Oil Cooler Thermostat Housing Gaskets#
01/06/2024 – 17/06/2024
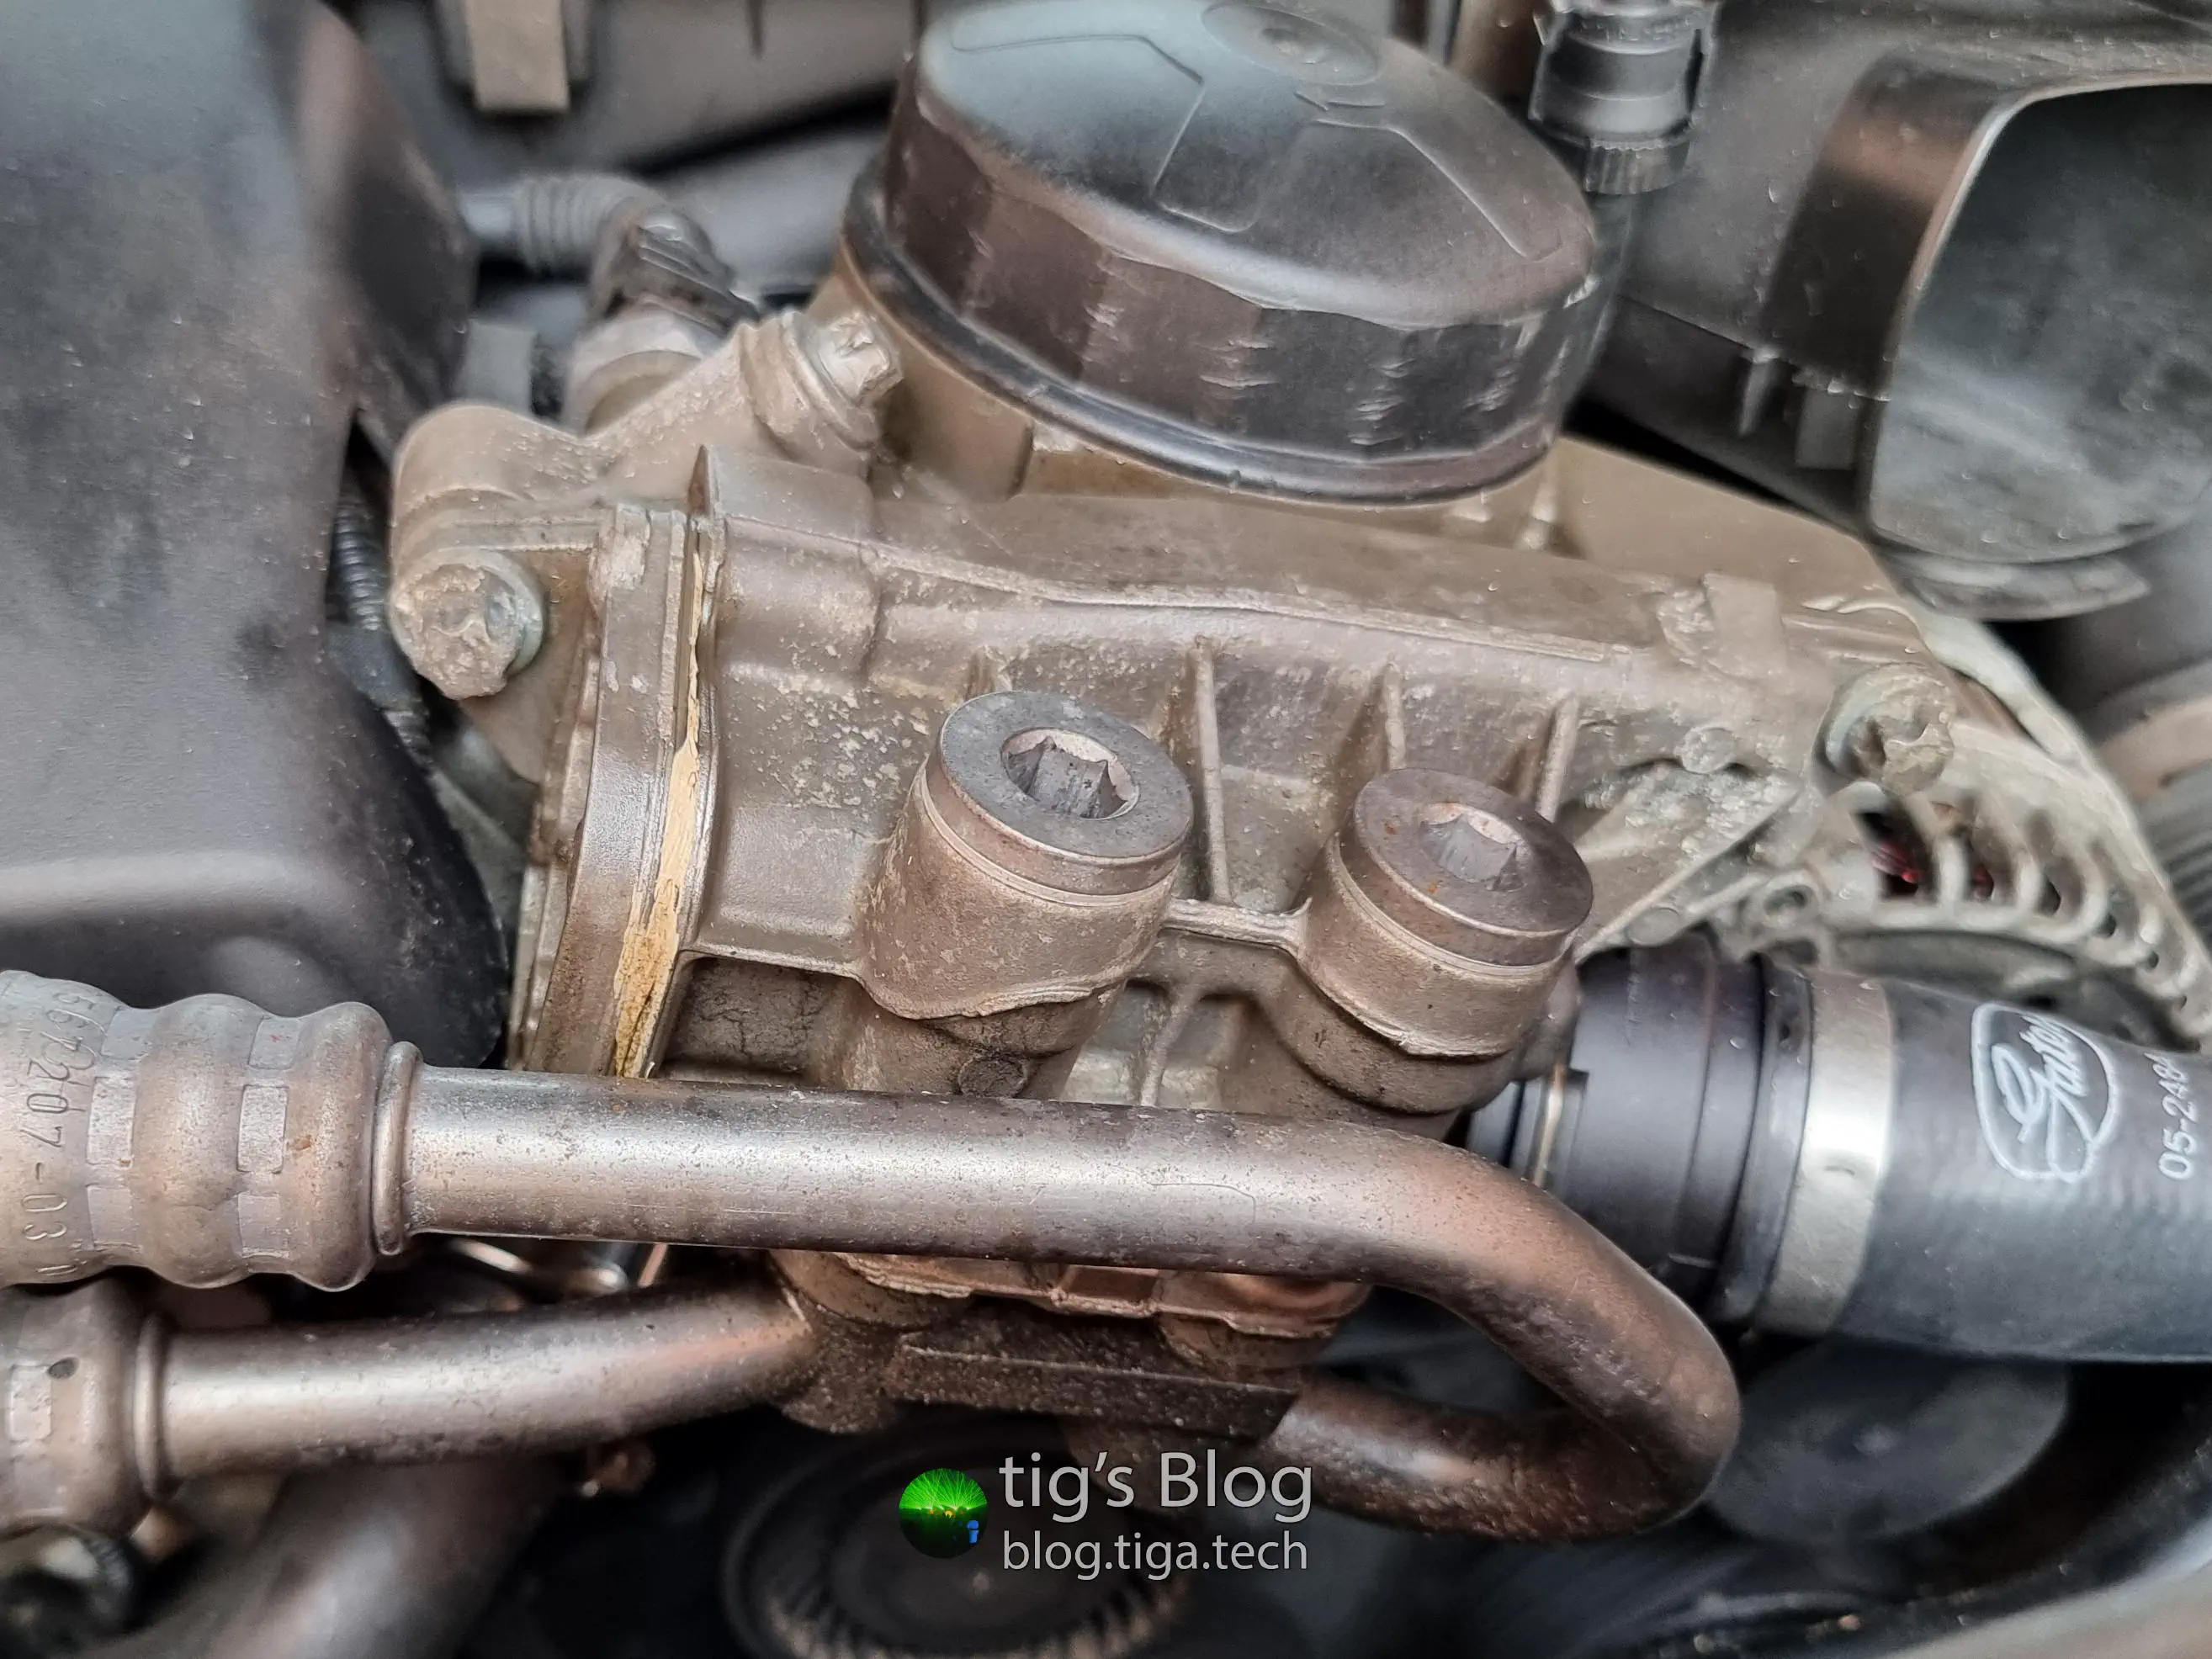
One of the most common oil leaks on the N54 originates from the oil filter housing (OFH) and/or oil cooler thermostat housing (OCTH).
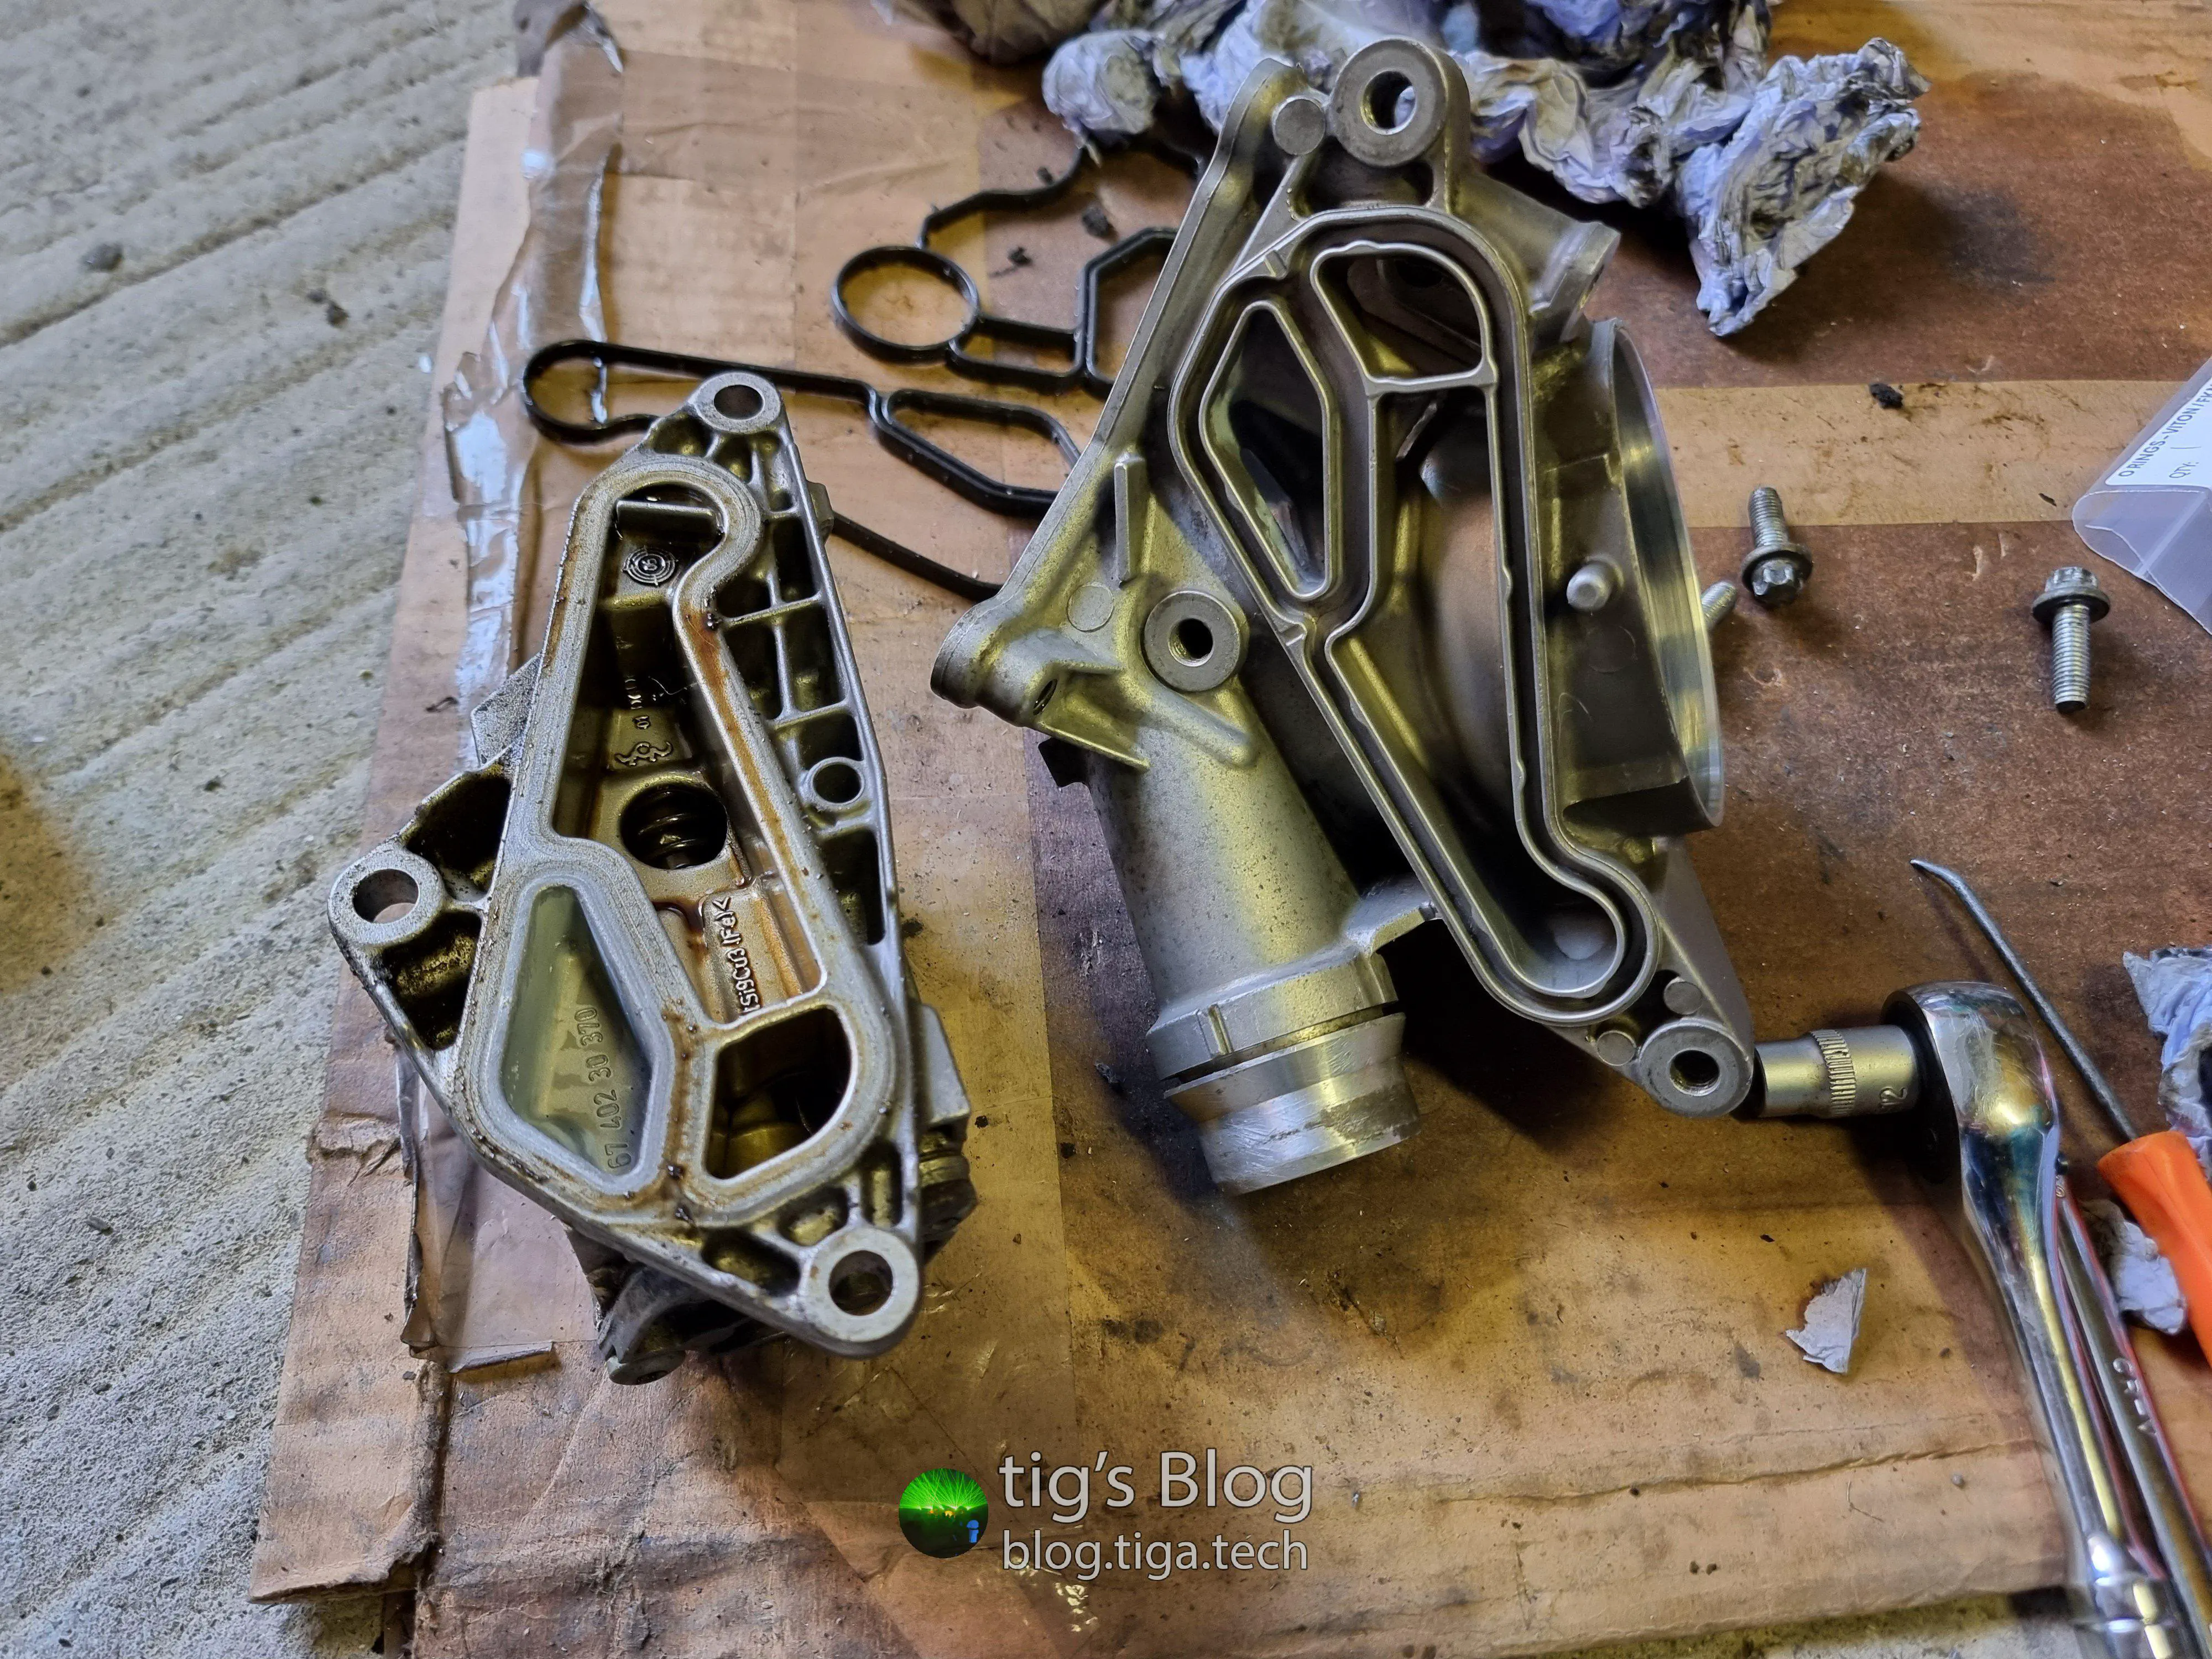
OFH & Oil Cooling Design#
The OFHOil filter housing bolts onto the cylinder head and, naturally, facilitates oil filtration.
Interestingly, the OFHOil filter housing has been integrated into the cooling system with an internal gallery joining a port on the cylinder head side and a hose fitting on the outer edge. The radiator top hose (cylinder head coolant return) connects to the hose fitting.
There’s also a small port on the OFHOil filter housing which allows coolant to pass through to the coolant gallery seen on the top left of the OCTHOil cooler thermostat housing in the image below. I can only assume this serves to aid in thermal regulation of the OCTHOil cooler thermostat housing.
Flanged to the OFHOil filter housing, you’ll find the OCTHOil cooler thermostat housing (shown above). This housing admits oil to the air-oil heat exchangerA small radiator5 (i.e. oil cooler, found in the front of the OS/FOffside Front wheel arch, fed by an air duct from the front grille). The thermostat regulates the flow relative to oil temperature by adjusting the bypass between the feed and return lines of the heat exchanger.
However, despite this elaborate design, these units are well known for springing leaks from various points — A gasket between the OFHOil filter housing and the cylinder head, another between the OFHOil filter housing and the OCTHOil cooler thermostat housing, and an O-ring on the OCTOil cooler thermostat cap.
A failure in any of these seals can easily result in an oil leak, and a failure in either of the two gaskets can result in oil mixing with coolant.
Repair#
I was already planning to replace both of these gaskets but hadn’t got round to it as it wasn’t super crucial in my case. However, when the radiator top hose blew out, I decided I may as well get those gaskets sorted while I was in there™.
I was unaware of the O-ring in the OCTOil cooler thermostat cap to begin with, so I hadn’t planned to replace that, but after having a closer look, I noticed that was the origin of the oil leak.
Despite my mention of the good history of this car in my previous post on the 335i, I found that a previous owner had implemented a truly shameful “repair” here; instead of doing what needed to be done, they had simply taken off the cap, coated the thing in some form of silicone sealant, and popped it back on.
Now, in defence of this move, BMW don’t have a part number for the OCTOil cooler thermostat cap O-ring, and neither they nor any third-parties (bar a few Bimmerpost forum members in far-away countries) sell a replacement.
Thankfully, I was able to track down the exact spec of the O-ring6 and found a suitable replacement on eBay. I purchased this and replacements for all other OFH/OCTHOil filter housing & oil cooler thermostat housing seals:
- O-ring for the OCTOil cooler thermostat cap6.
- O-rings for the oil cooler pipe flanges on the OCTHOil cooler thermostat housing side5.
- Gasket for the mating surface between the OFH/OCTHOil filter housing & oil cooler thermostat housing5.
- Gasket for the mating surface between the OFHOil filter housing and cylinder head5.
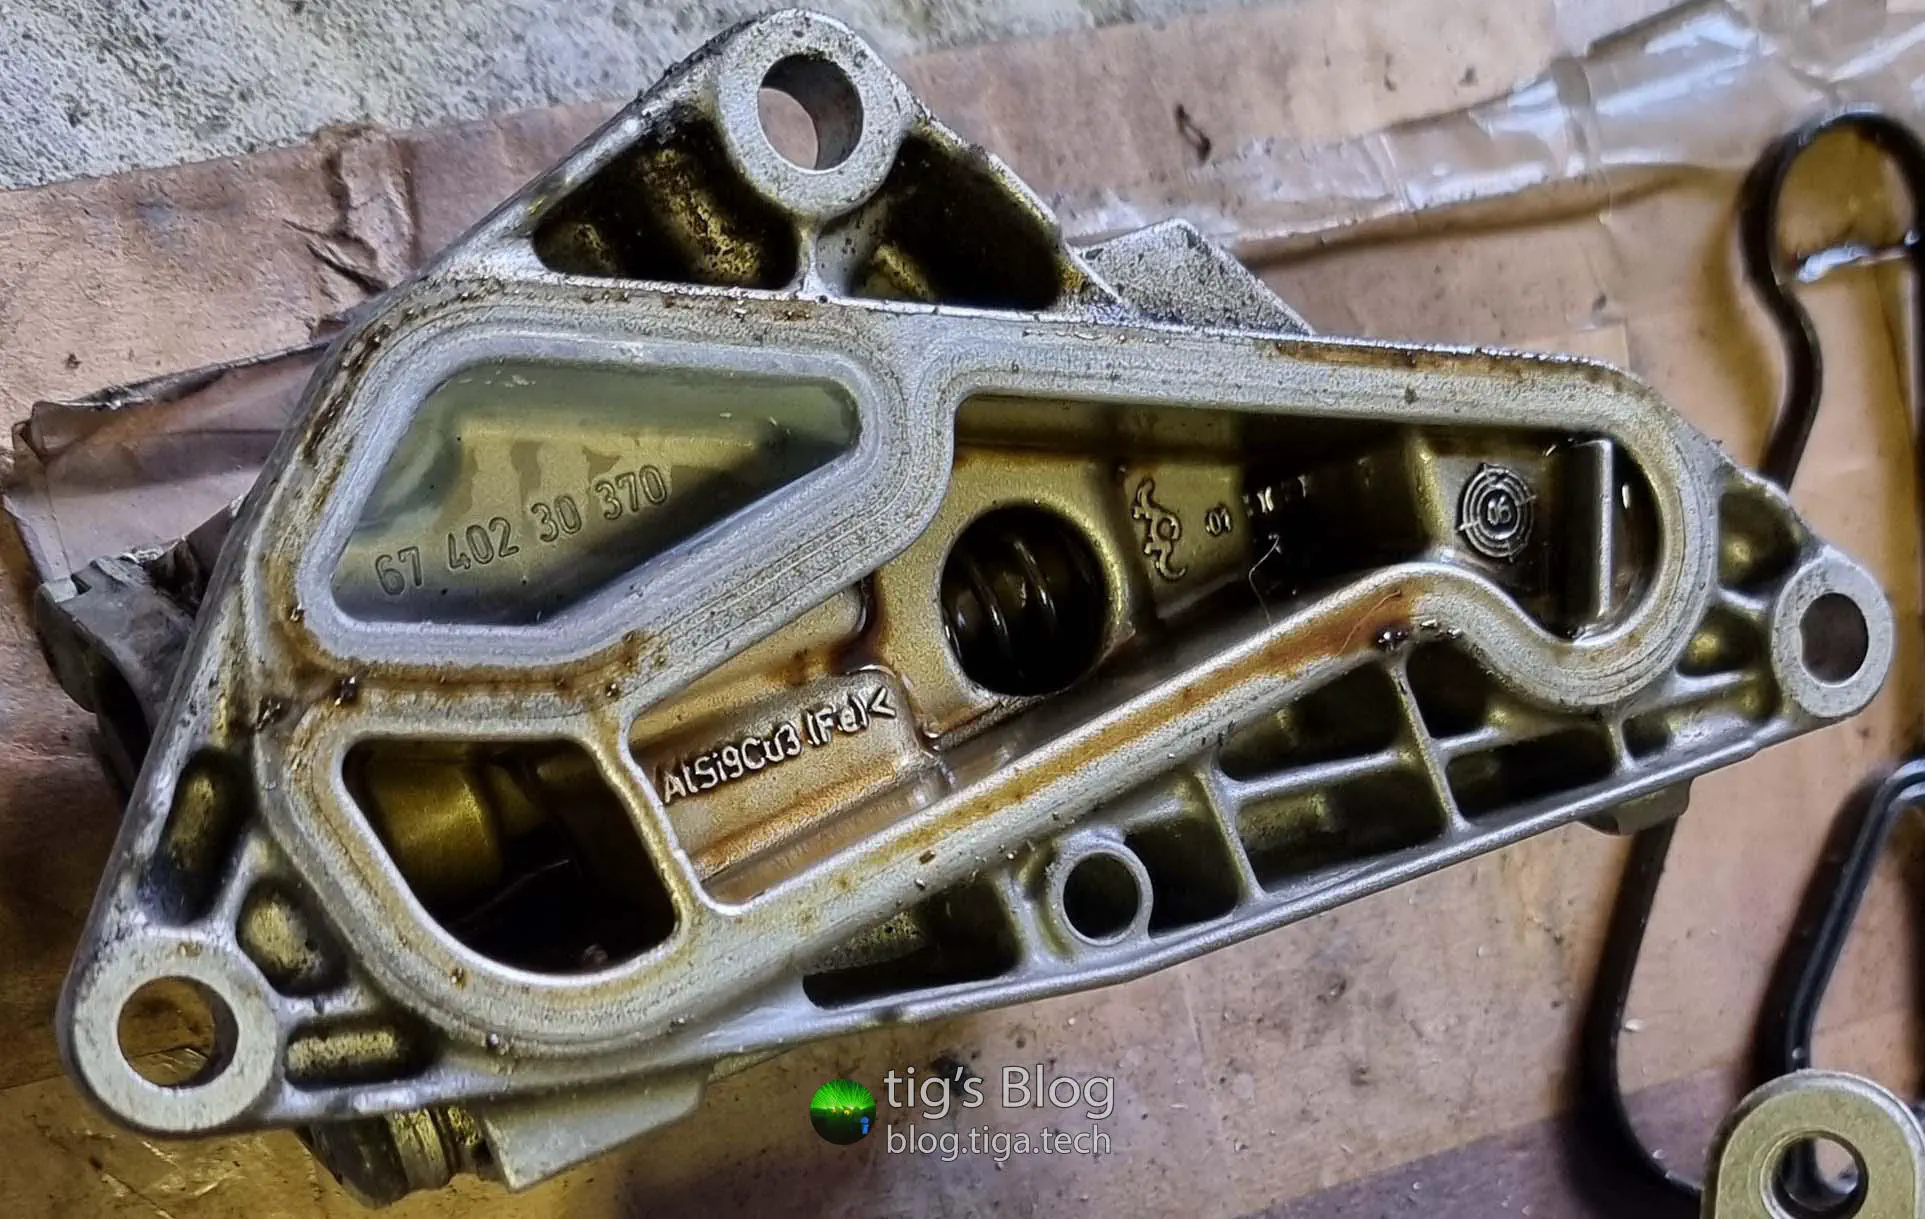
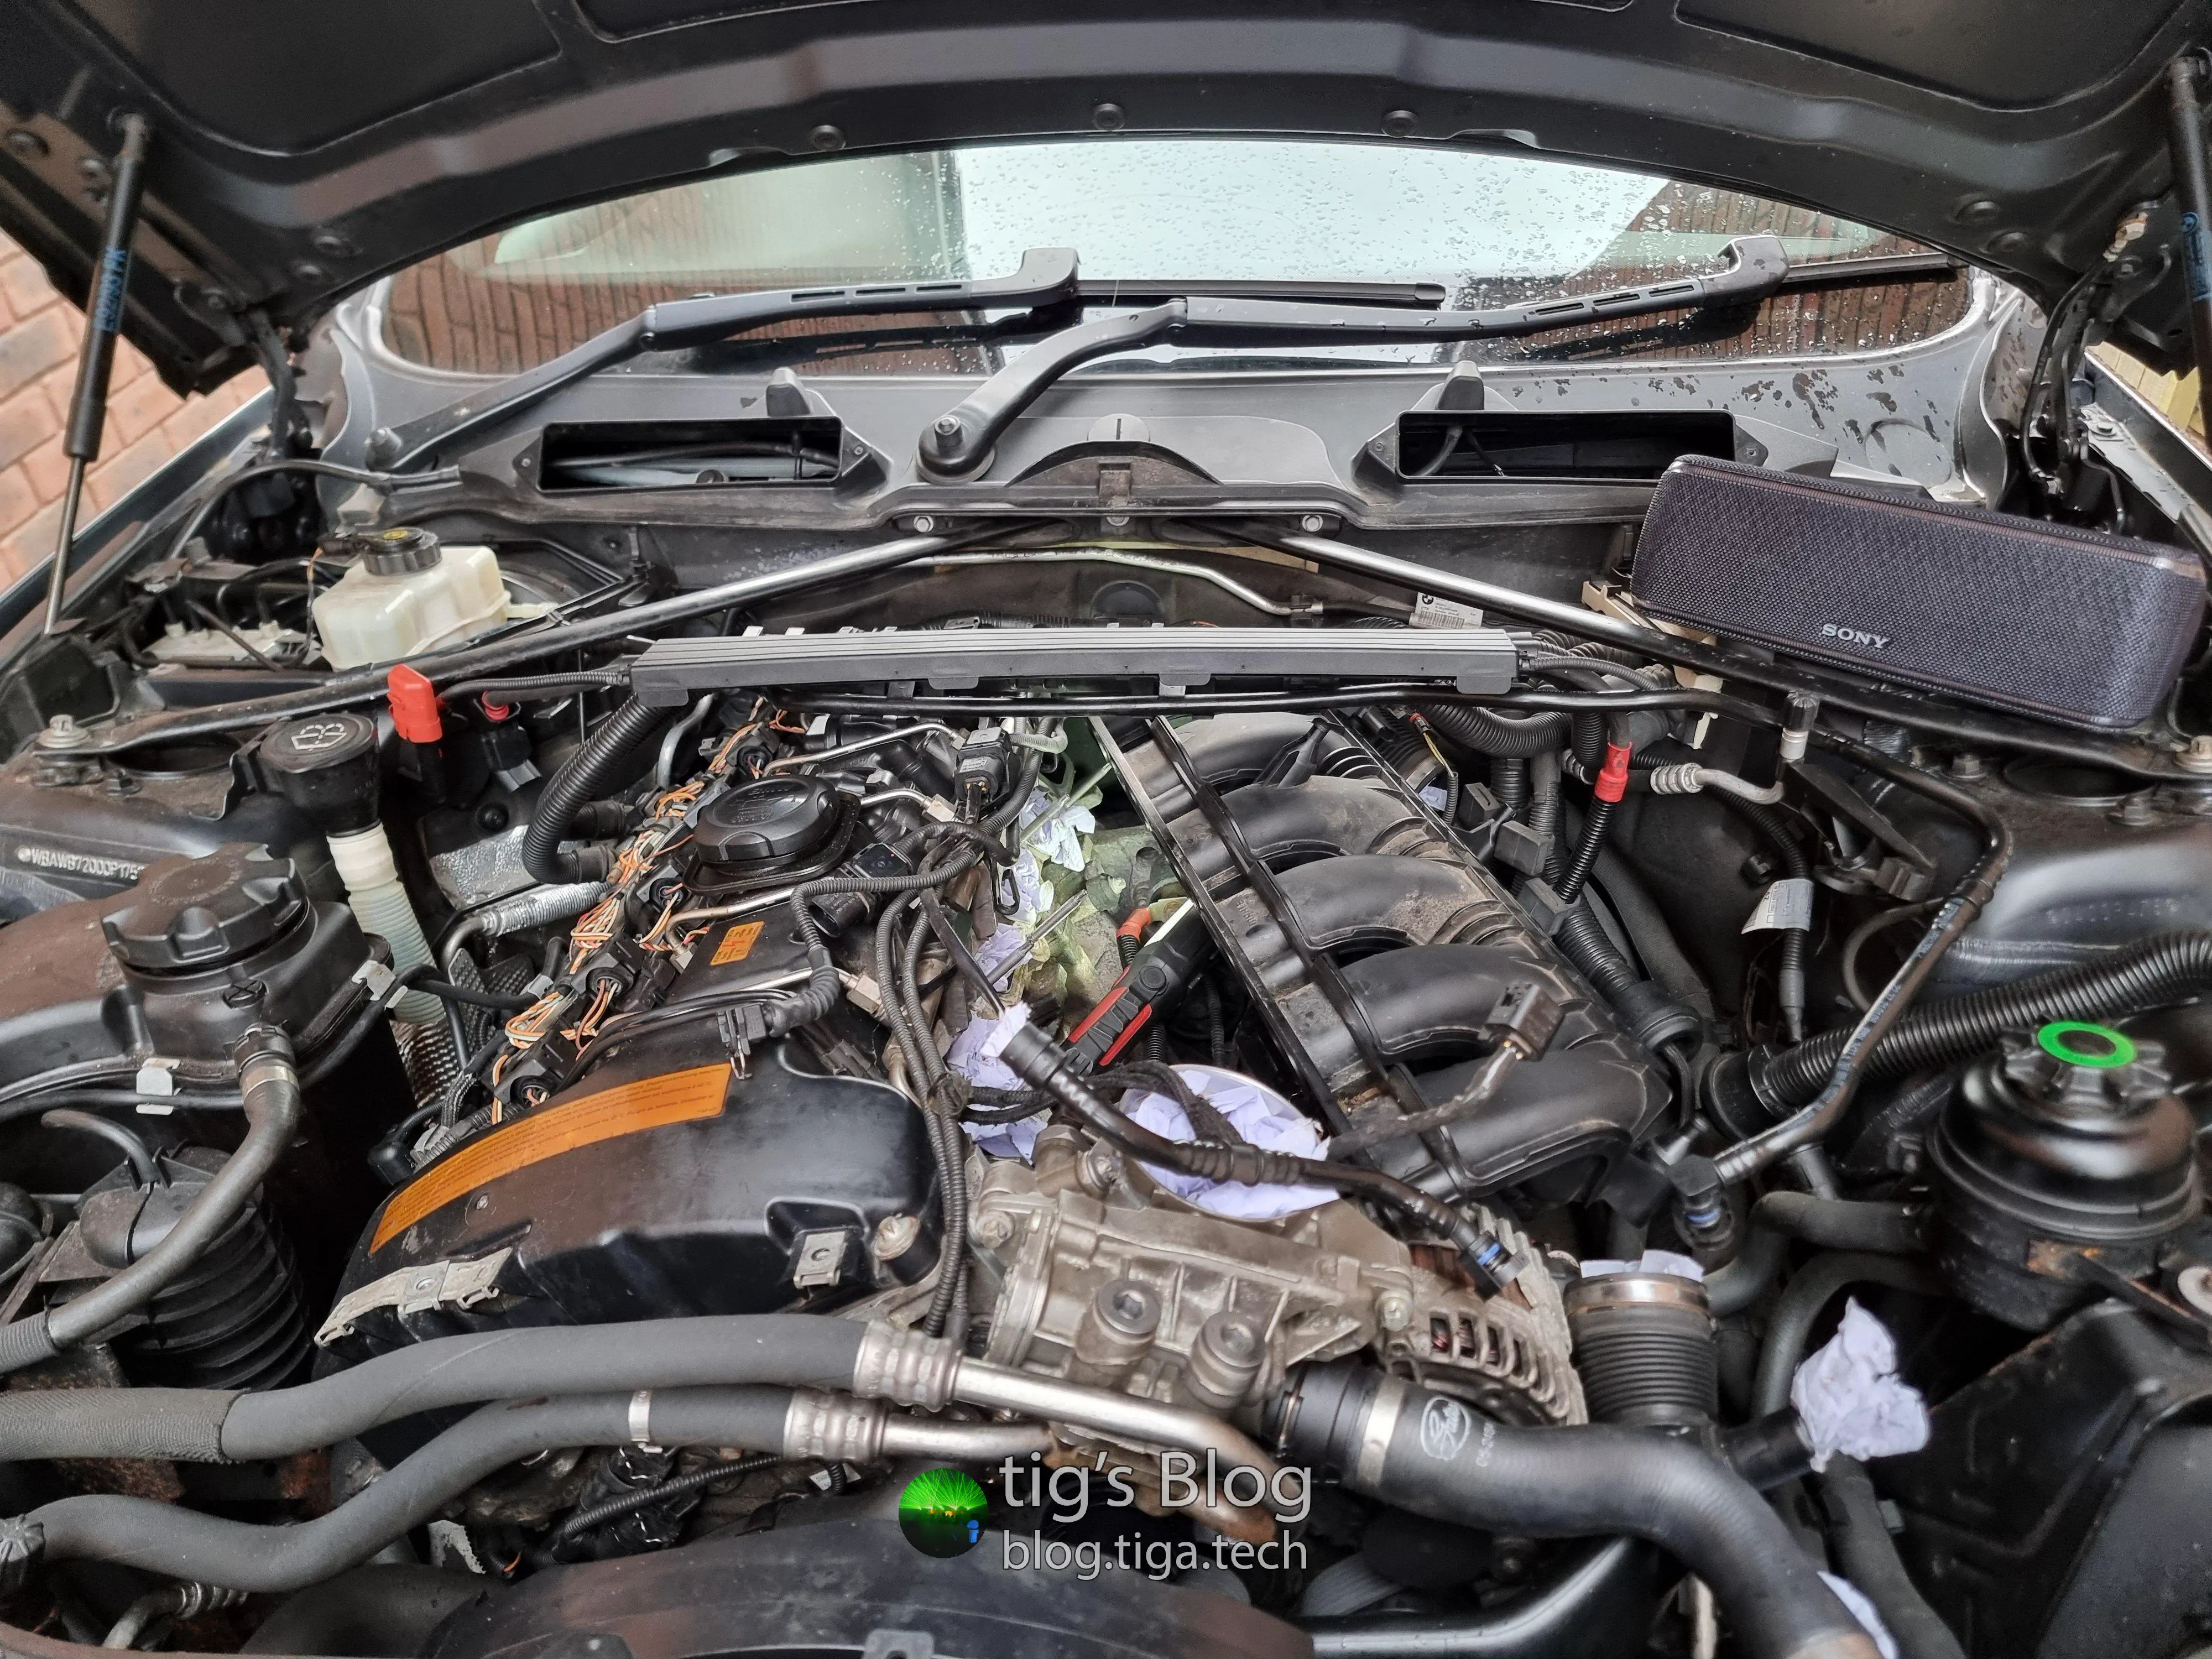
After receiving the parts, I proceeded to remove and tear down the units. Removing the OFH/OCTHOil filter housing & oil cooler thermostat housing was more difficult than I’d assumed with one of the bolts securing the OFHOil filter housing to the cylinder head being obscured by the intake manifold, but it was all plain sailing after getting around that.
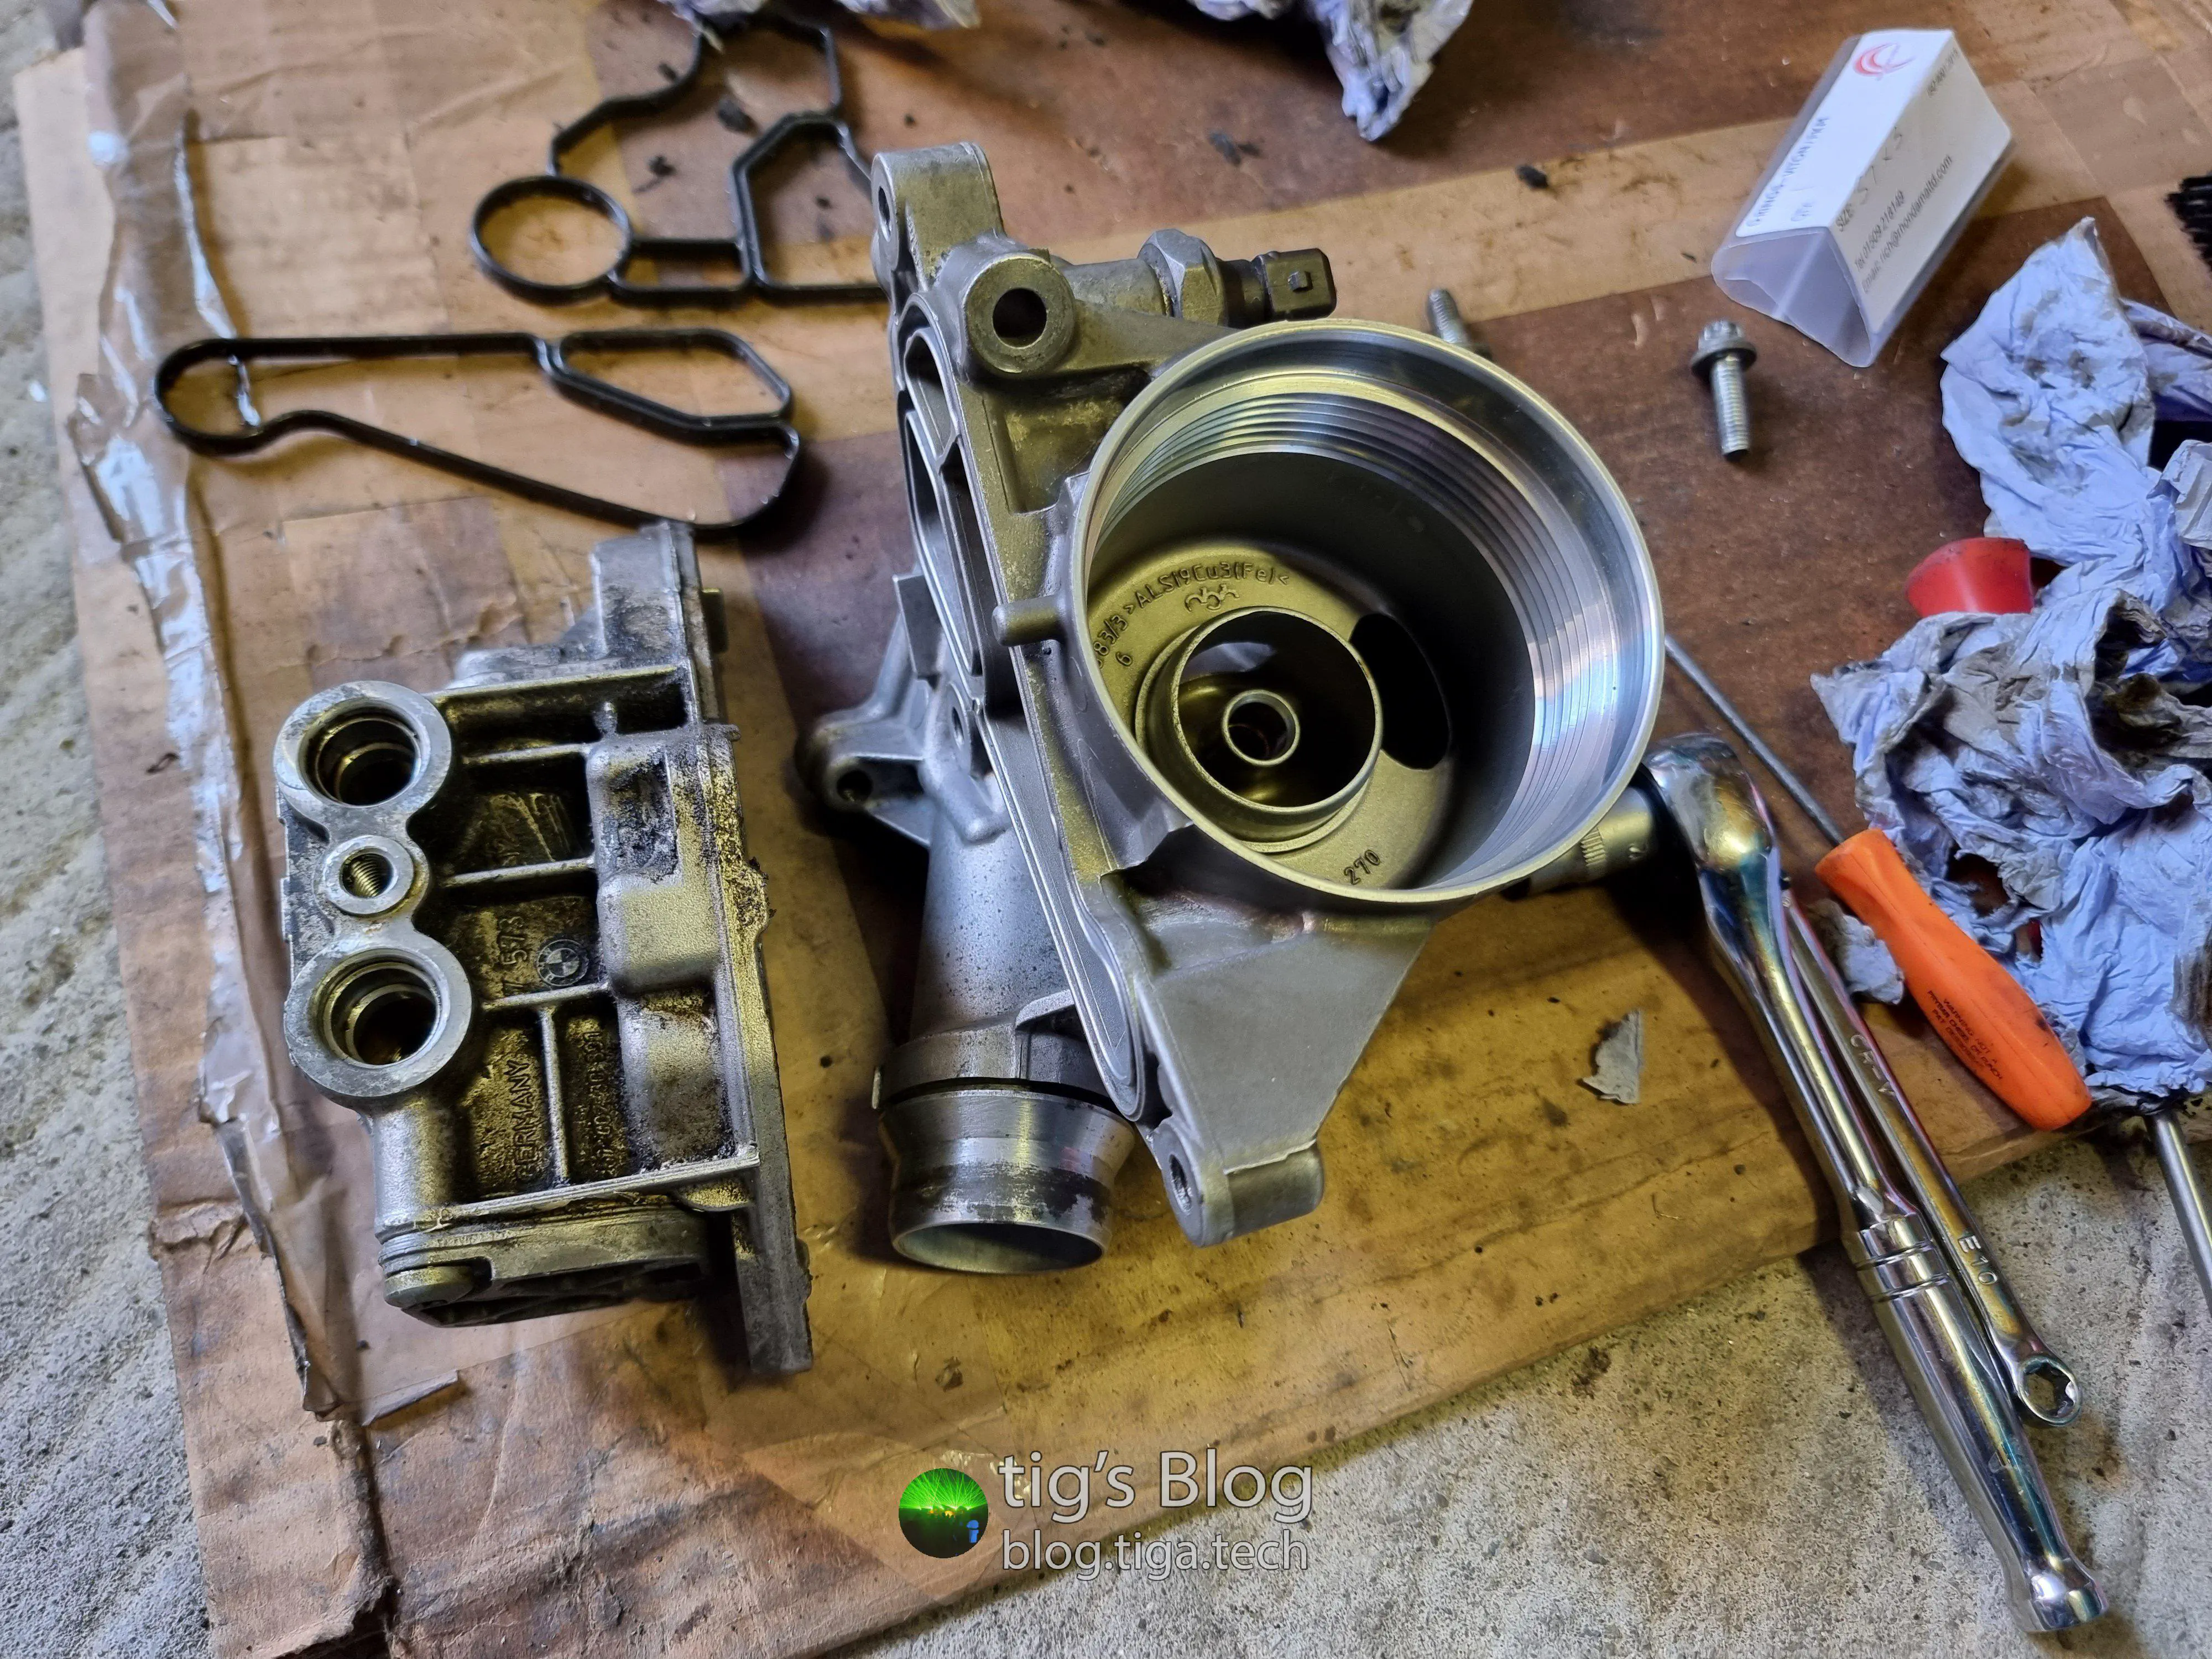
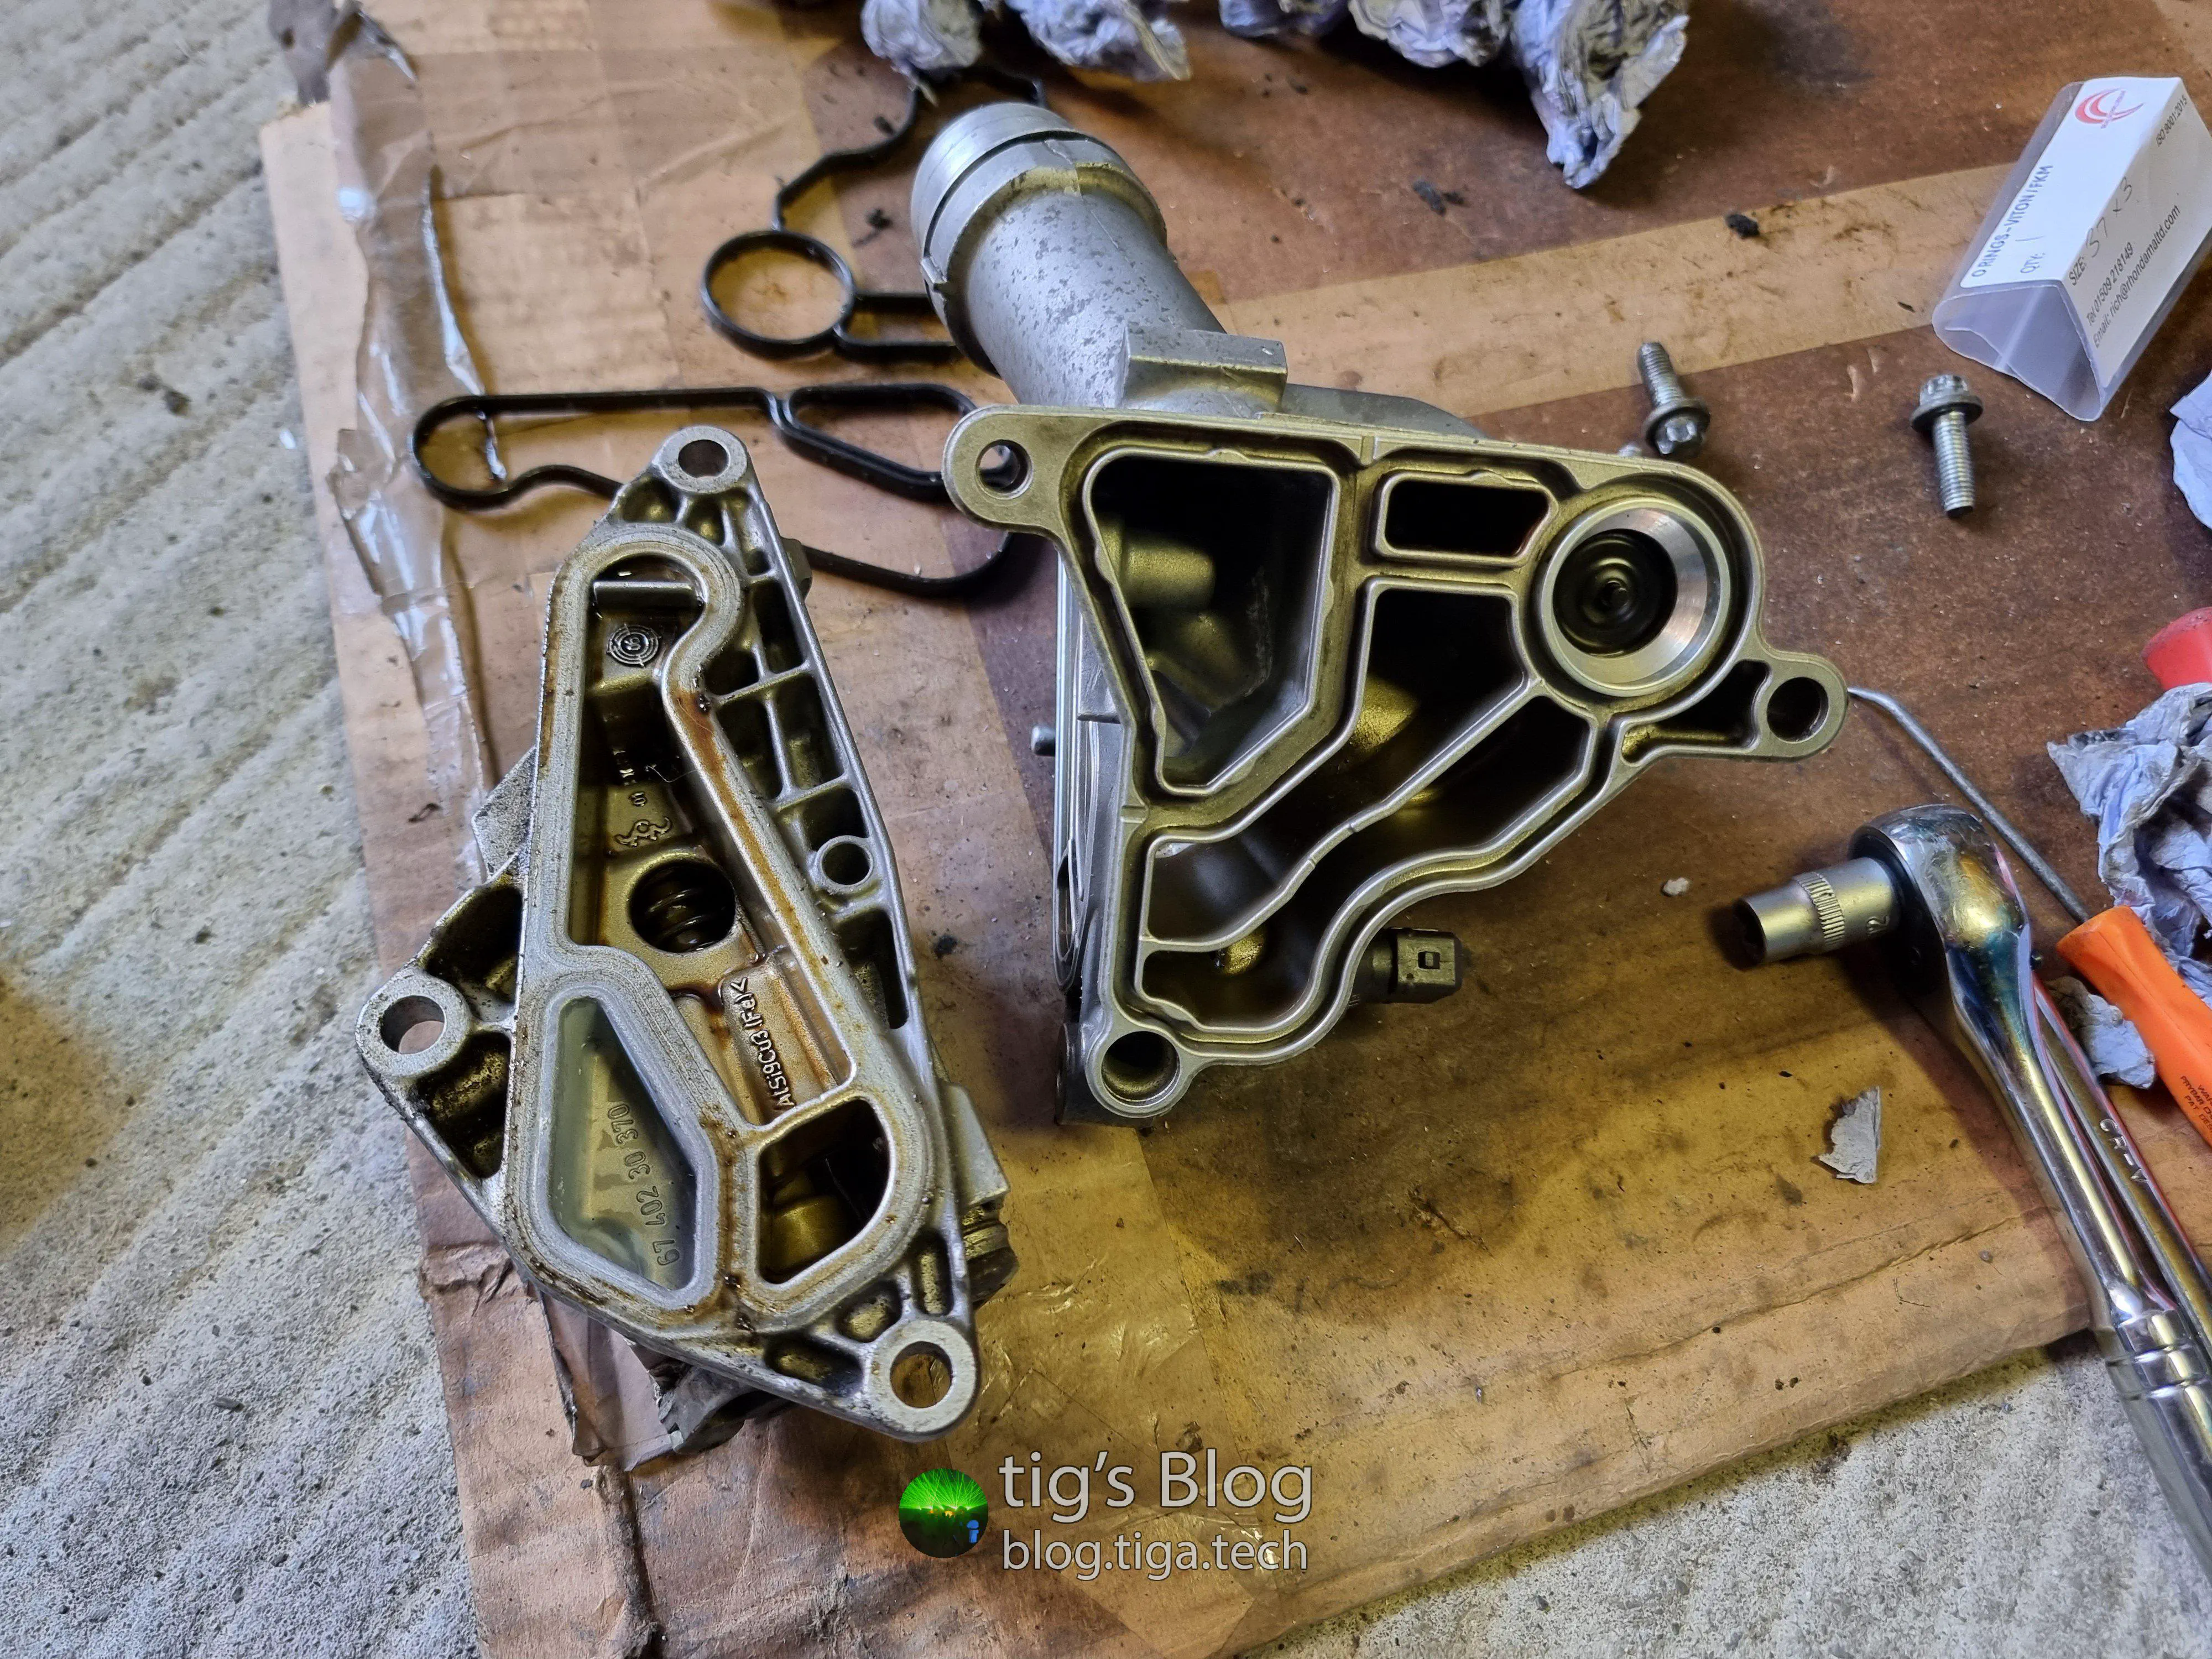
After splitting the OFH/OCTHOil filter housing & oil cooler thermostat housing and cleaning them up inside and out, I turned my attention to that bodged “fix” on the OCTOil cooler thermostat cap.
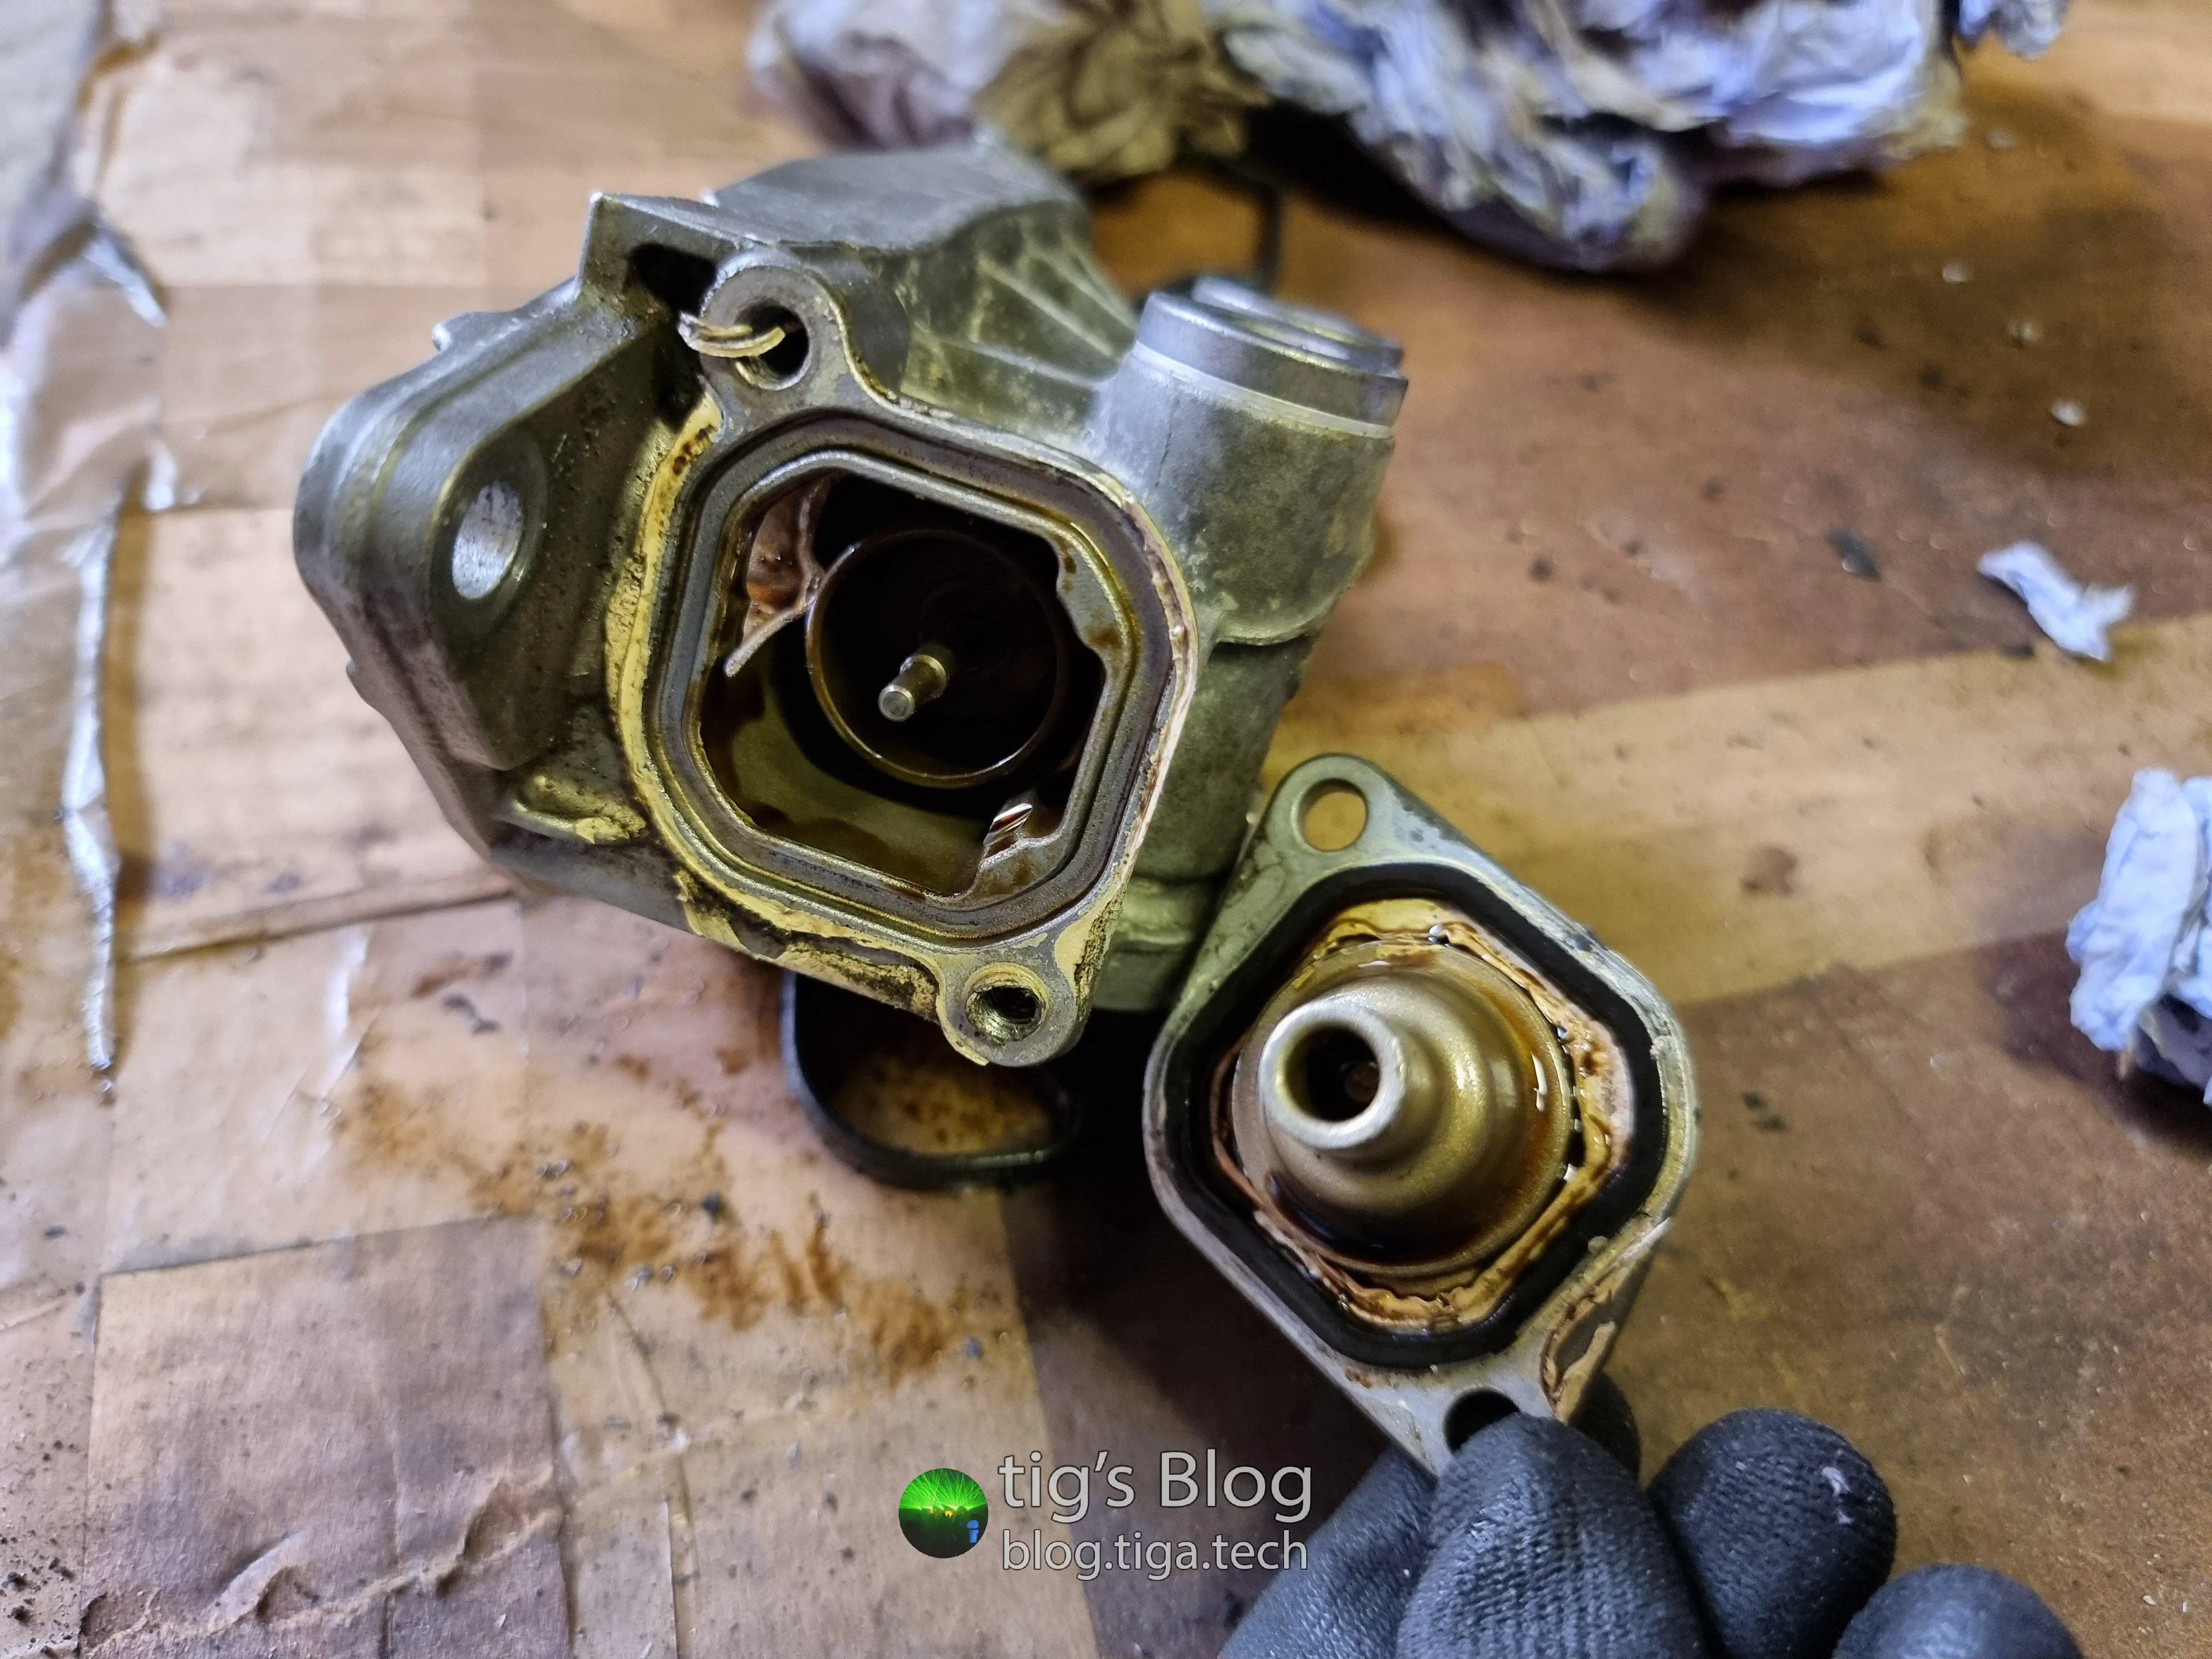
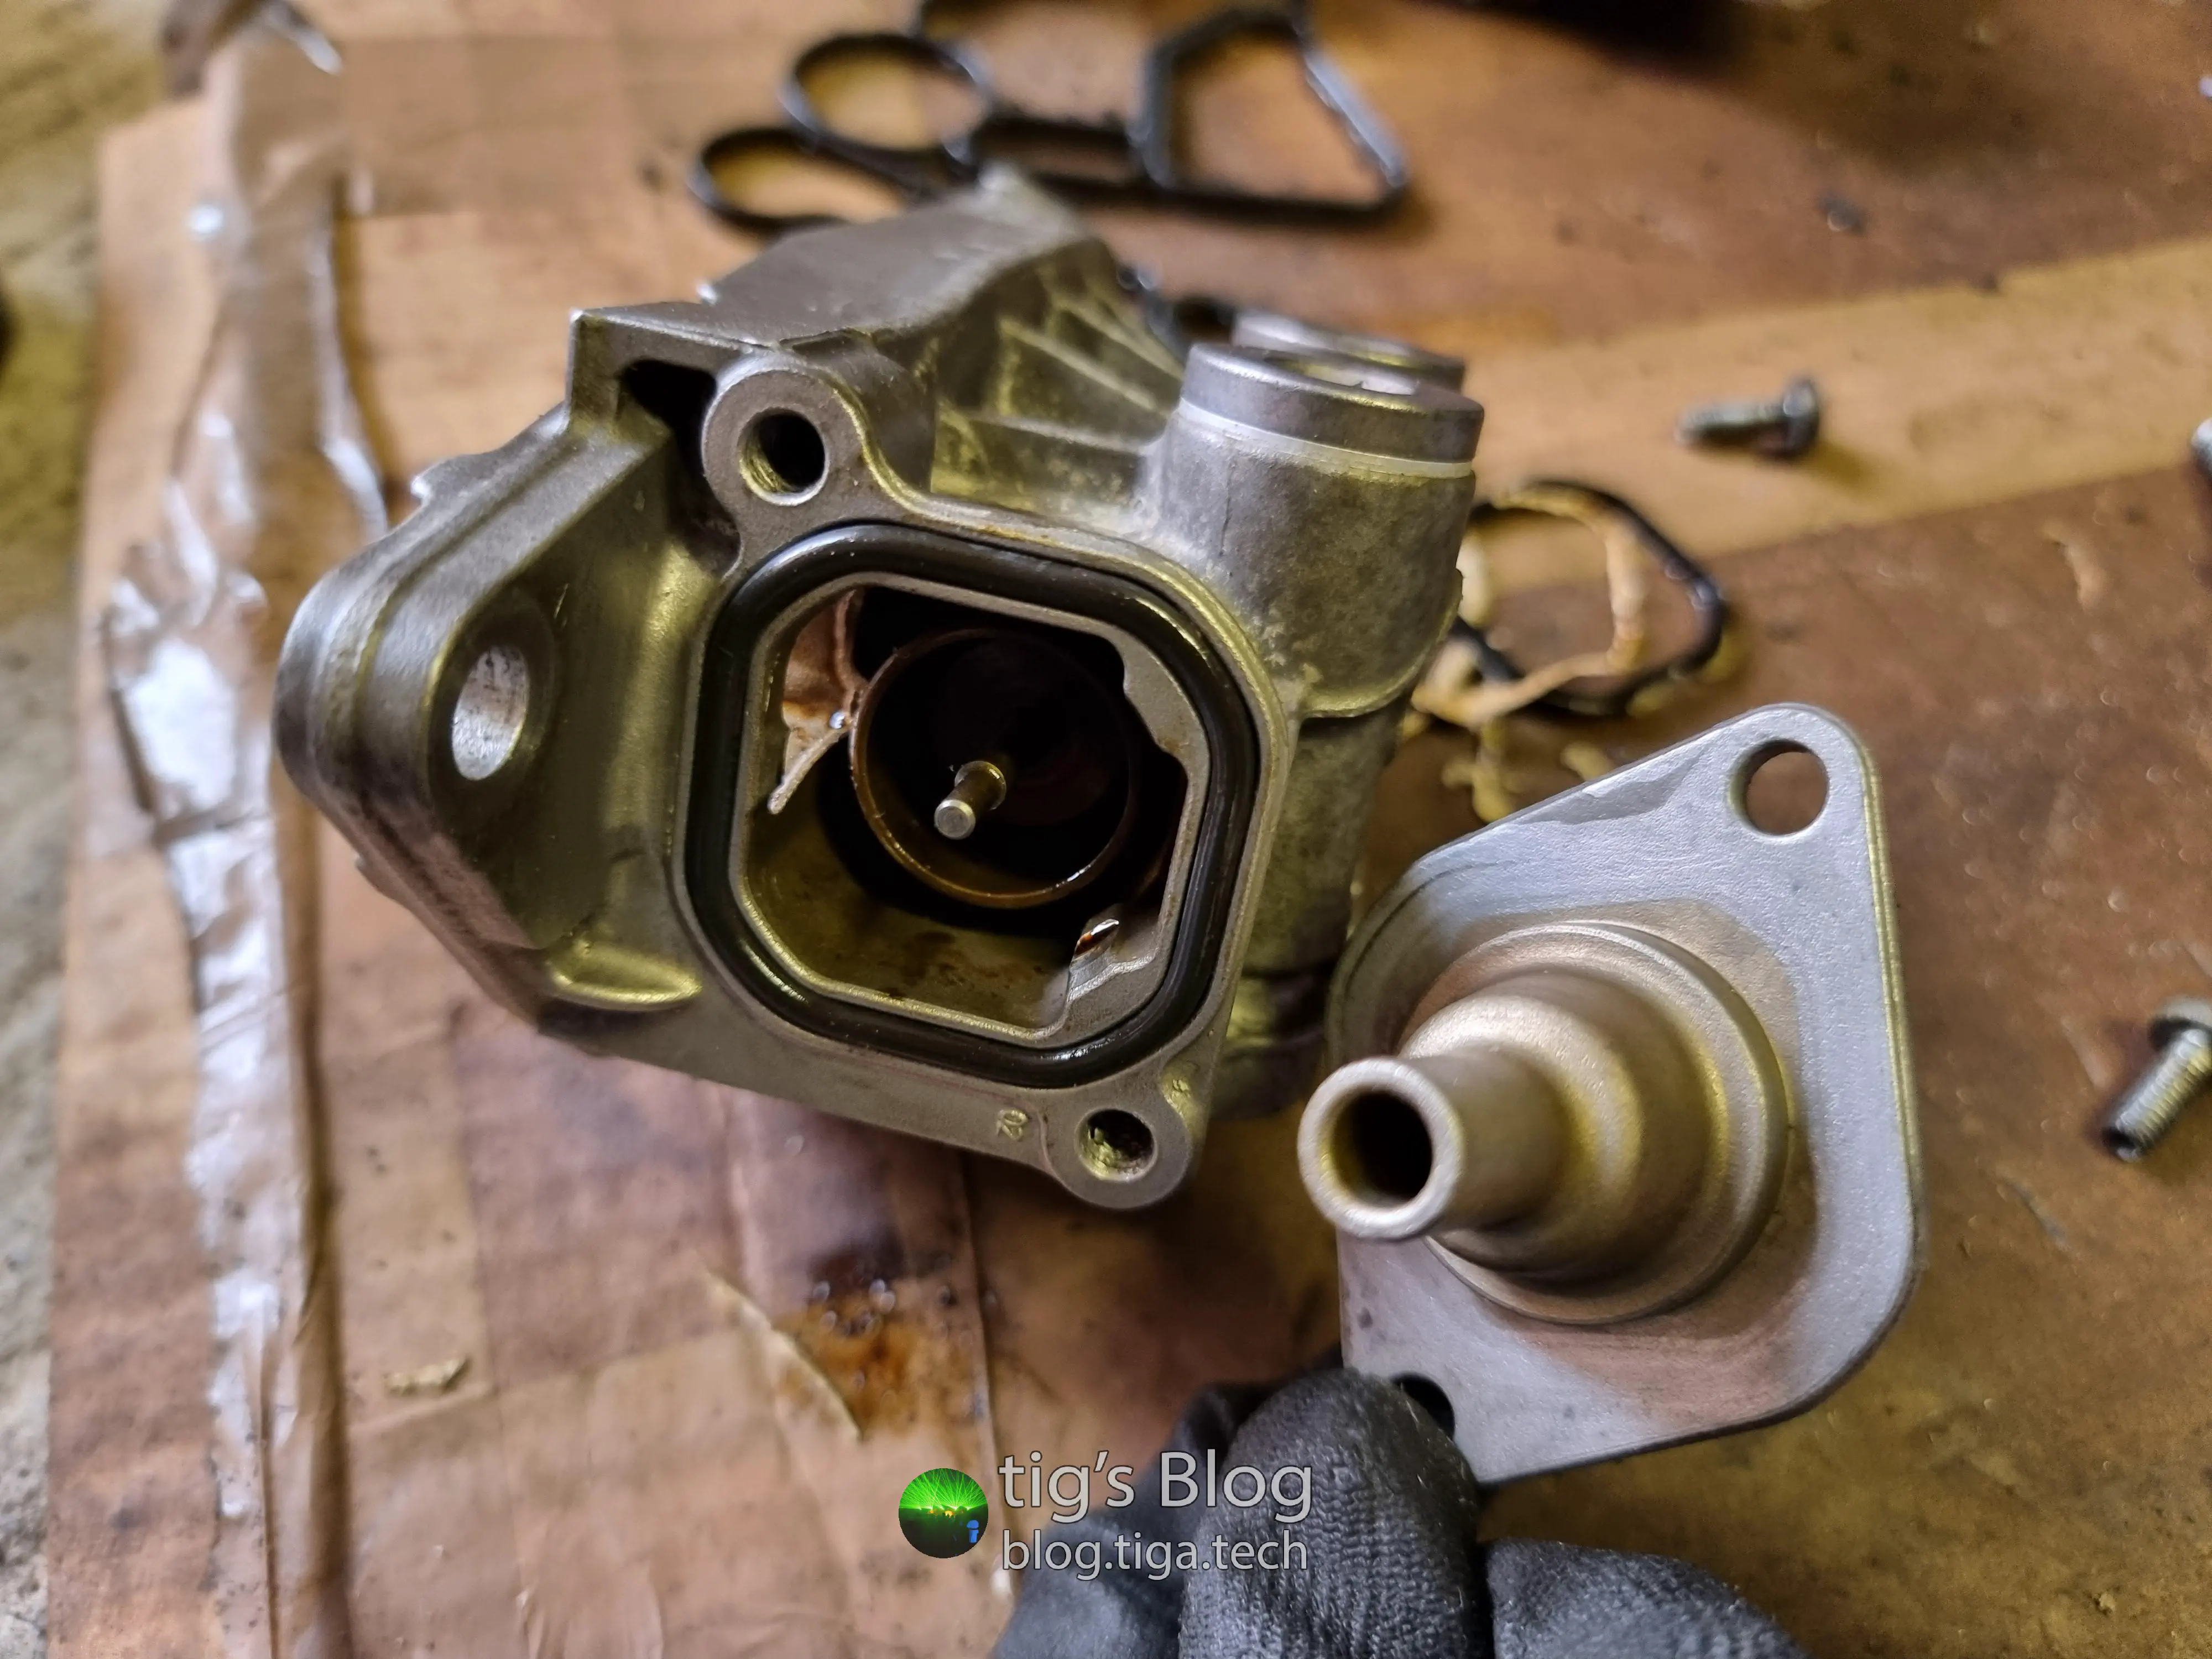
As noted above, I used a generic Viton O-ring6 to replace the original O-ring for the OCTOil cooler thermostat cap. I believe the OEMOriginal Equipment Manufacturer — A company that makes the OE (Original Equipment, i.e. genuine BMW) parts, just without the BMW logo on them.-spec part is actually an almost-square “O”-ring, but the standard circular one I purchased fit like a glove and has yet to show any signs of leakage in the last 7 months. Time will tell how it holds up longer term.
With the OFH/OCTHOil filter housing & oil cooler thermostat housing now being nicely cleaned up and put back together with all new seals, I fitted it back onto the block and re-fitted the oil cooler pipes after replacing both O-rings.
Serpentine Belt, Tensioner, Idler Pulleys#
01/06/2024 – 17/06/2024
I hadn’t been planning to do this one, but in doing the OFH/OCTHOil filter housing & oil cooler thermostat housing seals I realised that the extent of the oil leak was, whilst not egregious, a little worse than I’d thought.
This is a problem for the serpentine belt for two reasons:
- Oil degrades rubber. I’d far rather spend a little to replace the belt and know it’s OK than let a belt of unknown quality potentially cause me a huge problem at the worst time.
- The N54 engine, among others, is known for its propensity to eat belts. So much so, in fact, that there are a plethora of aftermarket crank seal guards available. For example, this VTT crank seal guard from ML Performance (not sponsored).
If the serpentine belt fails, there’s a strong chance it’ll get sucked behind the front crankshaft pulley, and subsequently pushed past the crank seal and into the oil pan. Once in the oil pan, it can get pulled into the oil pick-up, almost certainly resulting in catastrophic engine failure. Fun!
The belt appeared to be fine upon inspection, however, as I’m quite partial to doing what I can to avoid a chance of catastrophic engine failure, I decided I’d replace it anyway.
Naturally, where my mind went next was “hey, if I’m doing the serpentine belt, I may as well do the tensioner and pulleys while I’m in there™, right?”
There wasn’t a hint of any problems from any of these additional components but what the hell, why not?
It makes this job a lot easier and gives you more room to work with if you pull the radiator fan first, and I was glad to discover how simple it was to do so. I’m writing this some time later, but as I recall there was nothing but a screw or two and a couple of plastic clips in the way of removing it.
All in all, swapping the belt, tensioner, and idler pulleys was super simple. I’m not sure what I expected… more pain, I suppose.
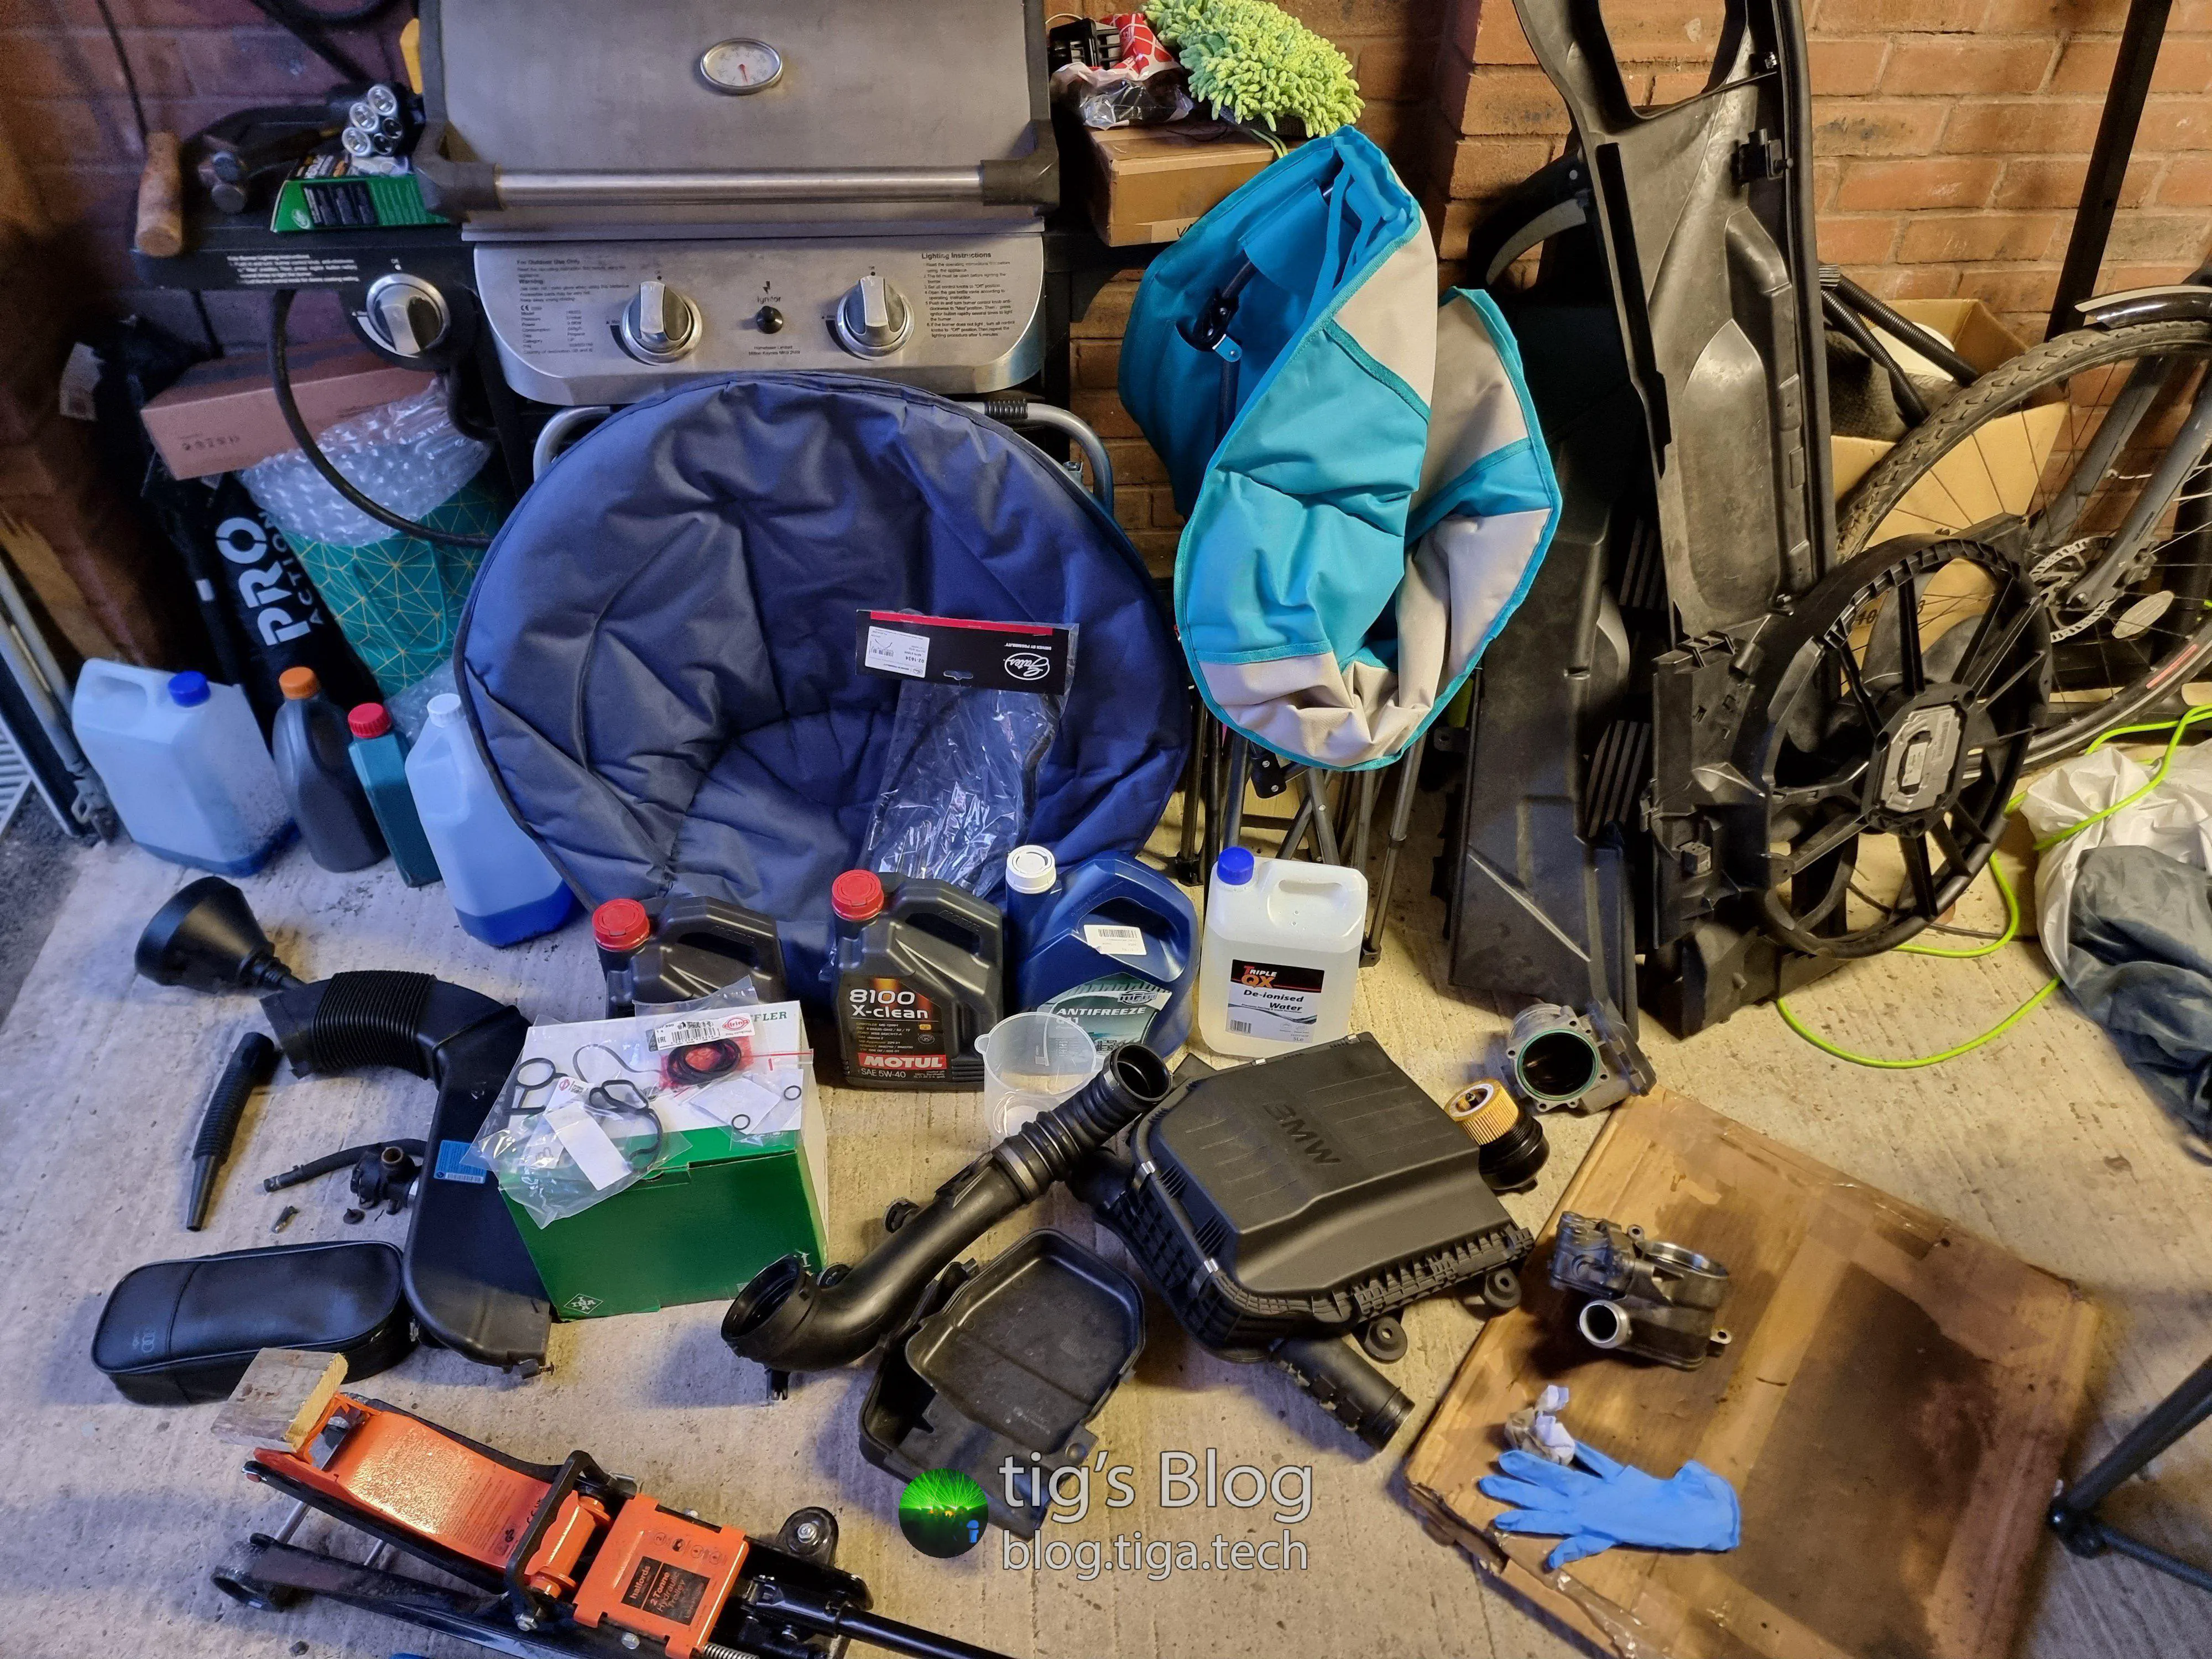
I don’t have any pictures from this job, so instead I shall throw in bonus picture of a subset of the collection of old and new parts scattered around my garage during these last couple of weeks:
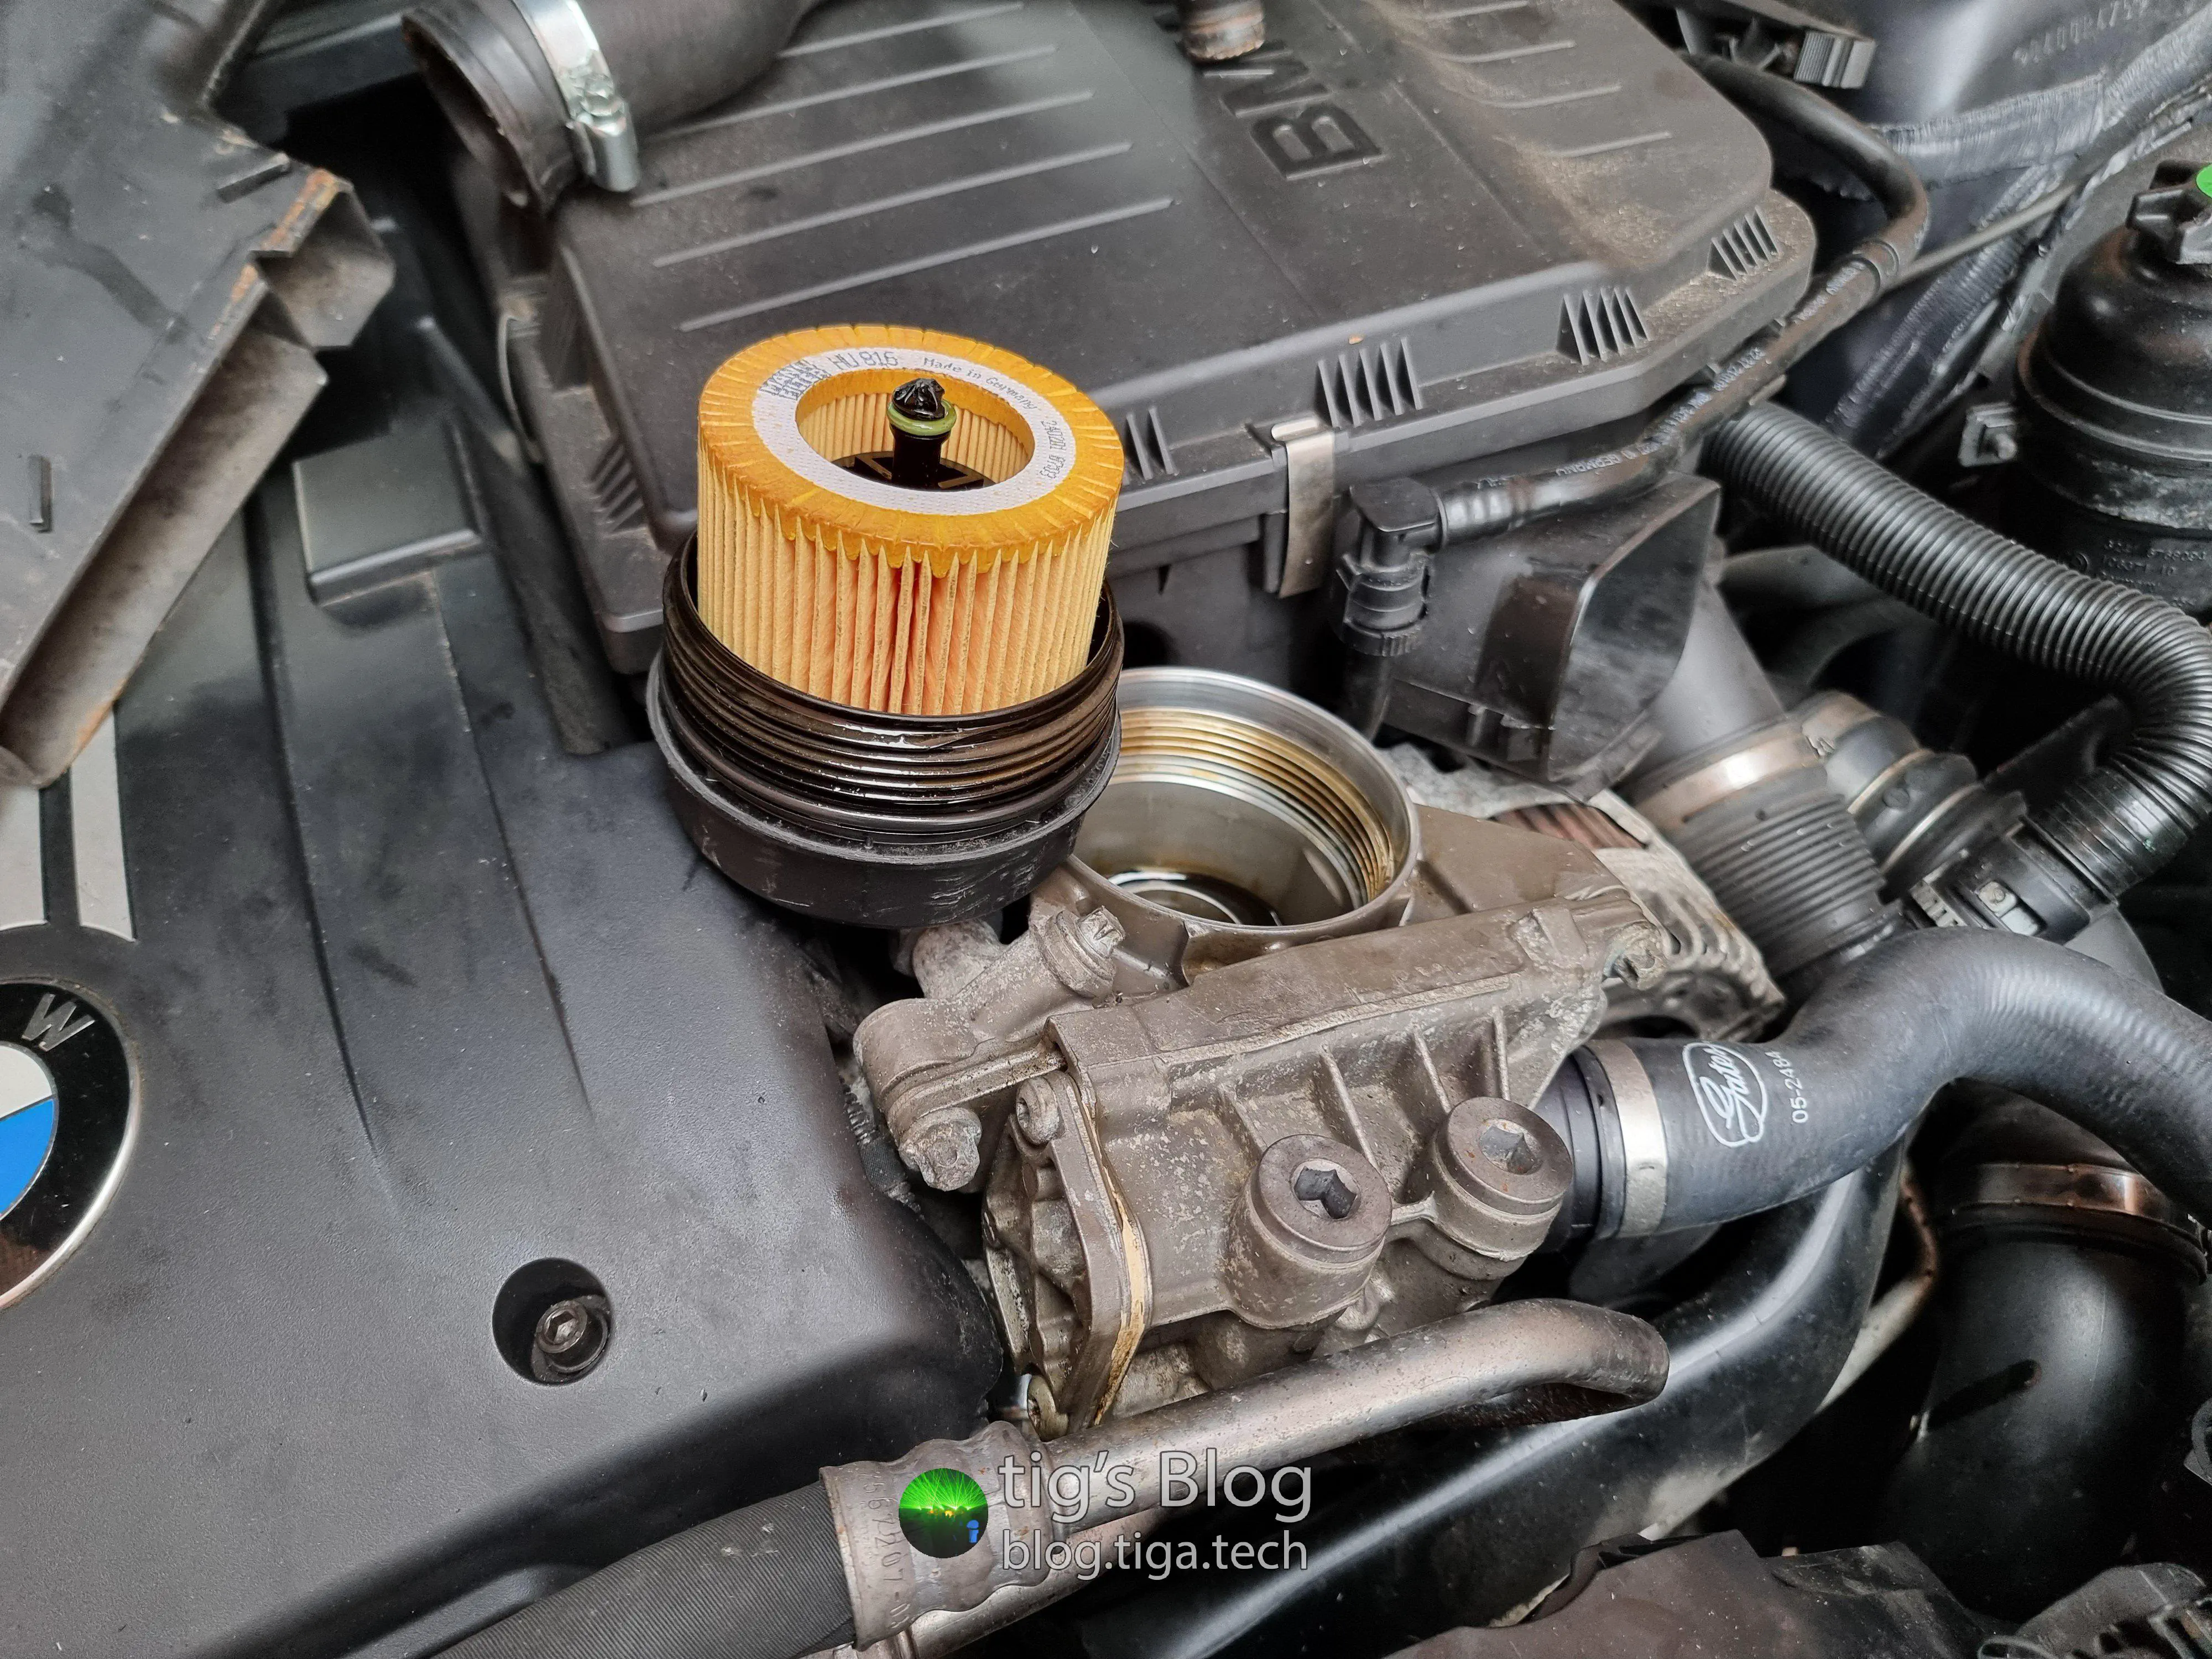
Oil, Oil Filter, and Coolant#
01/06/2024 – 17/06/2024
This is it, the final while I’m in there™ task that started with a blown radiator hose flange.
There’s not a whole lot to say as these three were all quite obvious things to do, and almost unavoidable for that matter, given everything else I did.
After a frankly ridiculous amount of deliberation and research, it turns out researching oils is almost entirely futile unless you have a degree in chemistry or a penchant for arguing with strangers on the internet. Why do I never seem to learn this lesson?
In the end, I purchased 10L of Motul 8100 X-Clean 5W-40 oil. This choice was not a result of my research, but simply a good deal on known-good oil.
Armed with the oil, a new MANN oil filter, 5L of G11-spec antifreeze concentrate, 20L of deionised water (the majority of which was for flushing purposes), and a new oil pan plug washer, I got to work.
As I mentioned above, I drained the coolant from the coolant hose running to the ATAutomatic Transmission oil cooler2 as this is one of the lowest areas of the cooling system.
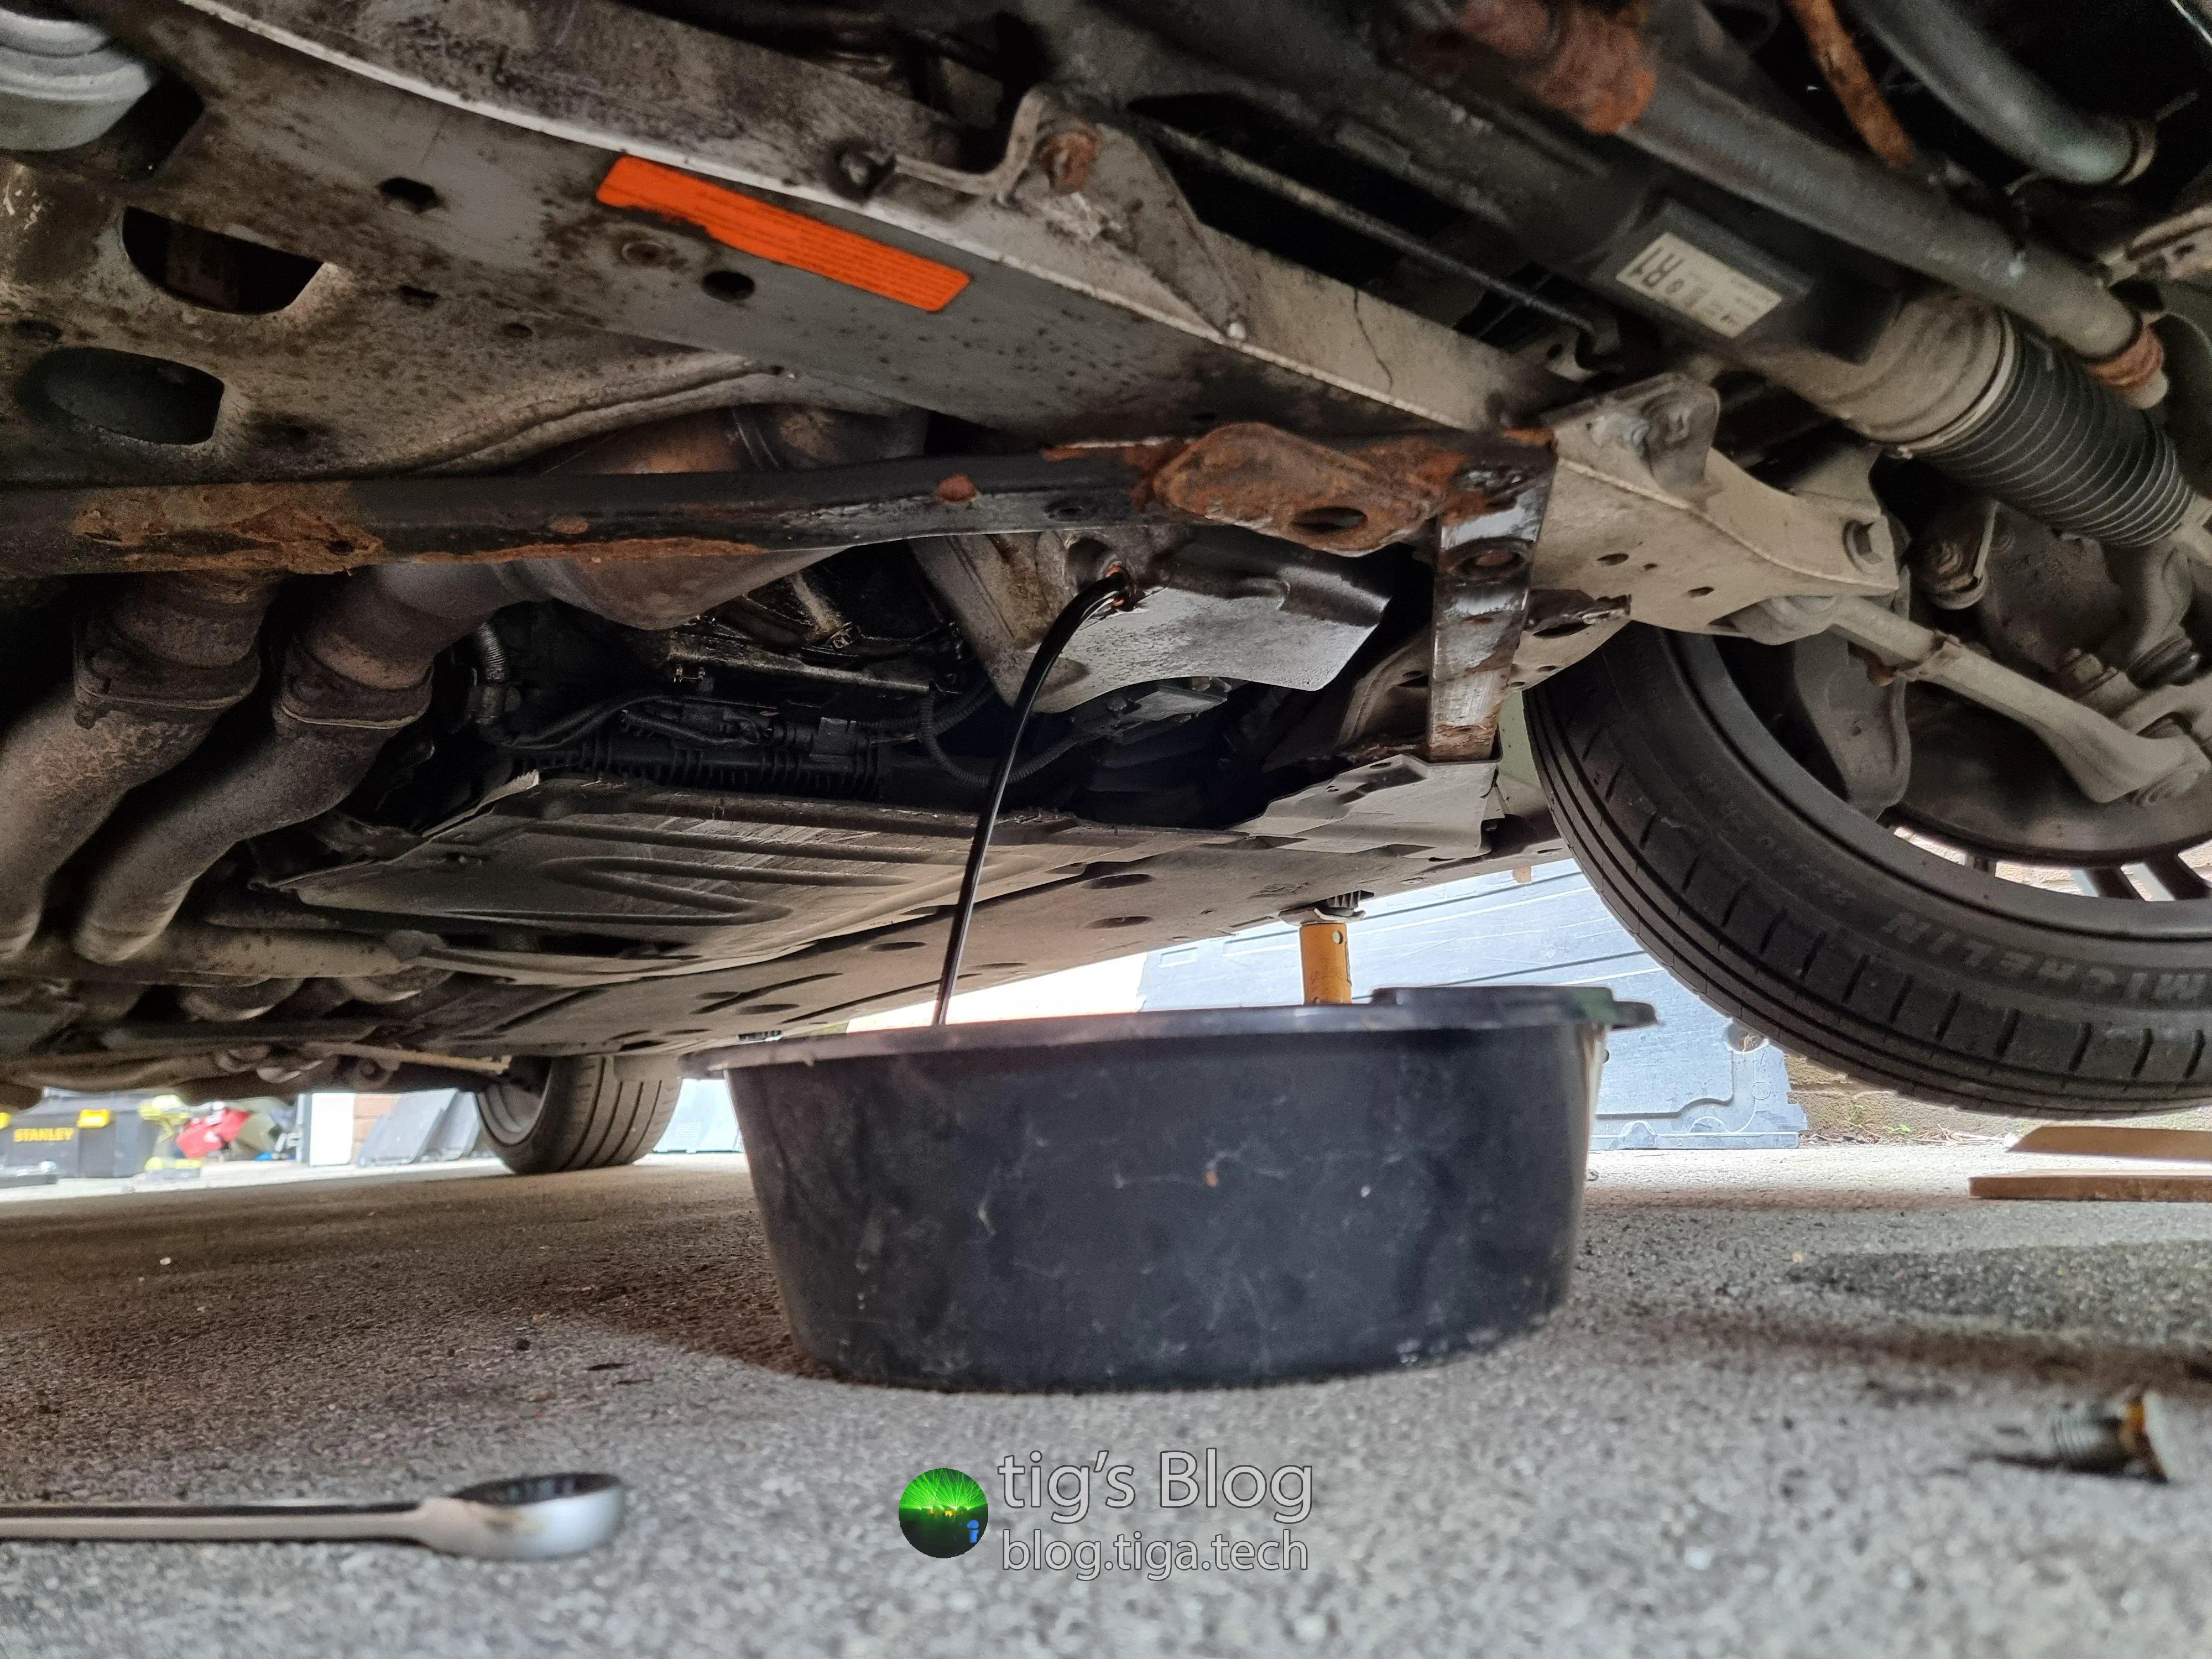
It took quite a lot of flushing to get all the gunk (see above) out of the cooling system, but after seeing nothing for a few flushes in a row, I was happy.
After the flush, there was little to do but mix and fill the deionised water and antifreeze concentrate, fill the oil, and throw in the new filter.
Coolant Expansion Tank#
20/06/2024
This was no biggy, and wasn’t even strictly necessary, but I noticed whilst flushing my coolant that the plastic fill level indicator had broken off in my coolant expansion tank.
I’m convinced I’d seen it there before, ruling out any likely chance of it having broken off before my ownership, and equally convinced that it wasn’t I who broke it. I suspect it was the roadside recovery mechanic.
Anyway, I purchased a replacement tank taken from an E8x 1 Series on eBay for £14.95. Bargain.
Three days later a friendly local courier lobbed it over my back gate with all the force of a M270B1 MLRS unit. Once unwrapped and inspected for the damage I was convinced would be there, but through some stroke of luck was not, it took me all of 10 minutes to swap. Love an easy job.
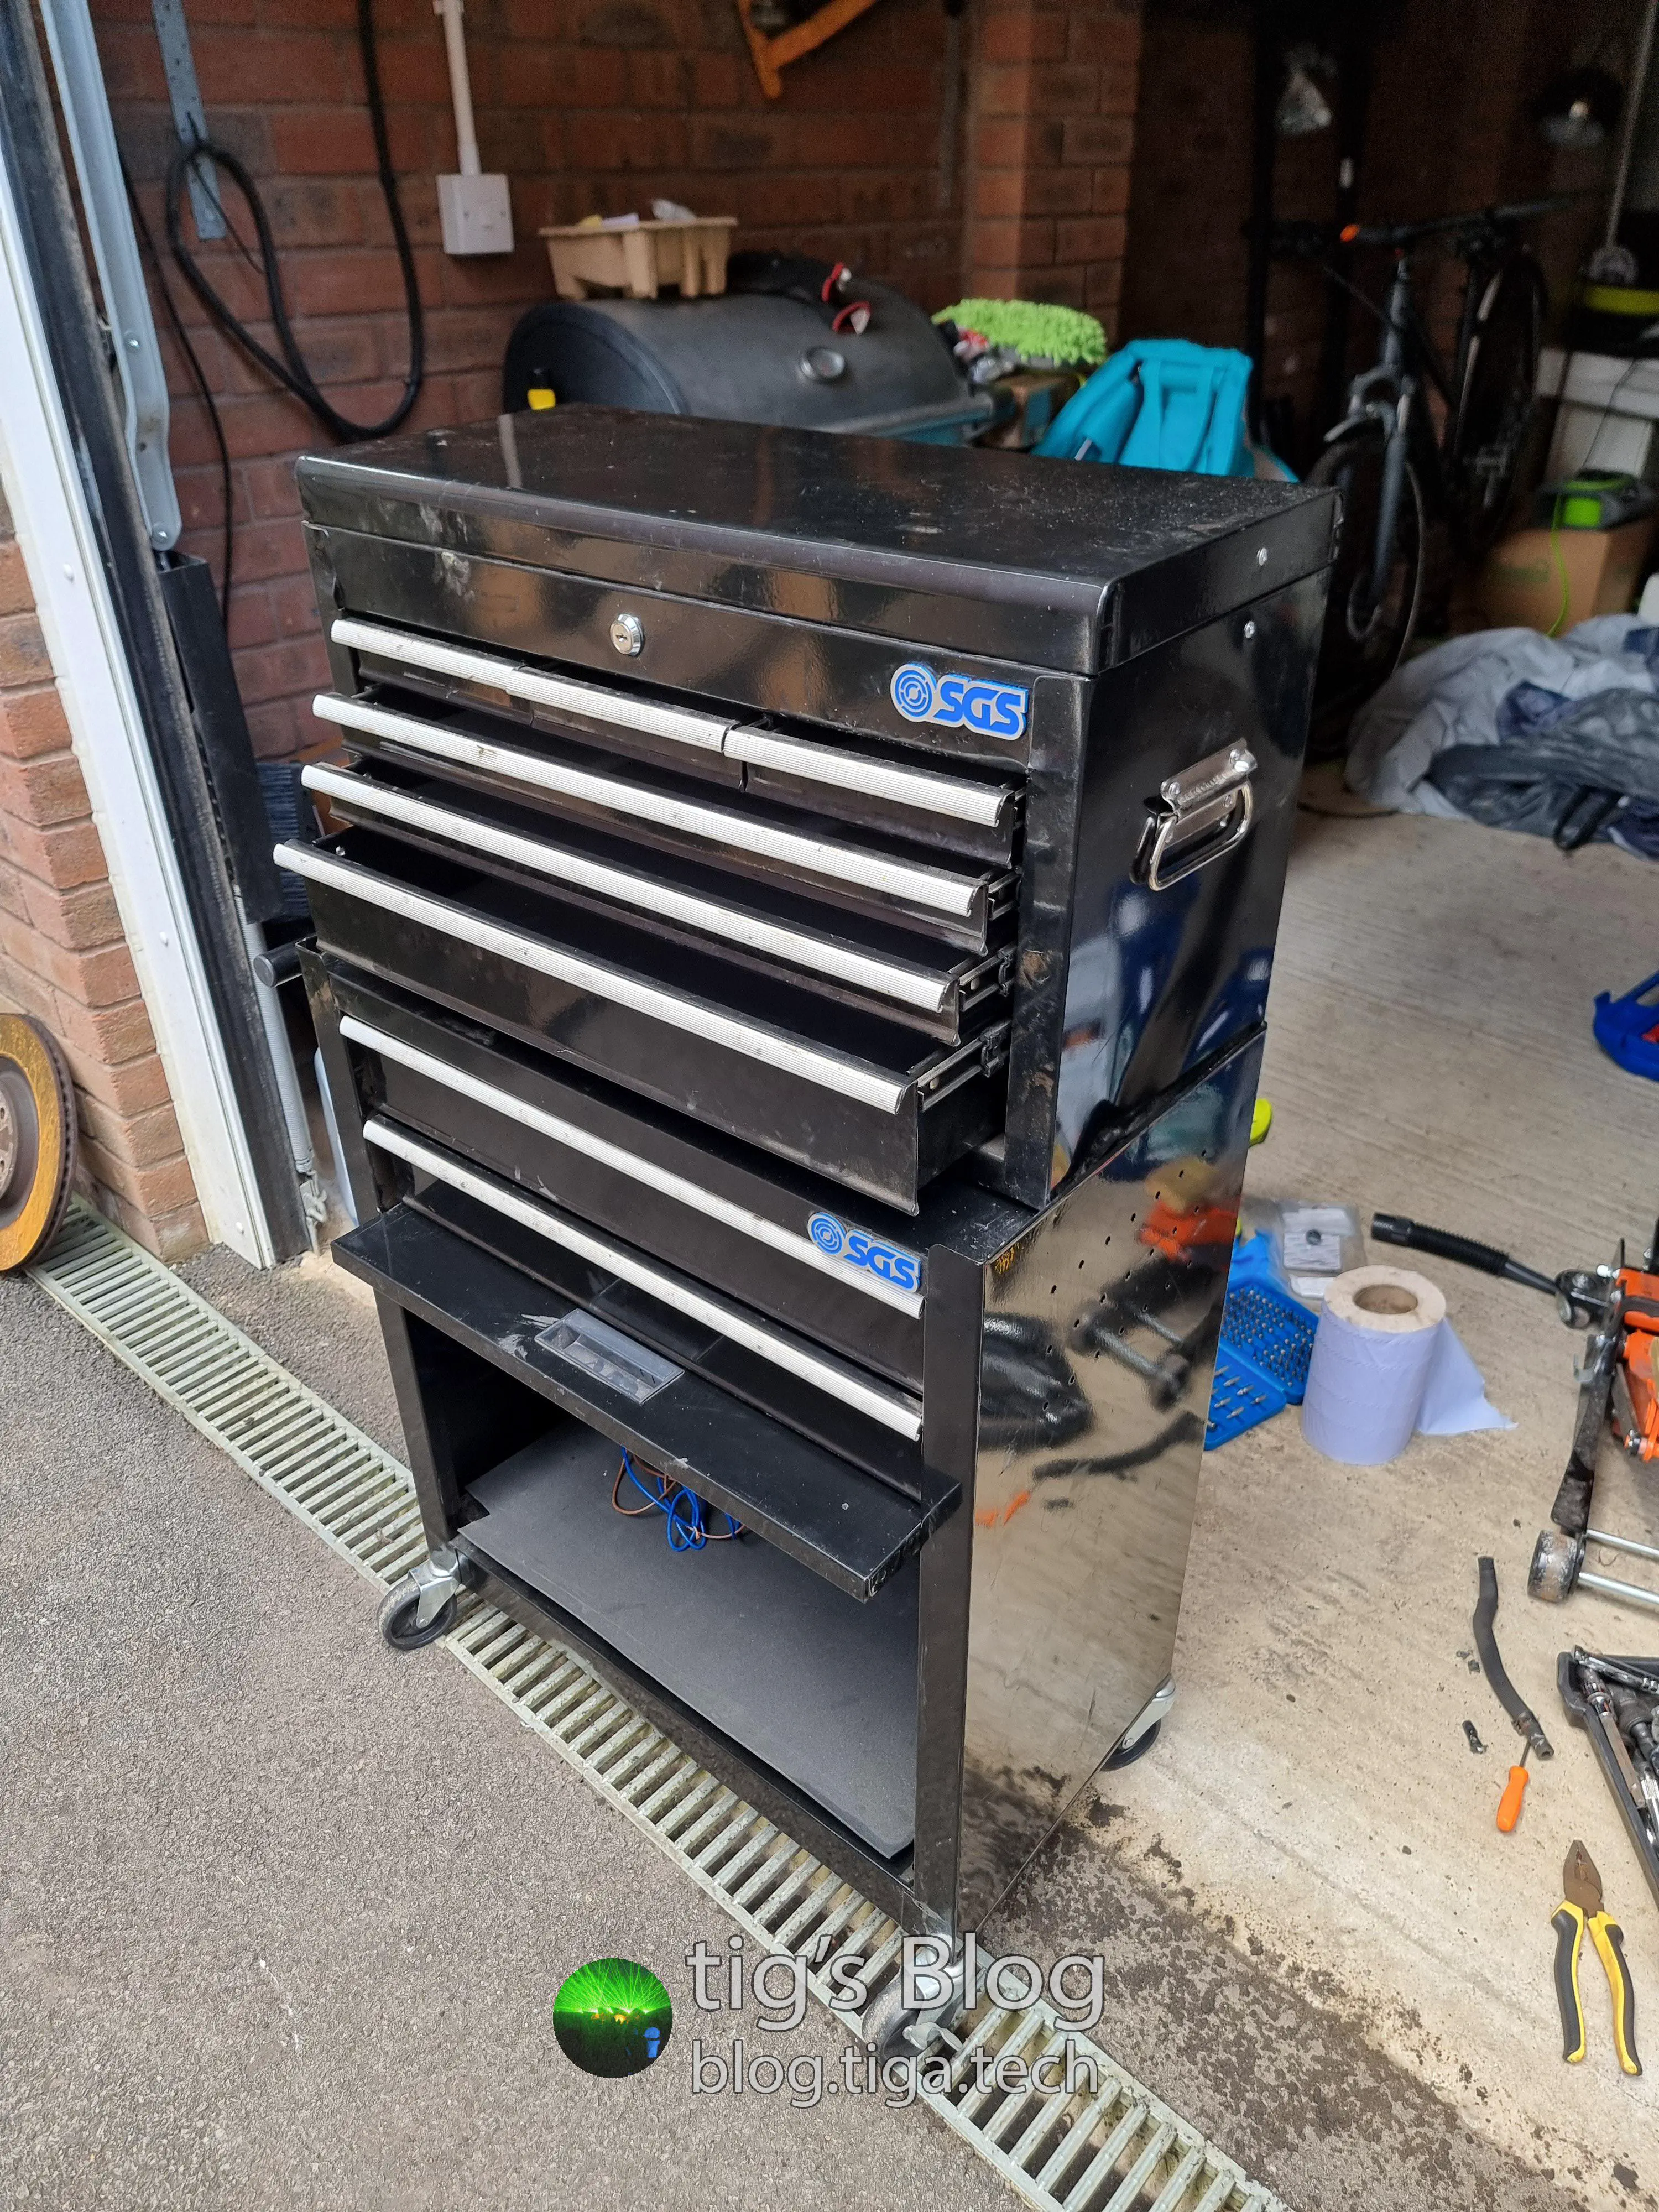
Being such a simple job, I also have no pictures from this one and shall once again throw in a bonus picture. This time it’s a new toolbox I got during these couple of weeks of work on the car.
Wheel Alignment#
20/06/2024
The steering wheel had been a little off-centre since I bought the car. Nothing serious but still, I’d like to have it sorted. Having also replaced a control arm and wheel hub & bearing recently, I figured now would be a good time to get a wheel alignment done.
During the alignment, a particularly well-stuck track rod arm on the nearside front made it difficult to adjust. In all honesty, I’m writing this so many months after the fact that I struggle to recall how much, or if at all, they were able to adjust the toe on that corner. The results would suggest there was some movement, though:
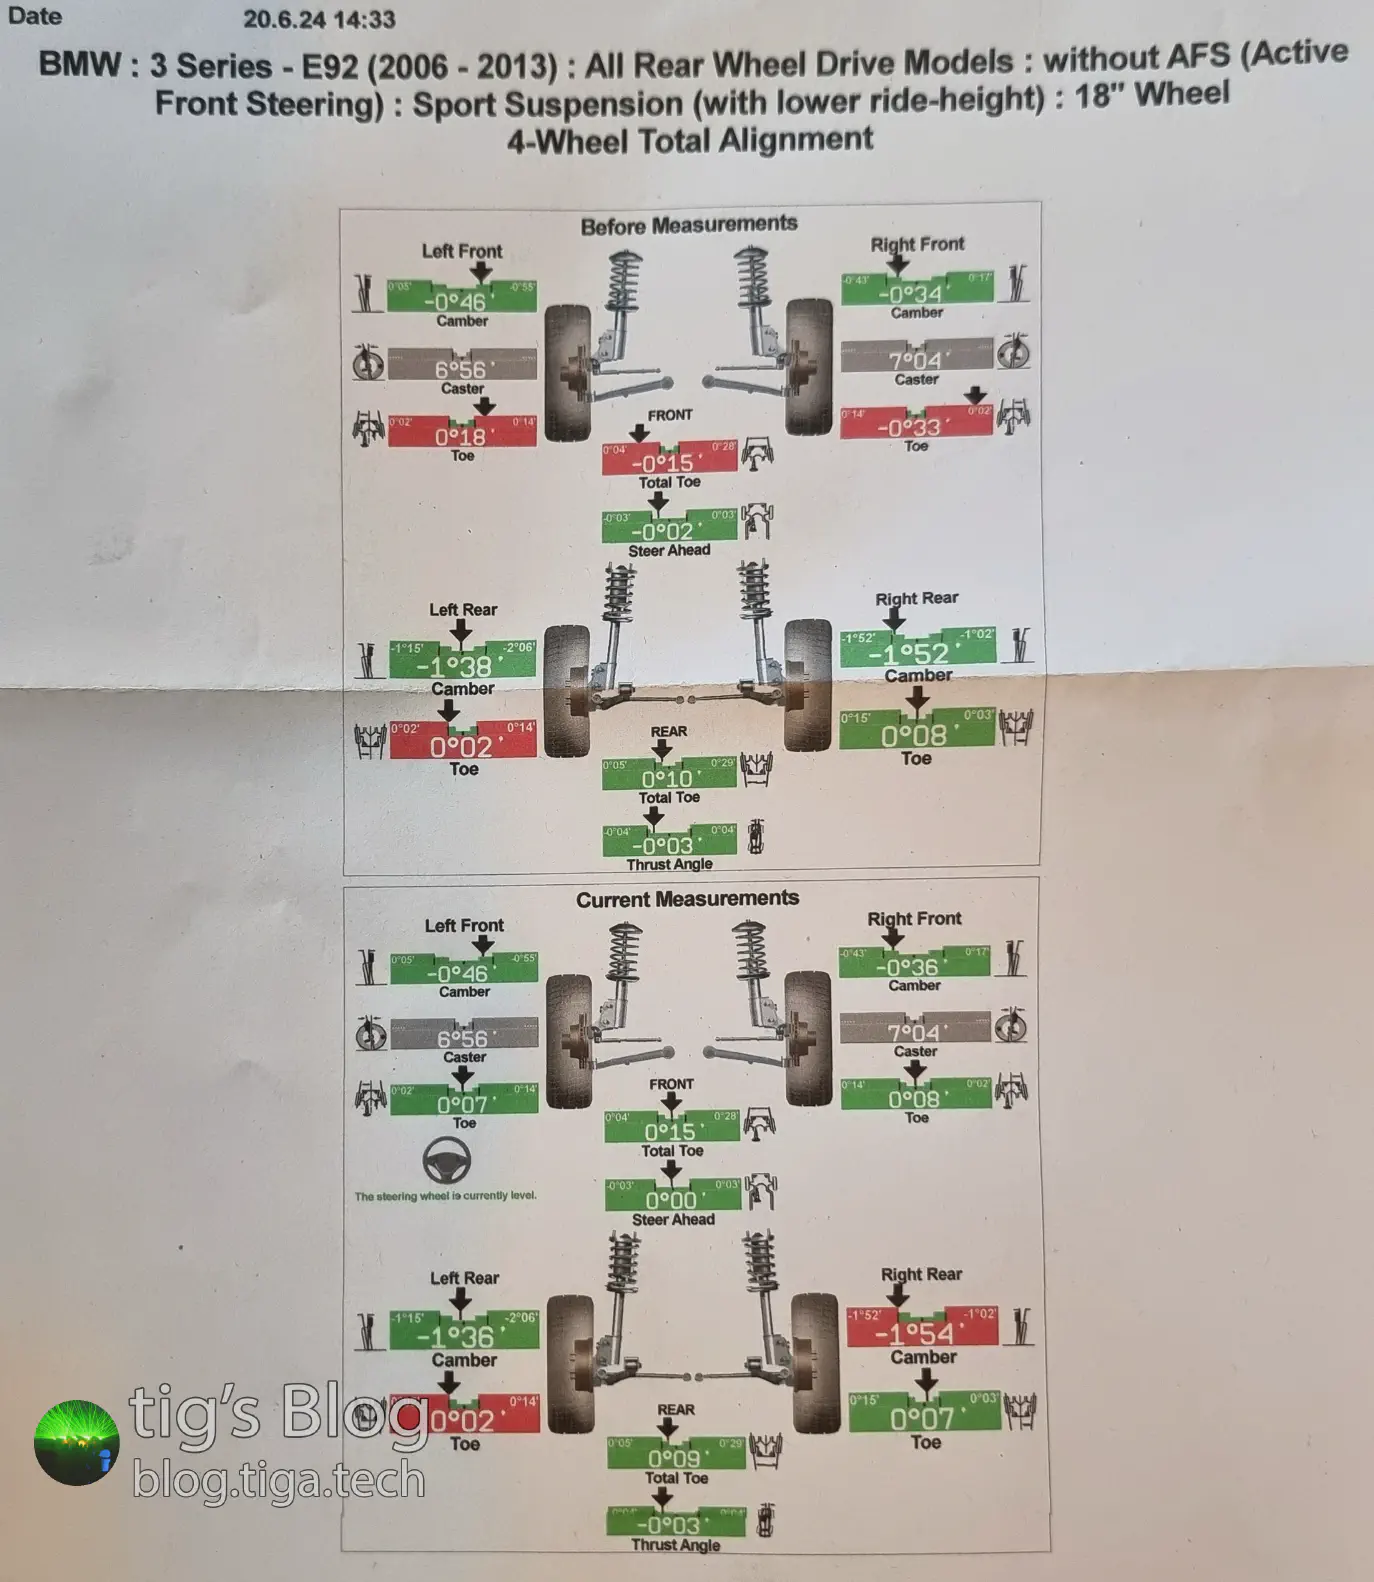
To be honest I wasn’t particularly happy with the alignment as they pretty much entirely ignored the rear of the car. I shall let more intelligent minds be the judge as to how necessary this was since I know very little in terms of acceptable thresholds for wheel geometry; I just see colours on a print-out.
That said, while it could well be a case of perception bias, I felt like the car handled and stuck to its lines better after the alignment.
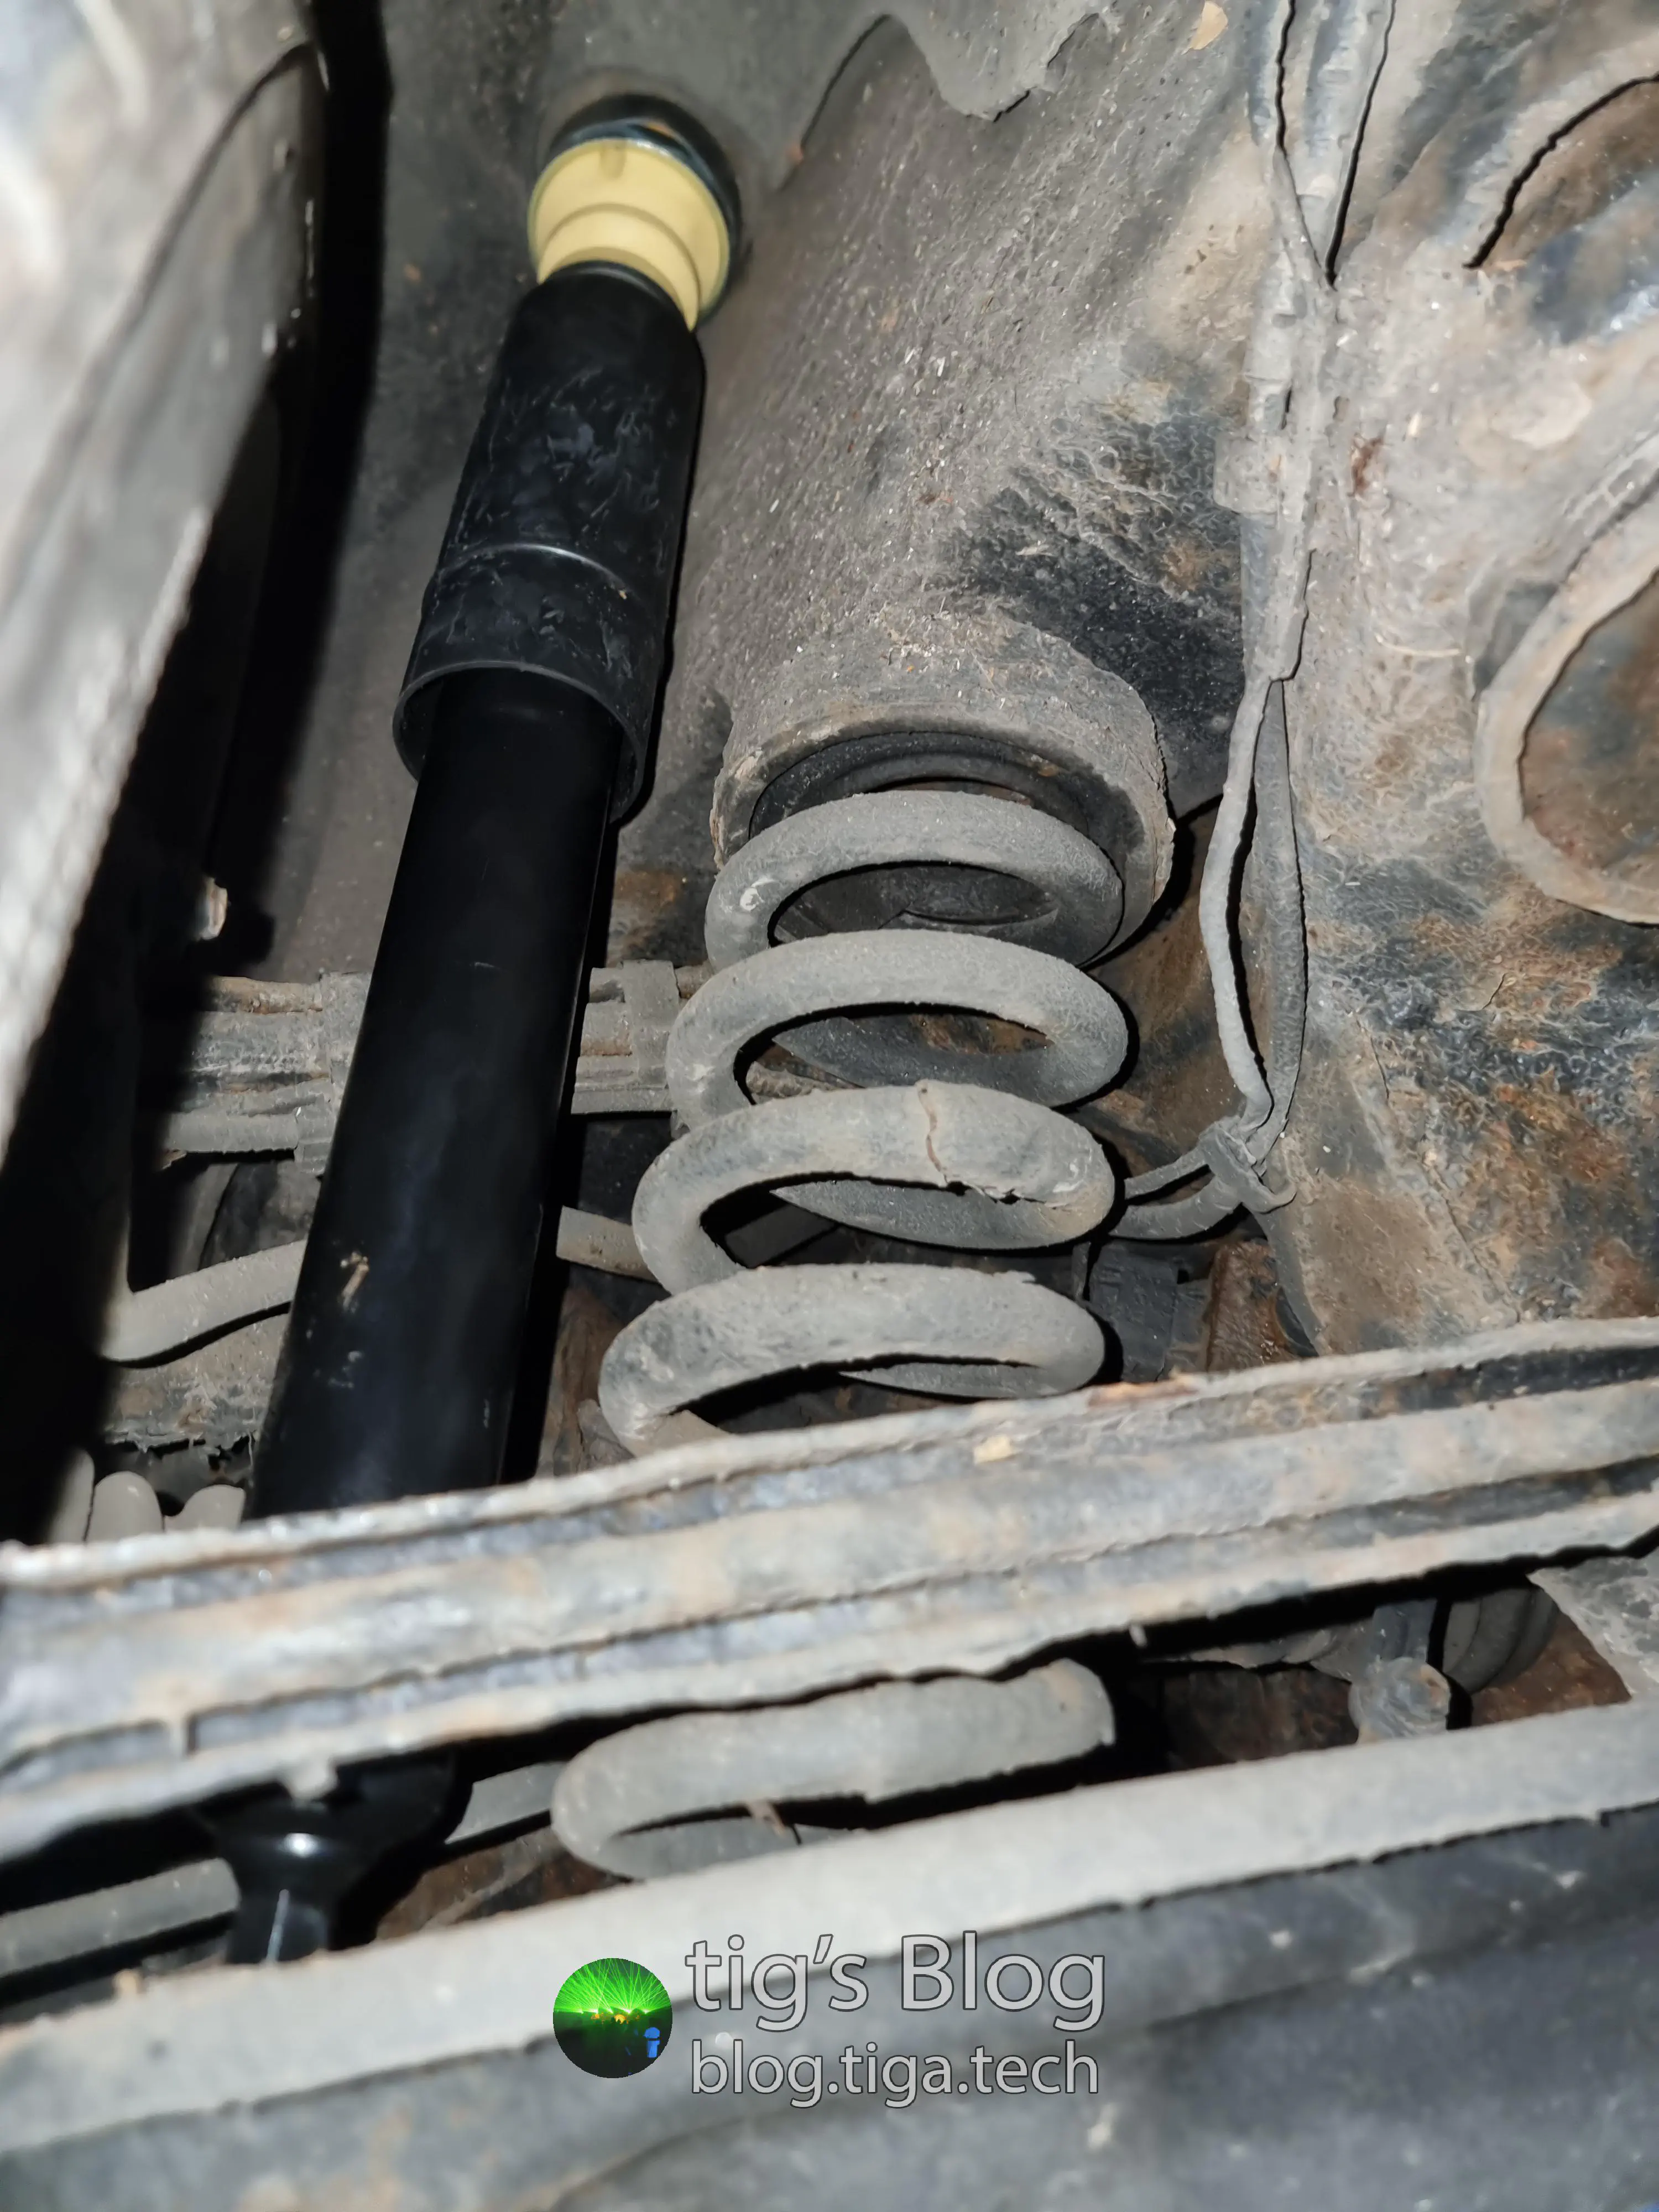
Rear Shock Absorbers#
16/12/2024
This was a fun one! During a drive home from a hike with my partner, the nearside rear shock absorber top mount partially self-destructed, resulting in this lovely situation:
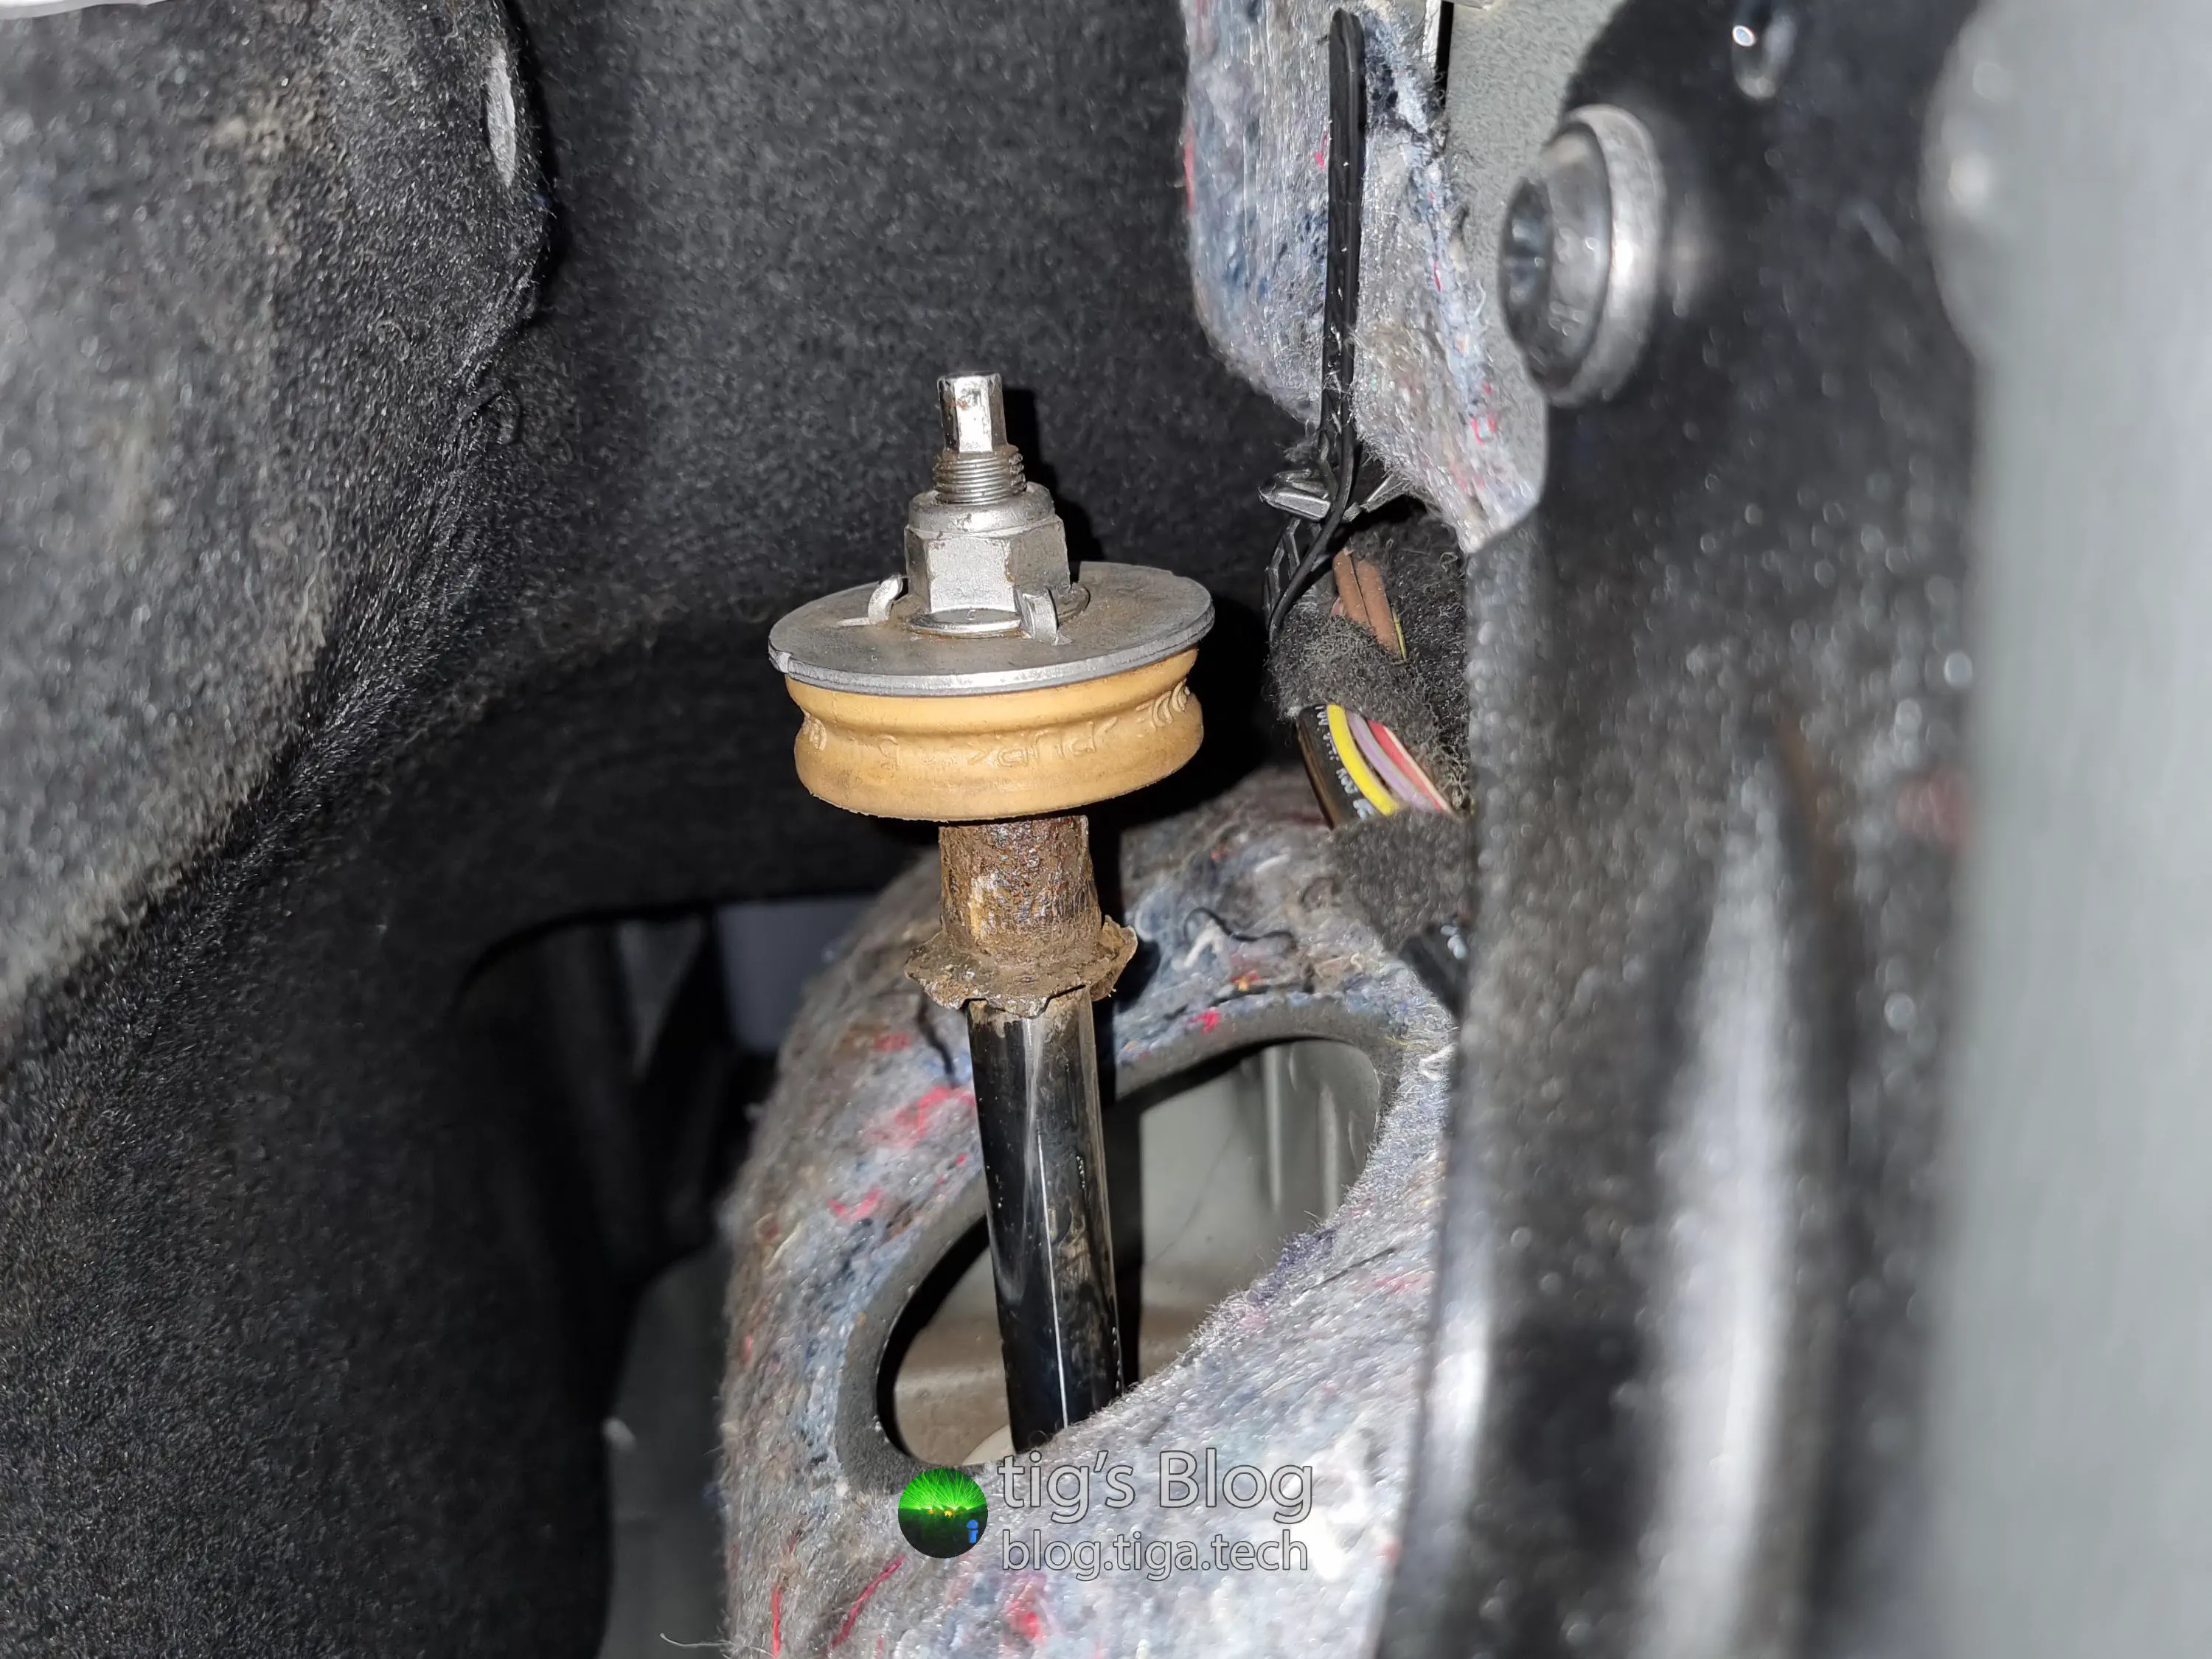
Now, this happened late on a Sunday afternoon, and while I didn’t have the necessary tools with me to remove trim pieces and visually inspect the issue, it was fairly clear what had happened. Given it was nothing truly catastrophic, there was no way I was waiting around for 2+ hours for roadside recovery, for my partner’s sake even if not my own.
With that in mind, I gingerly crawled the 335i home, all the while trying to ignore the utterly sinful banging and rattling noises coming from the loose shock doing its best wacky-waving-inflatable-arm-flailing-tube-man impression7 in its seat. Putting to use as best I could my mental map of Bristol’s least potholed and bump-ridden roads, we got home with no further problems.
To be honest, this failure so ridiculously unceremonious that it was just quite funny… At least, after my initial worry that I’d punched a hole in the underside of the body! I was used to VAG-style rear shocks, where the top end sits in a cup bolted to the underside of the chassis.
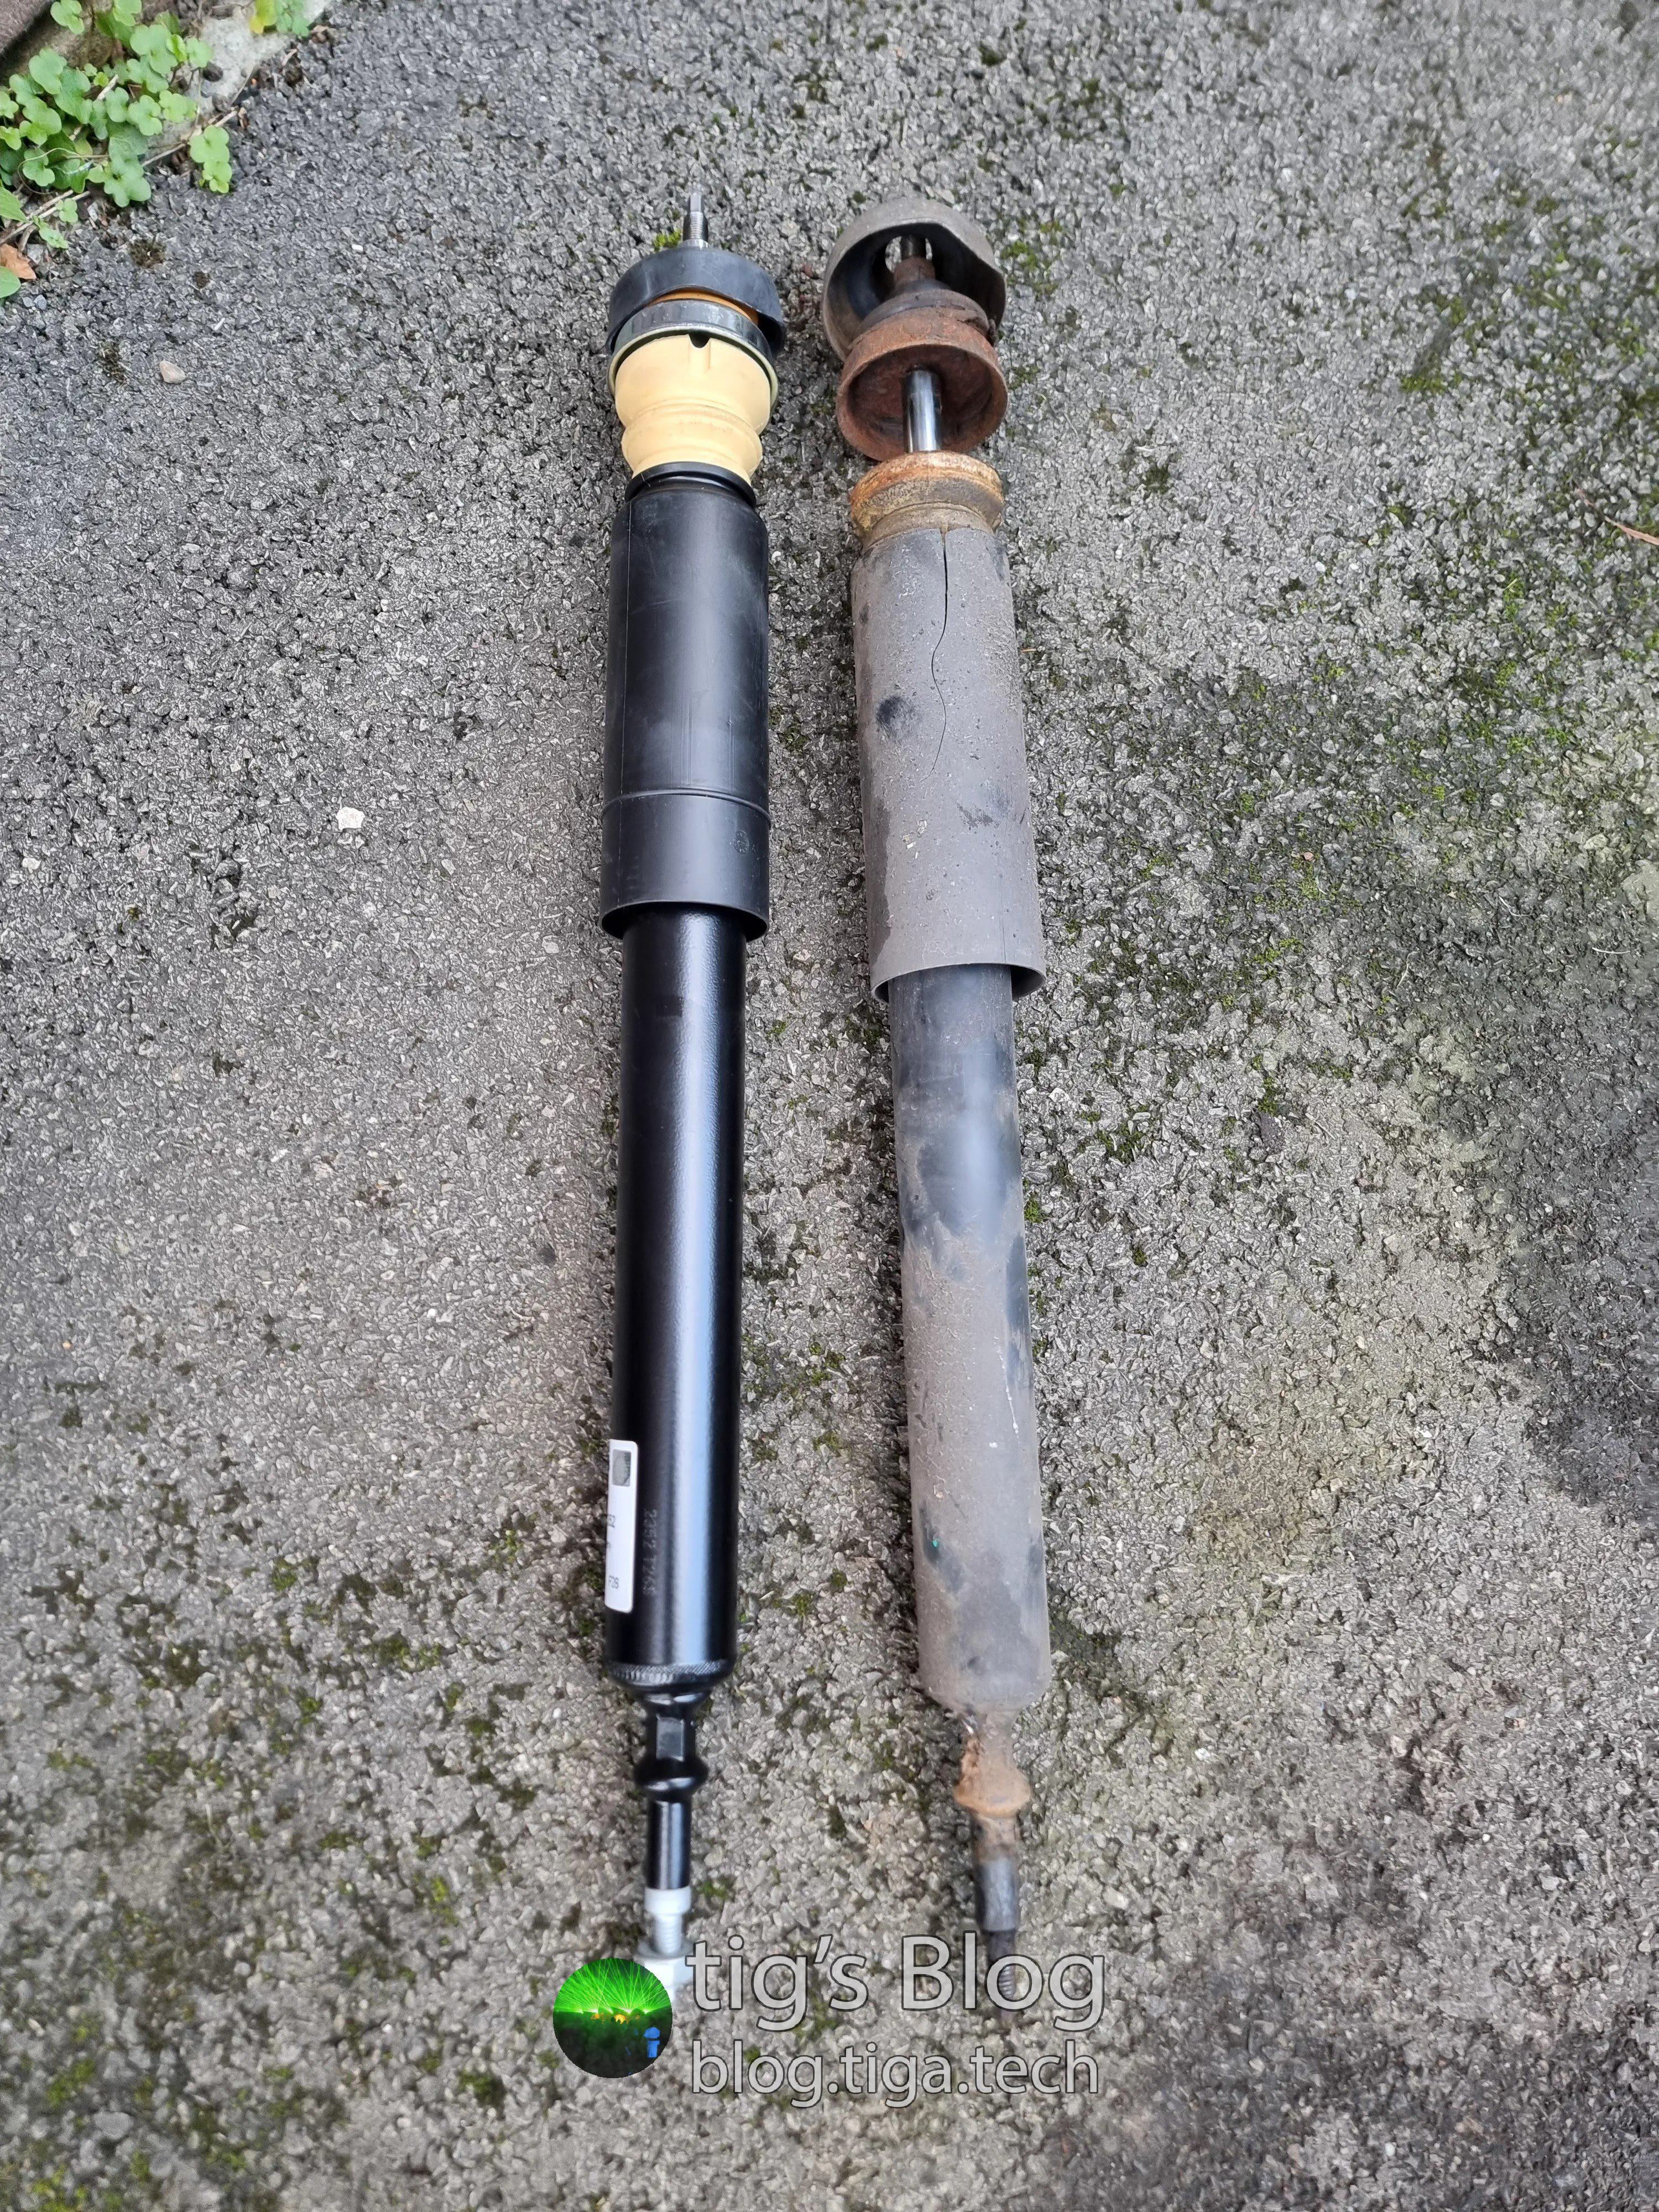
As I clearly needed to replace at least the top mount, I figured I may as well replace the shock too. At this point it only made sense to replace both shocks & mounts, especially given that I had no idea of the age or mileage on them. Might as well while I’m in there™, eh?
My 335i came with the M-Sport suspension option from factory, so I had to be a little careful in selecting the correct components. The vast majority of locally-available parts were not suitable.
In the end, I picked up the following parts from a combination of eBay and a local independent distributor:
- Sachs 311410 shock absorber8 x2
- Sachs 900127 dust cover8 kit — Includes two bump stops and dust covers.
- KYB SM5752 top mount kit8 x2 — Includes the supporting cup, sealing grommet, and both guide supports.
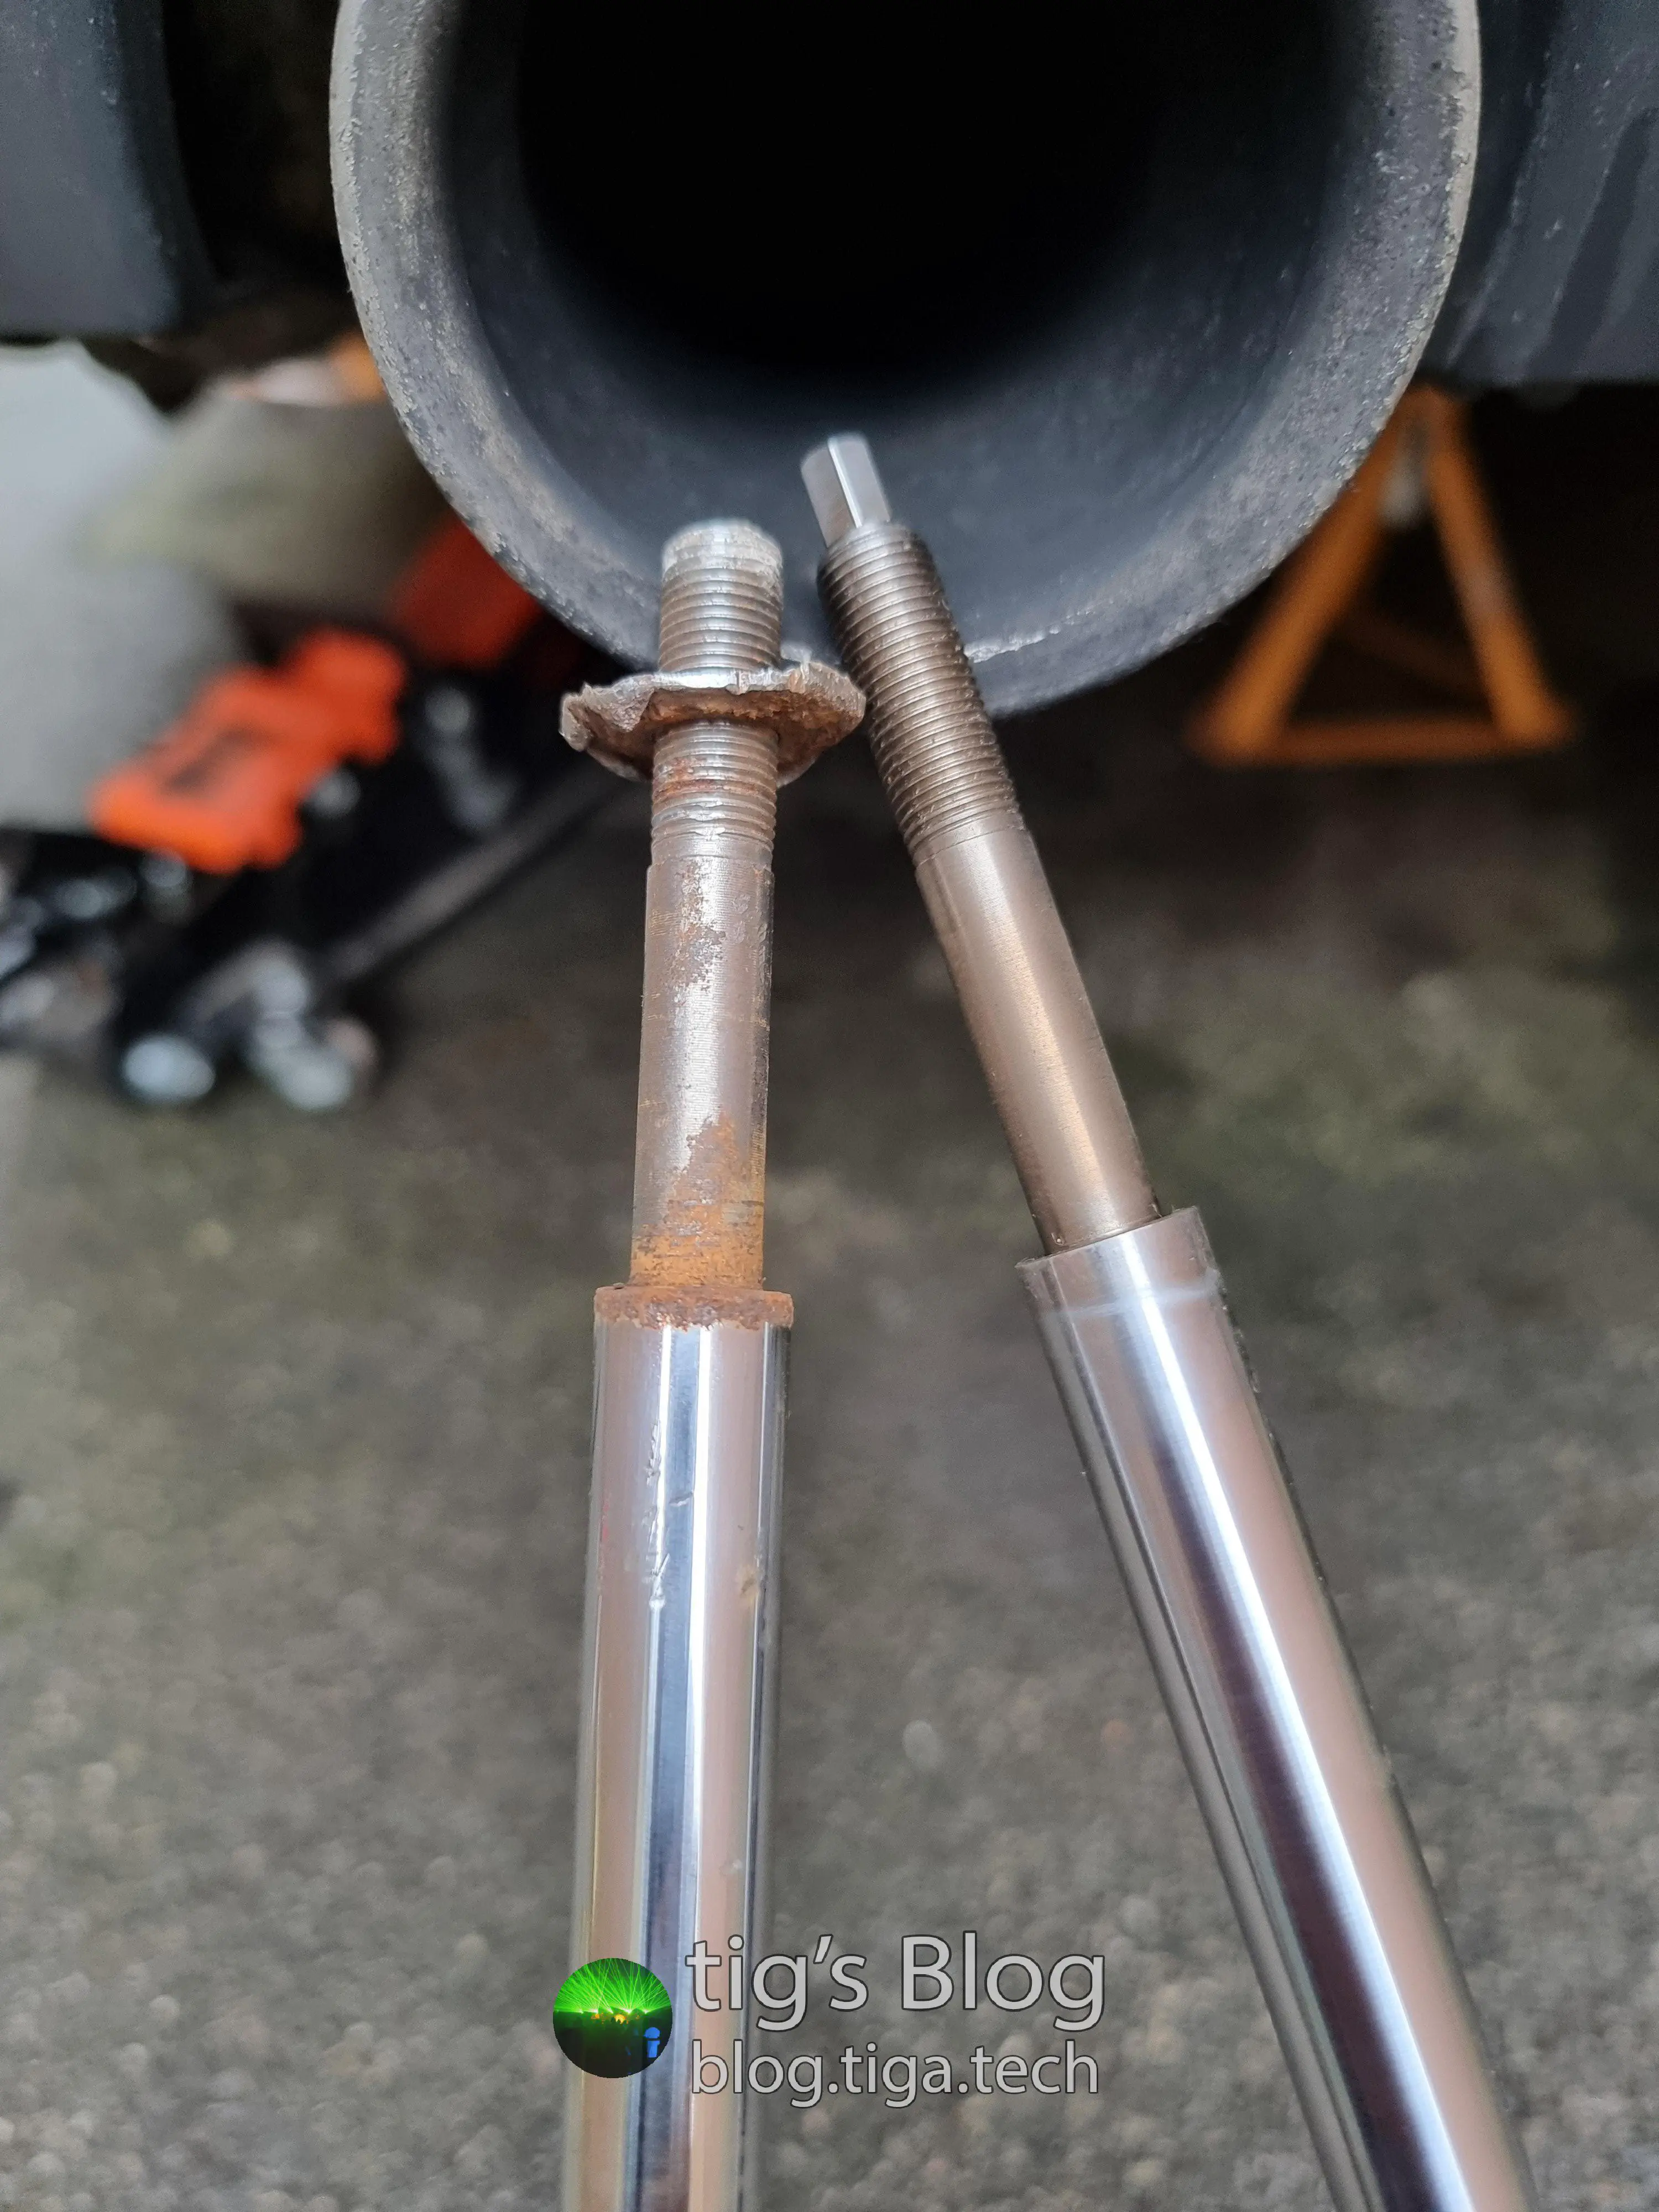
After getting my hands on the parts, I proceeded to remove and replace each shock absorber in turn. I spent a good while cocking around with a ratchet and a spanner, but in the end only made a spanner of myself:
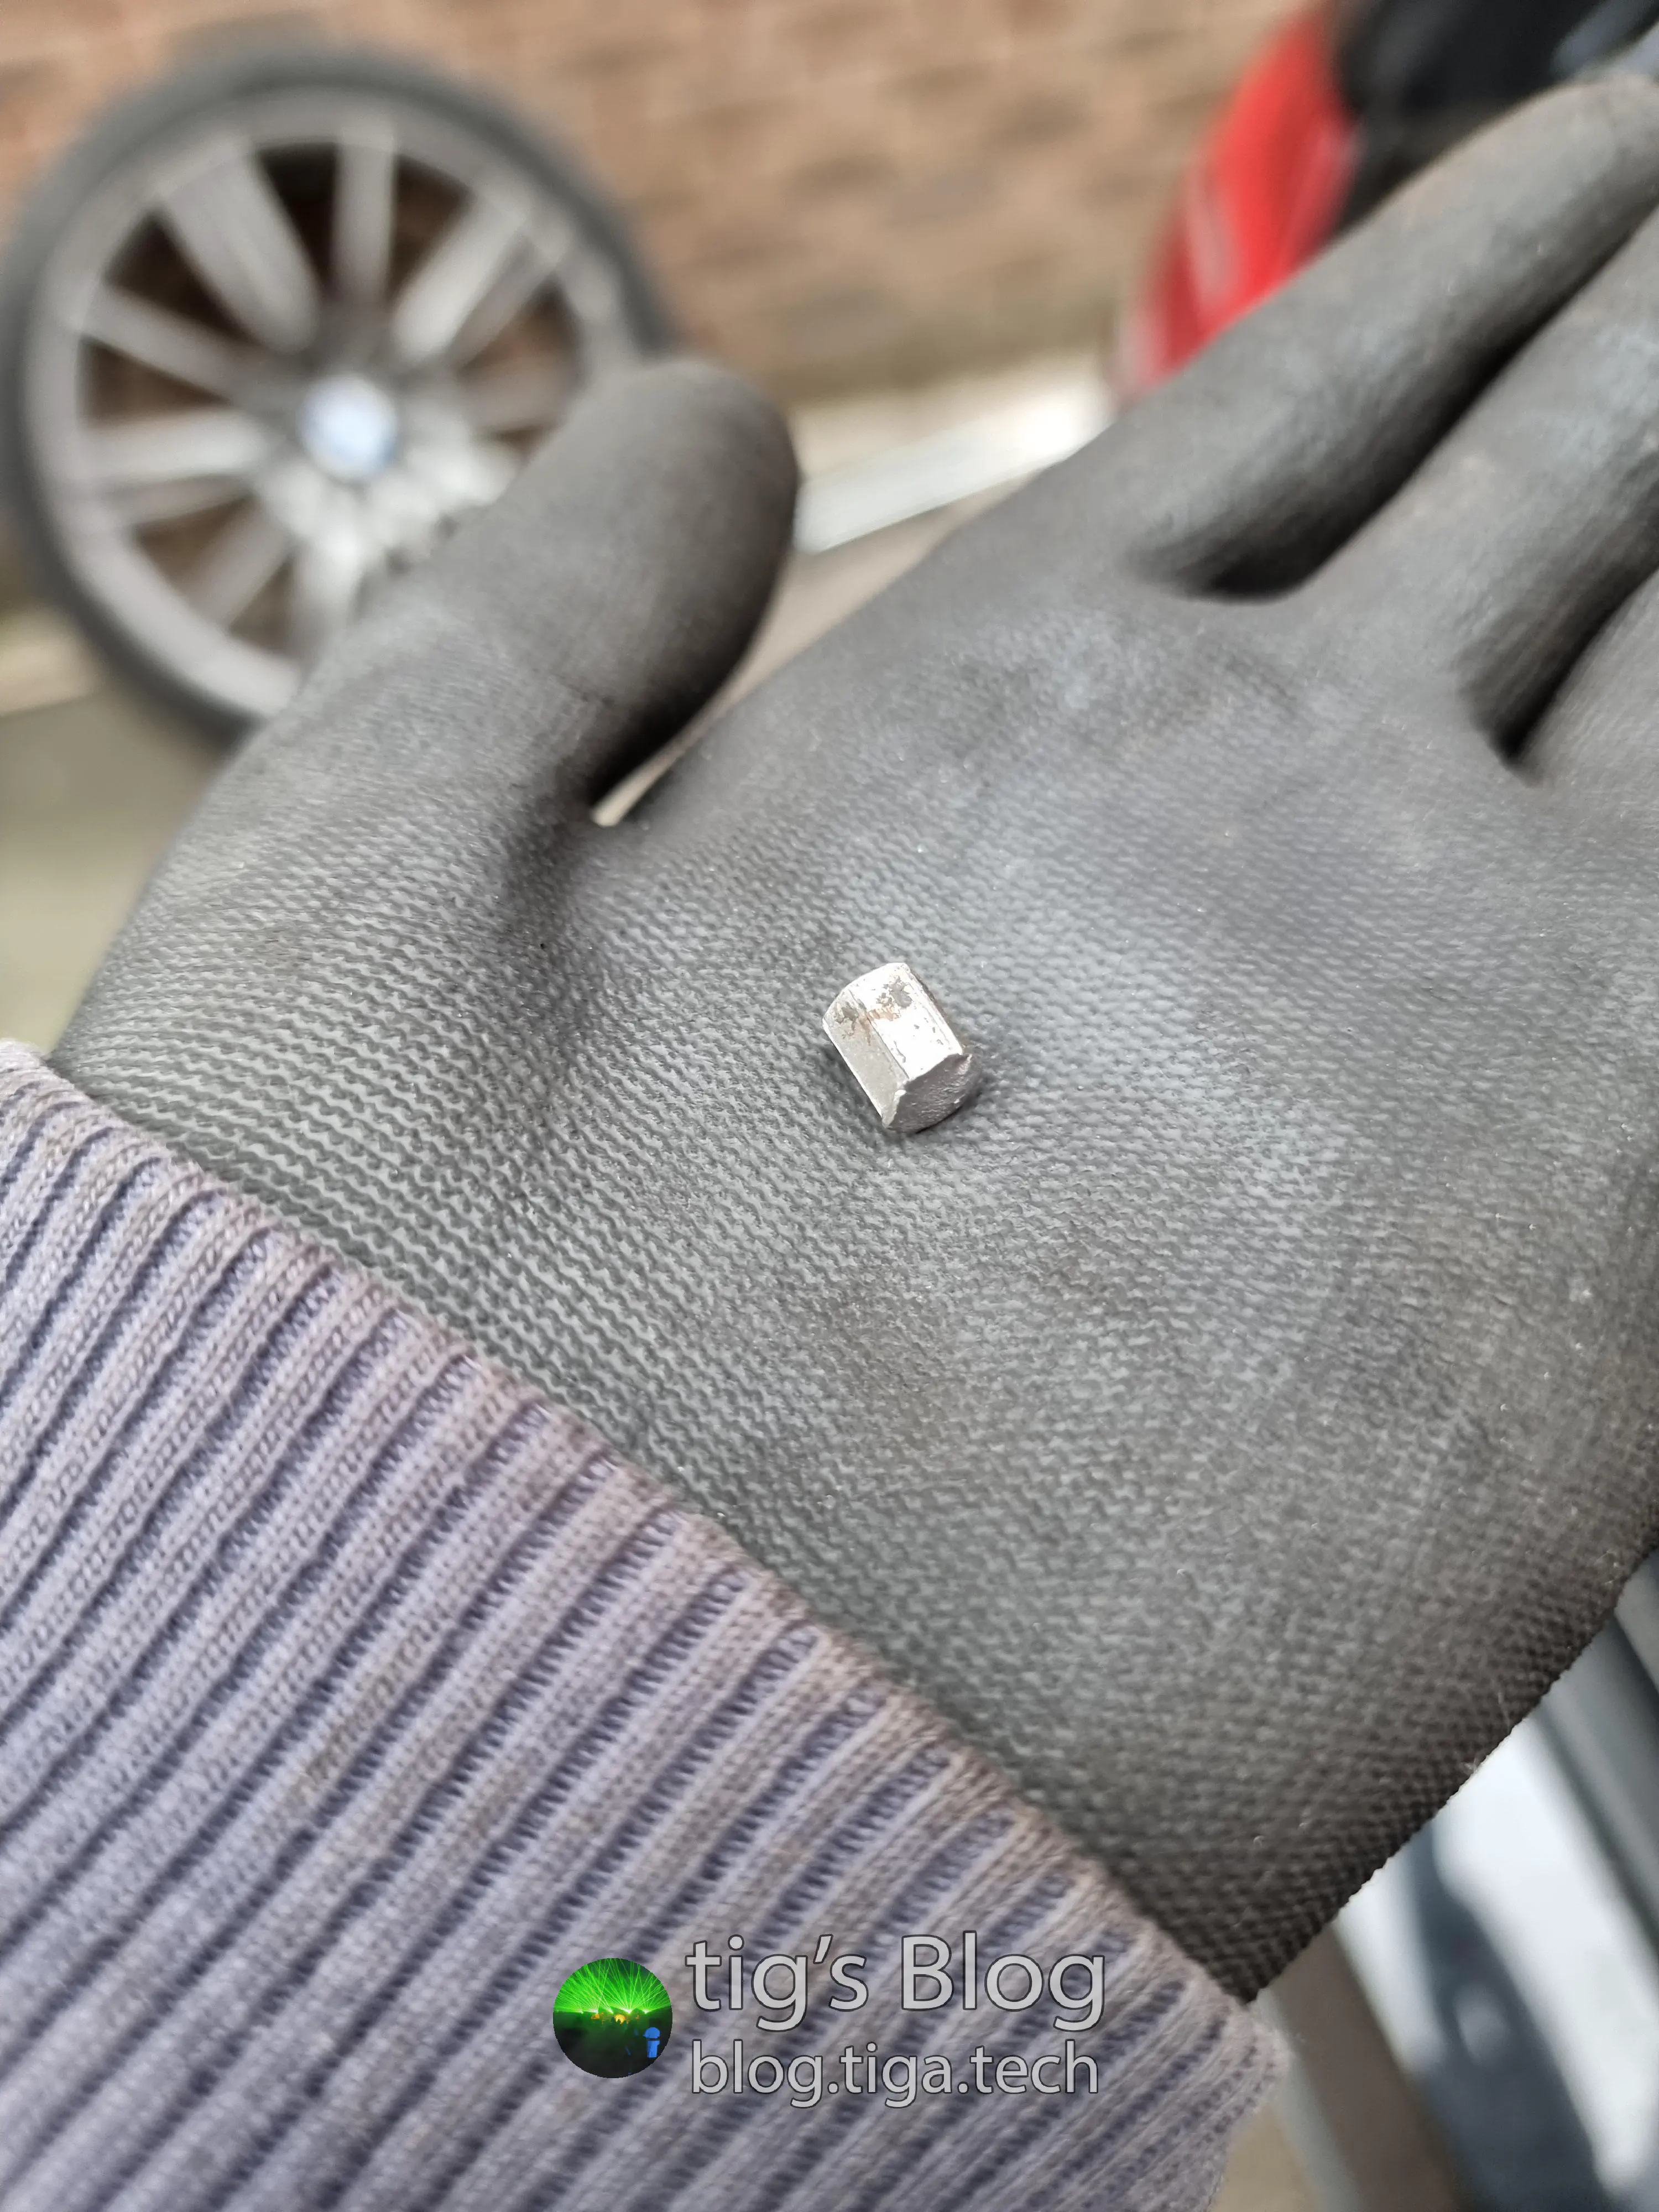
I tried using various tools to hold the shaft still whilst removing the top nut, but unfortunately to no avail. After this, I was frustrated and at a loss, and took a break. Talking with a friend that evening, he suggested using an impact wrench. I wasn’t convinced this would work given I had no way to stop the strut freely rotating, but I didn’t have any better ideas.
At first, I wasn’t able to get my impact wrench on to the top nut of the strut due to the limited vertical space in the boot (remember it’s a coupé). After numerous attempts to reposition the lower end of the strut, I finally got it into a slightly sketchy but workable position, and was able to fit my impact wrench onto the top nut. What do you know, it whipped the bolt right off!
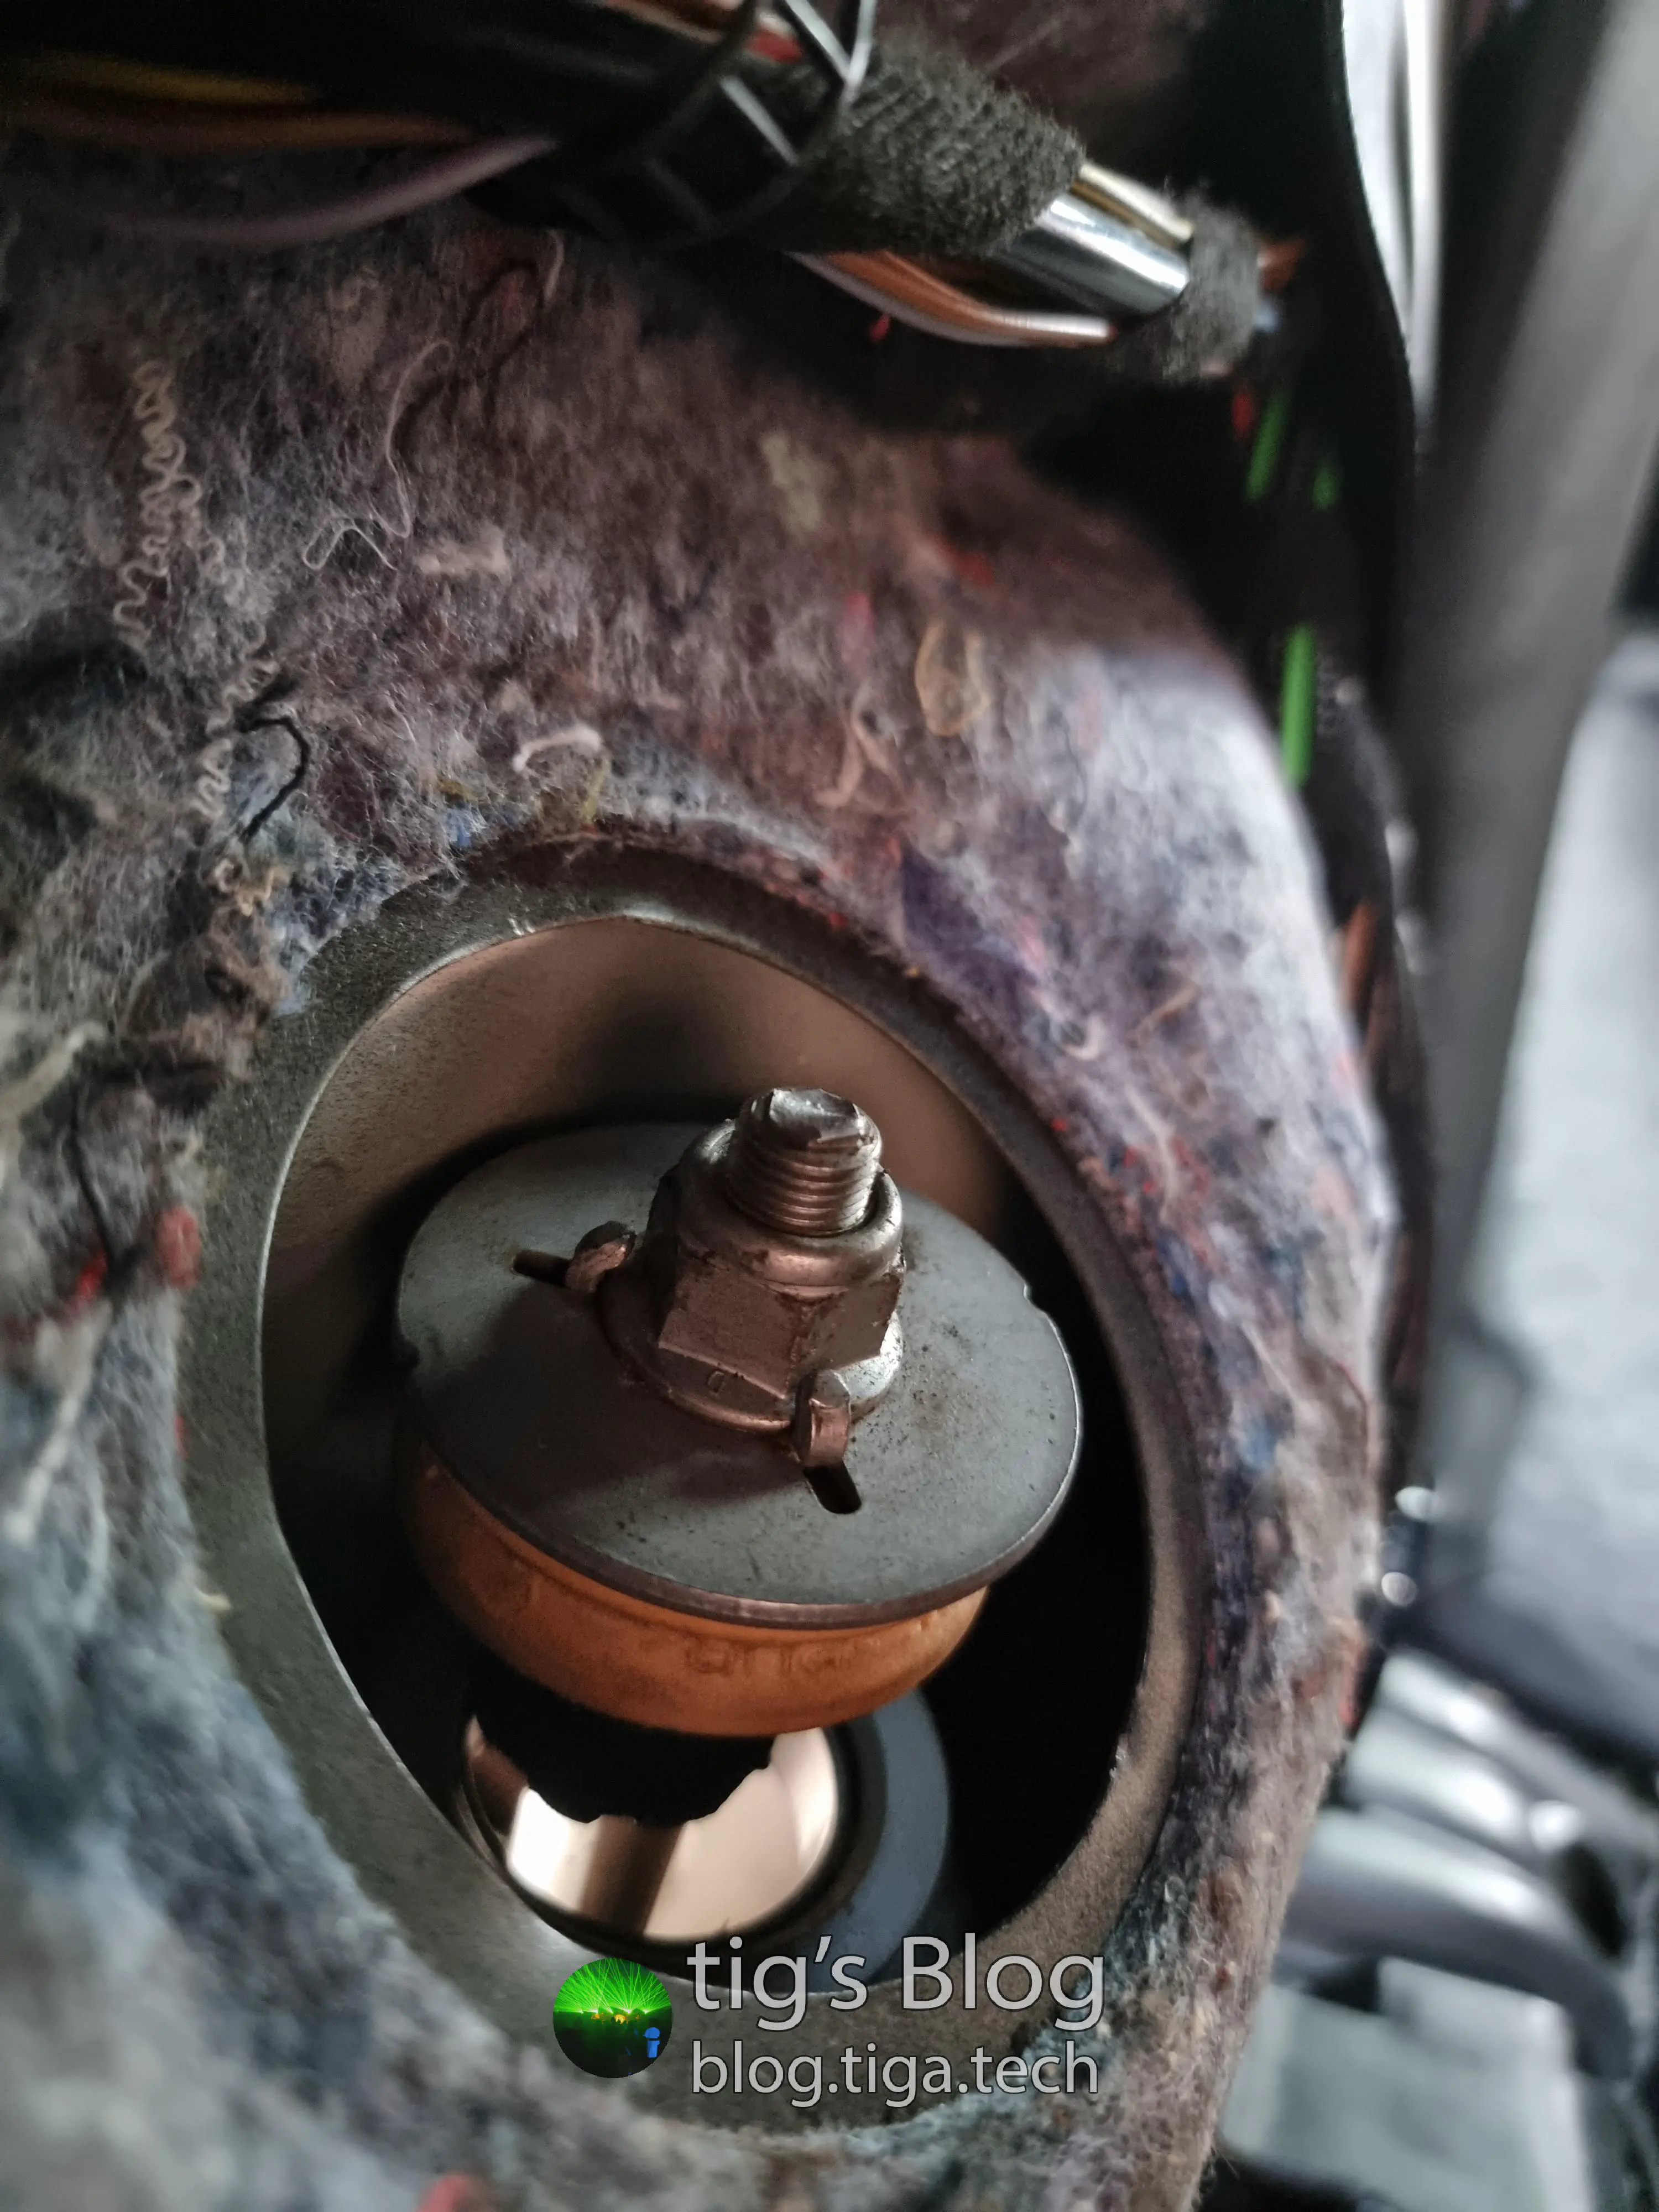
Boy was I in for a sight when I got the old shock off and had a look at it:
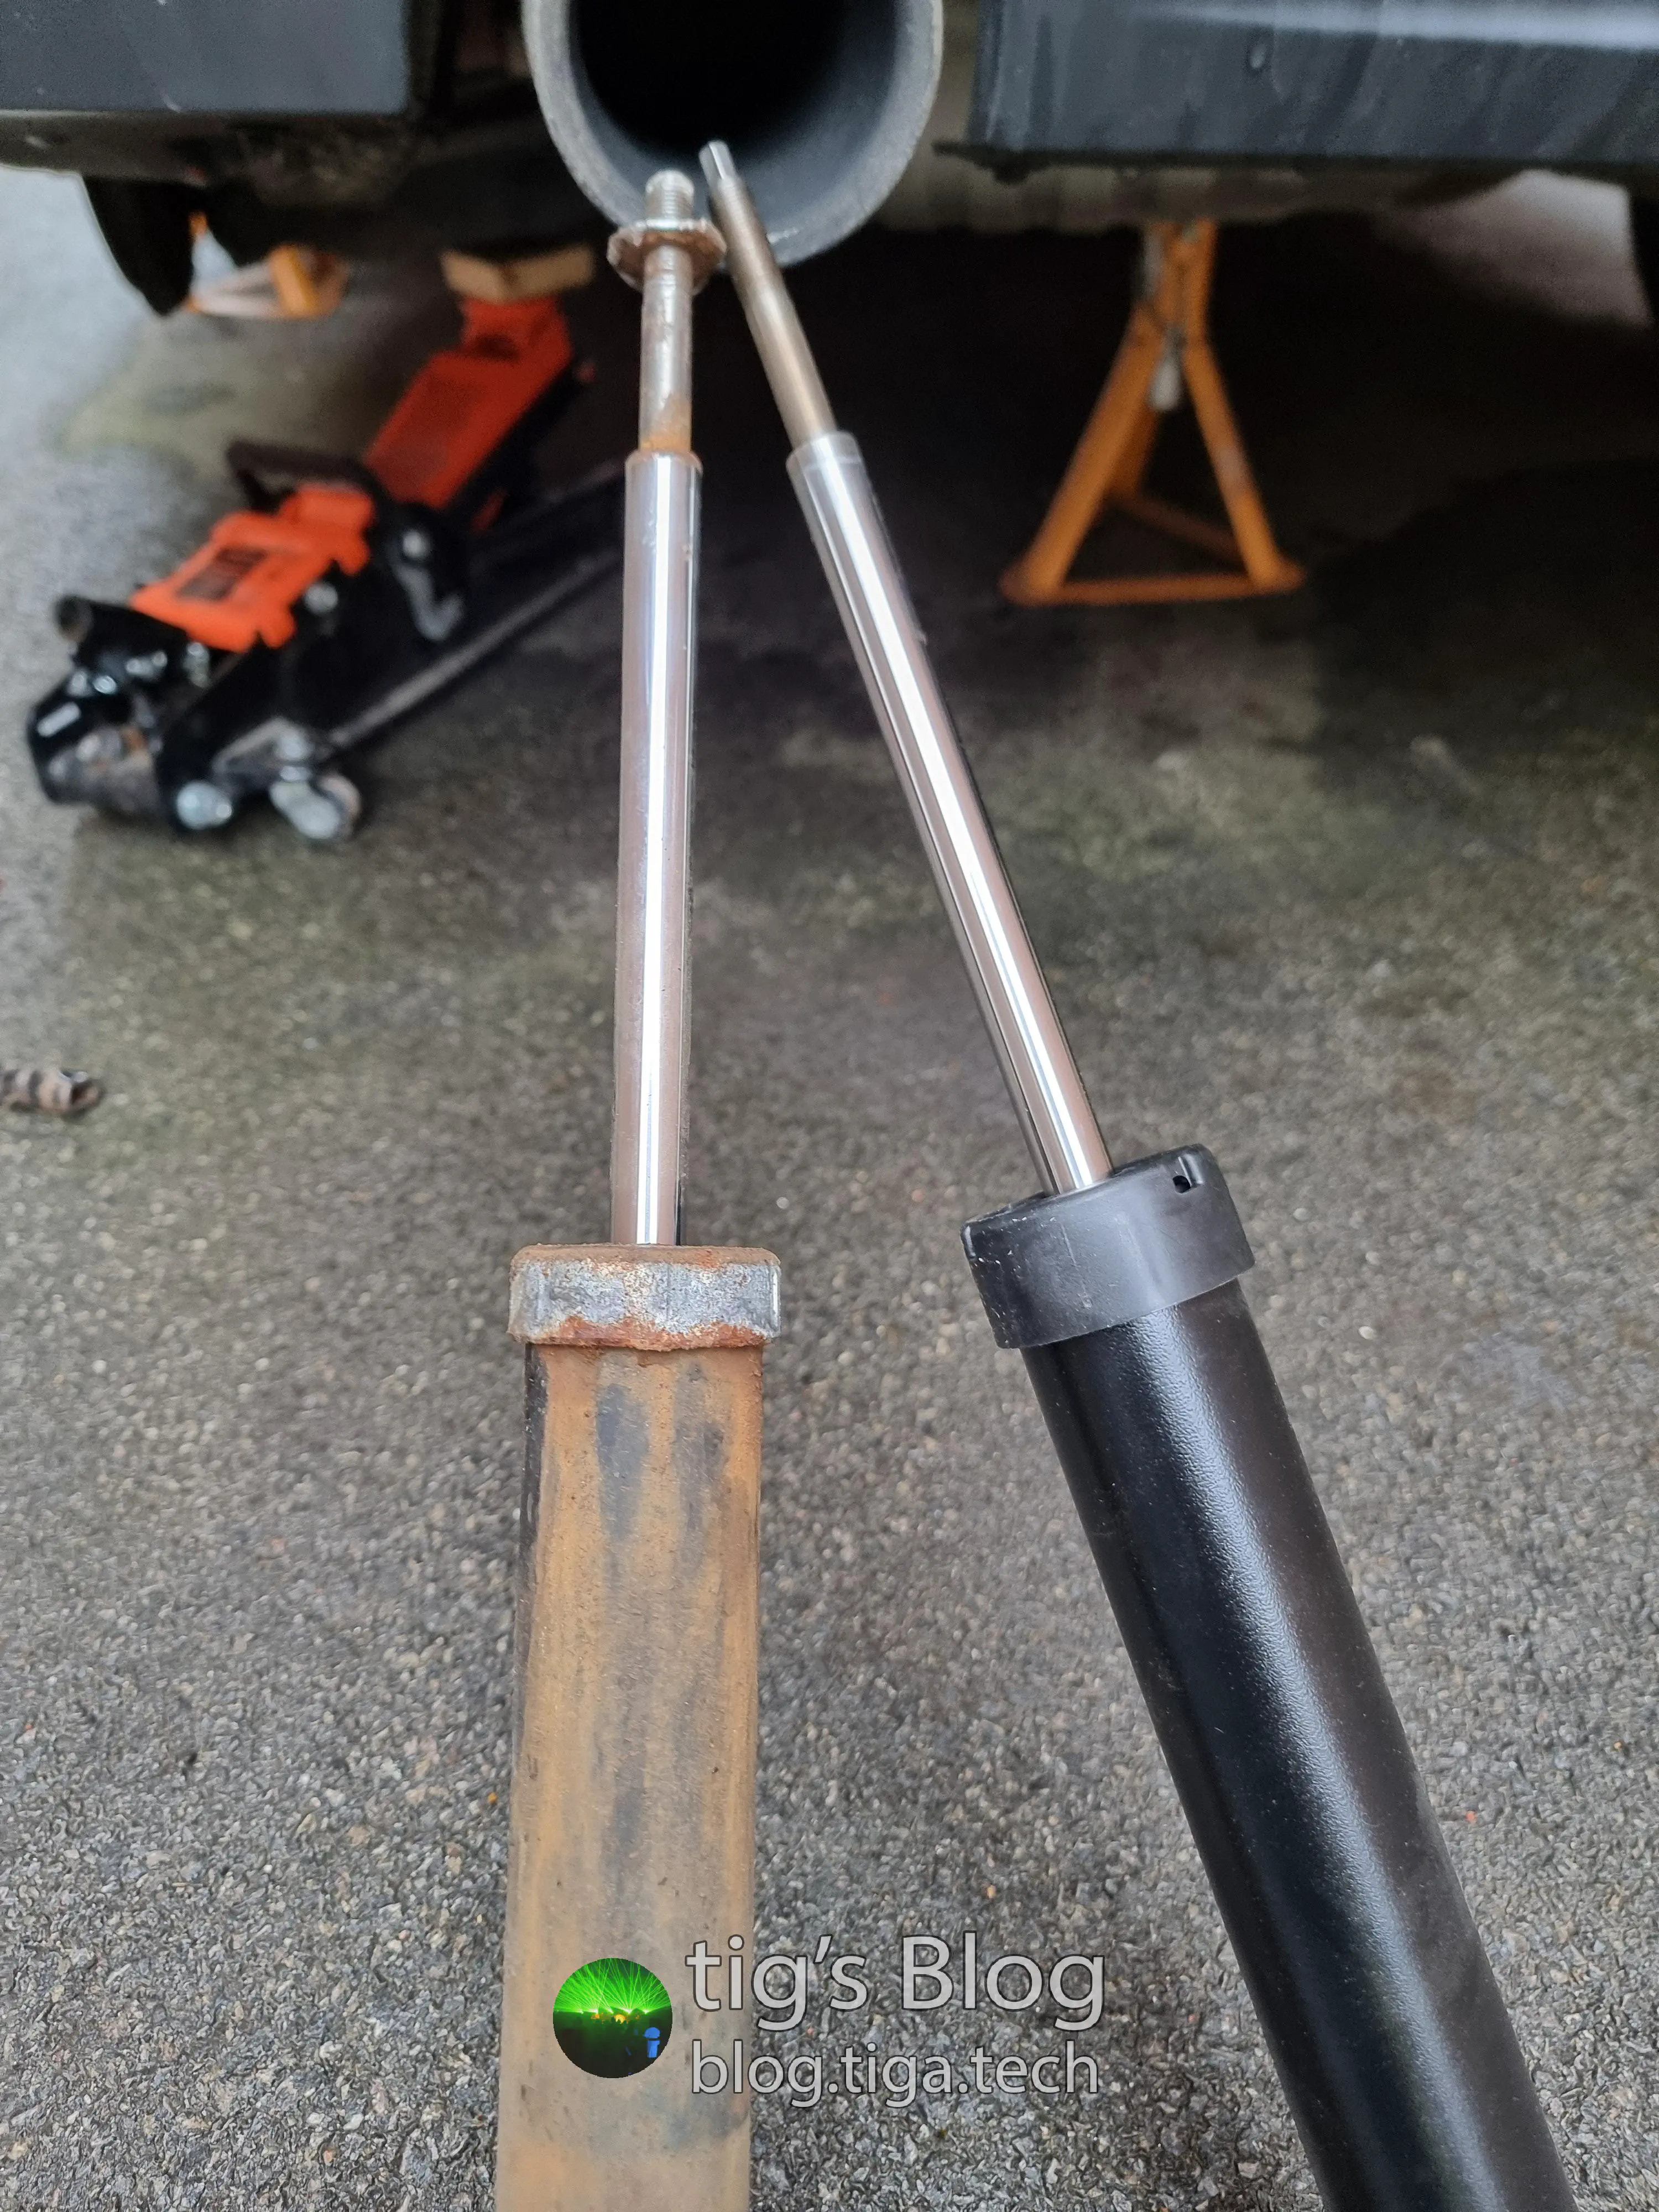
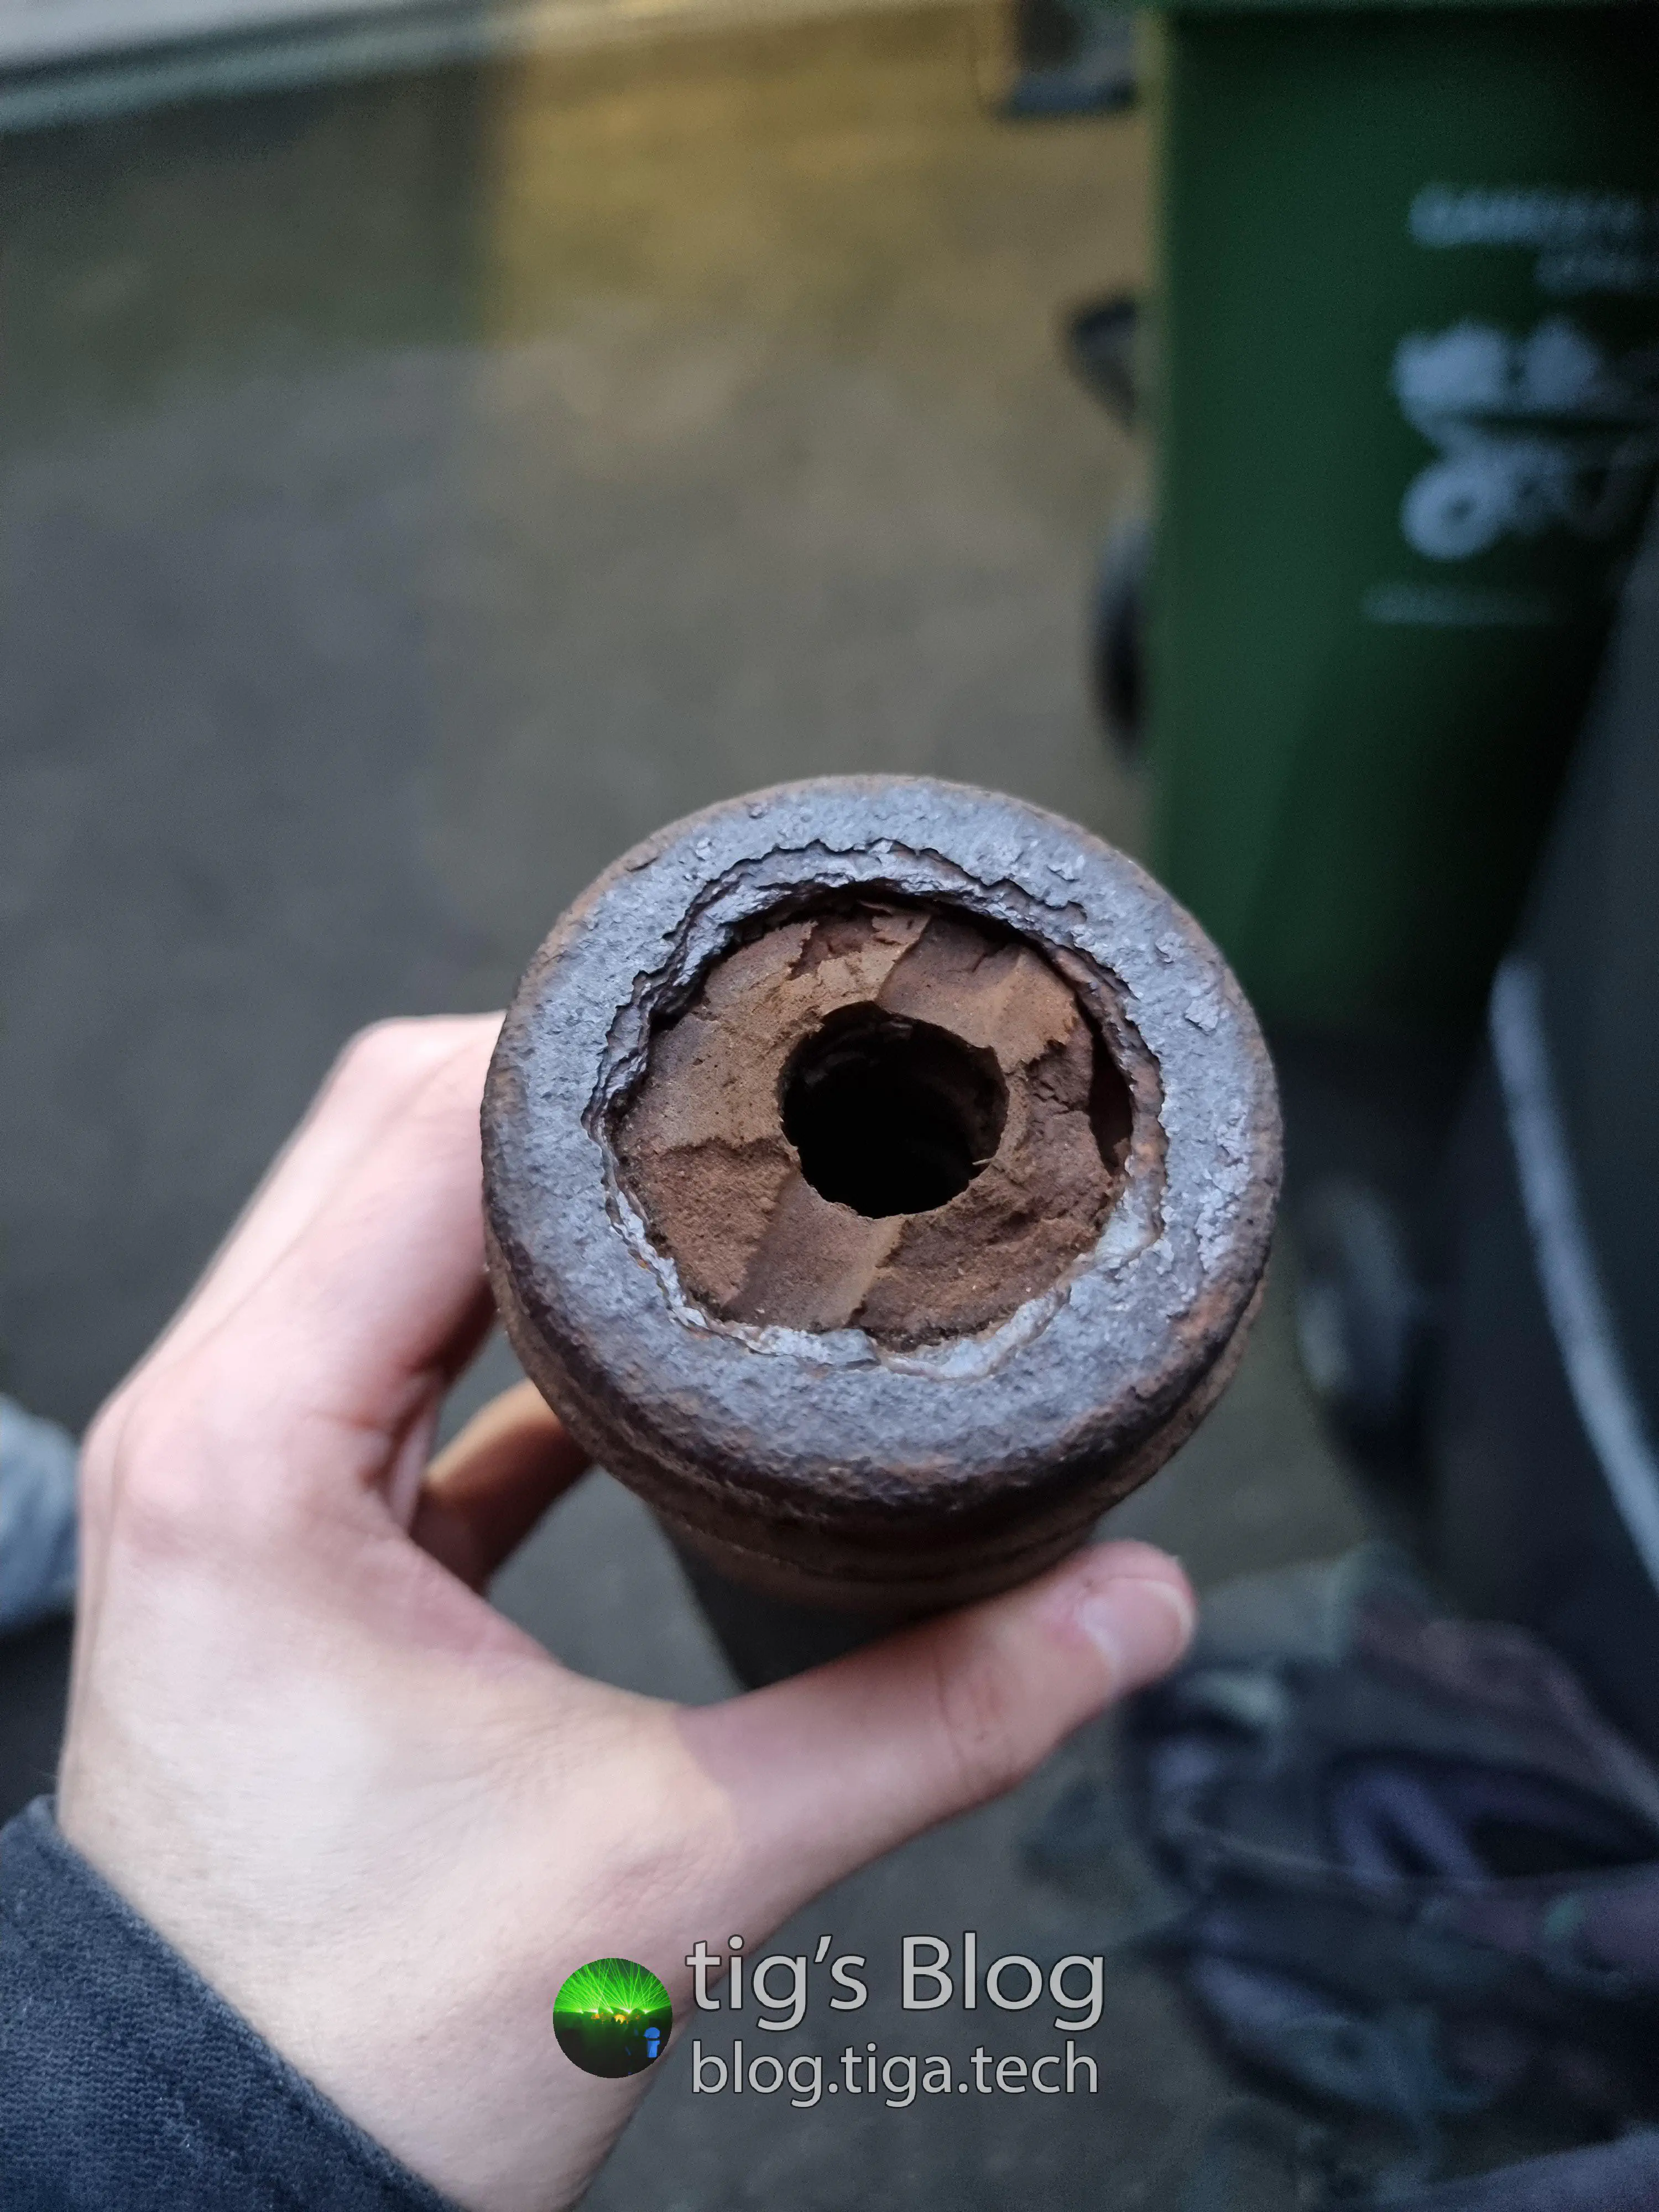
The washer-looking piece of metal at the top of the old shock used to be part of the metal cap on the bump stop in the last image. That thing was fucked.
Building and fitting the new shocks was mostly a breeze, the only tricky part being compressing them enough to get them over the track control arms. I later learned that there was a far easier way to do this… A lesson for the future.
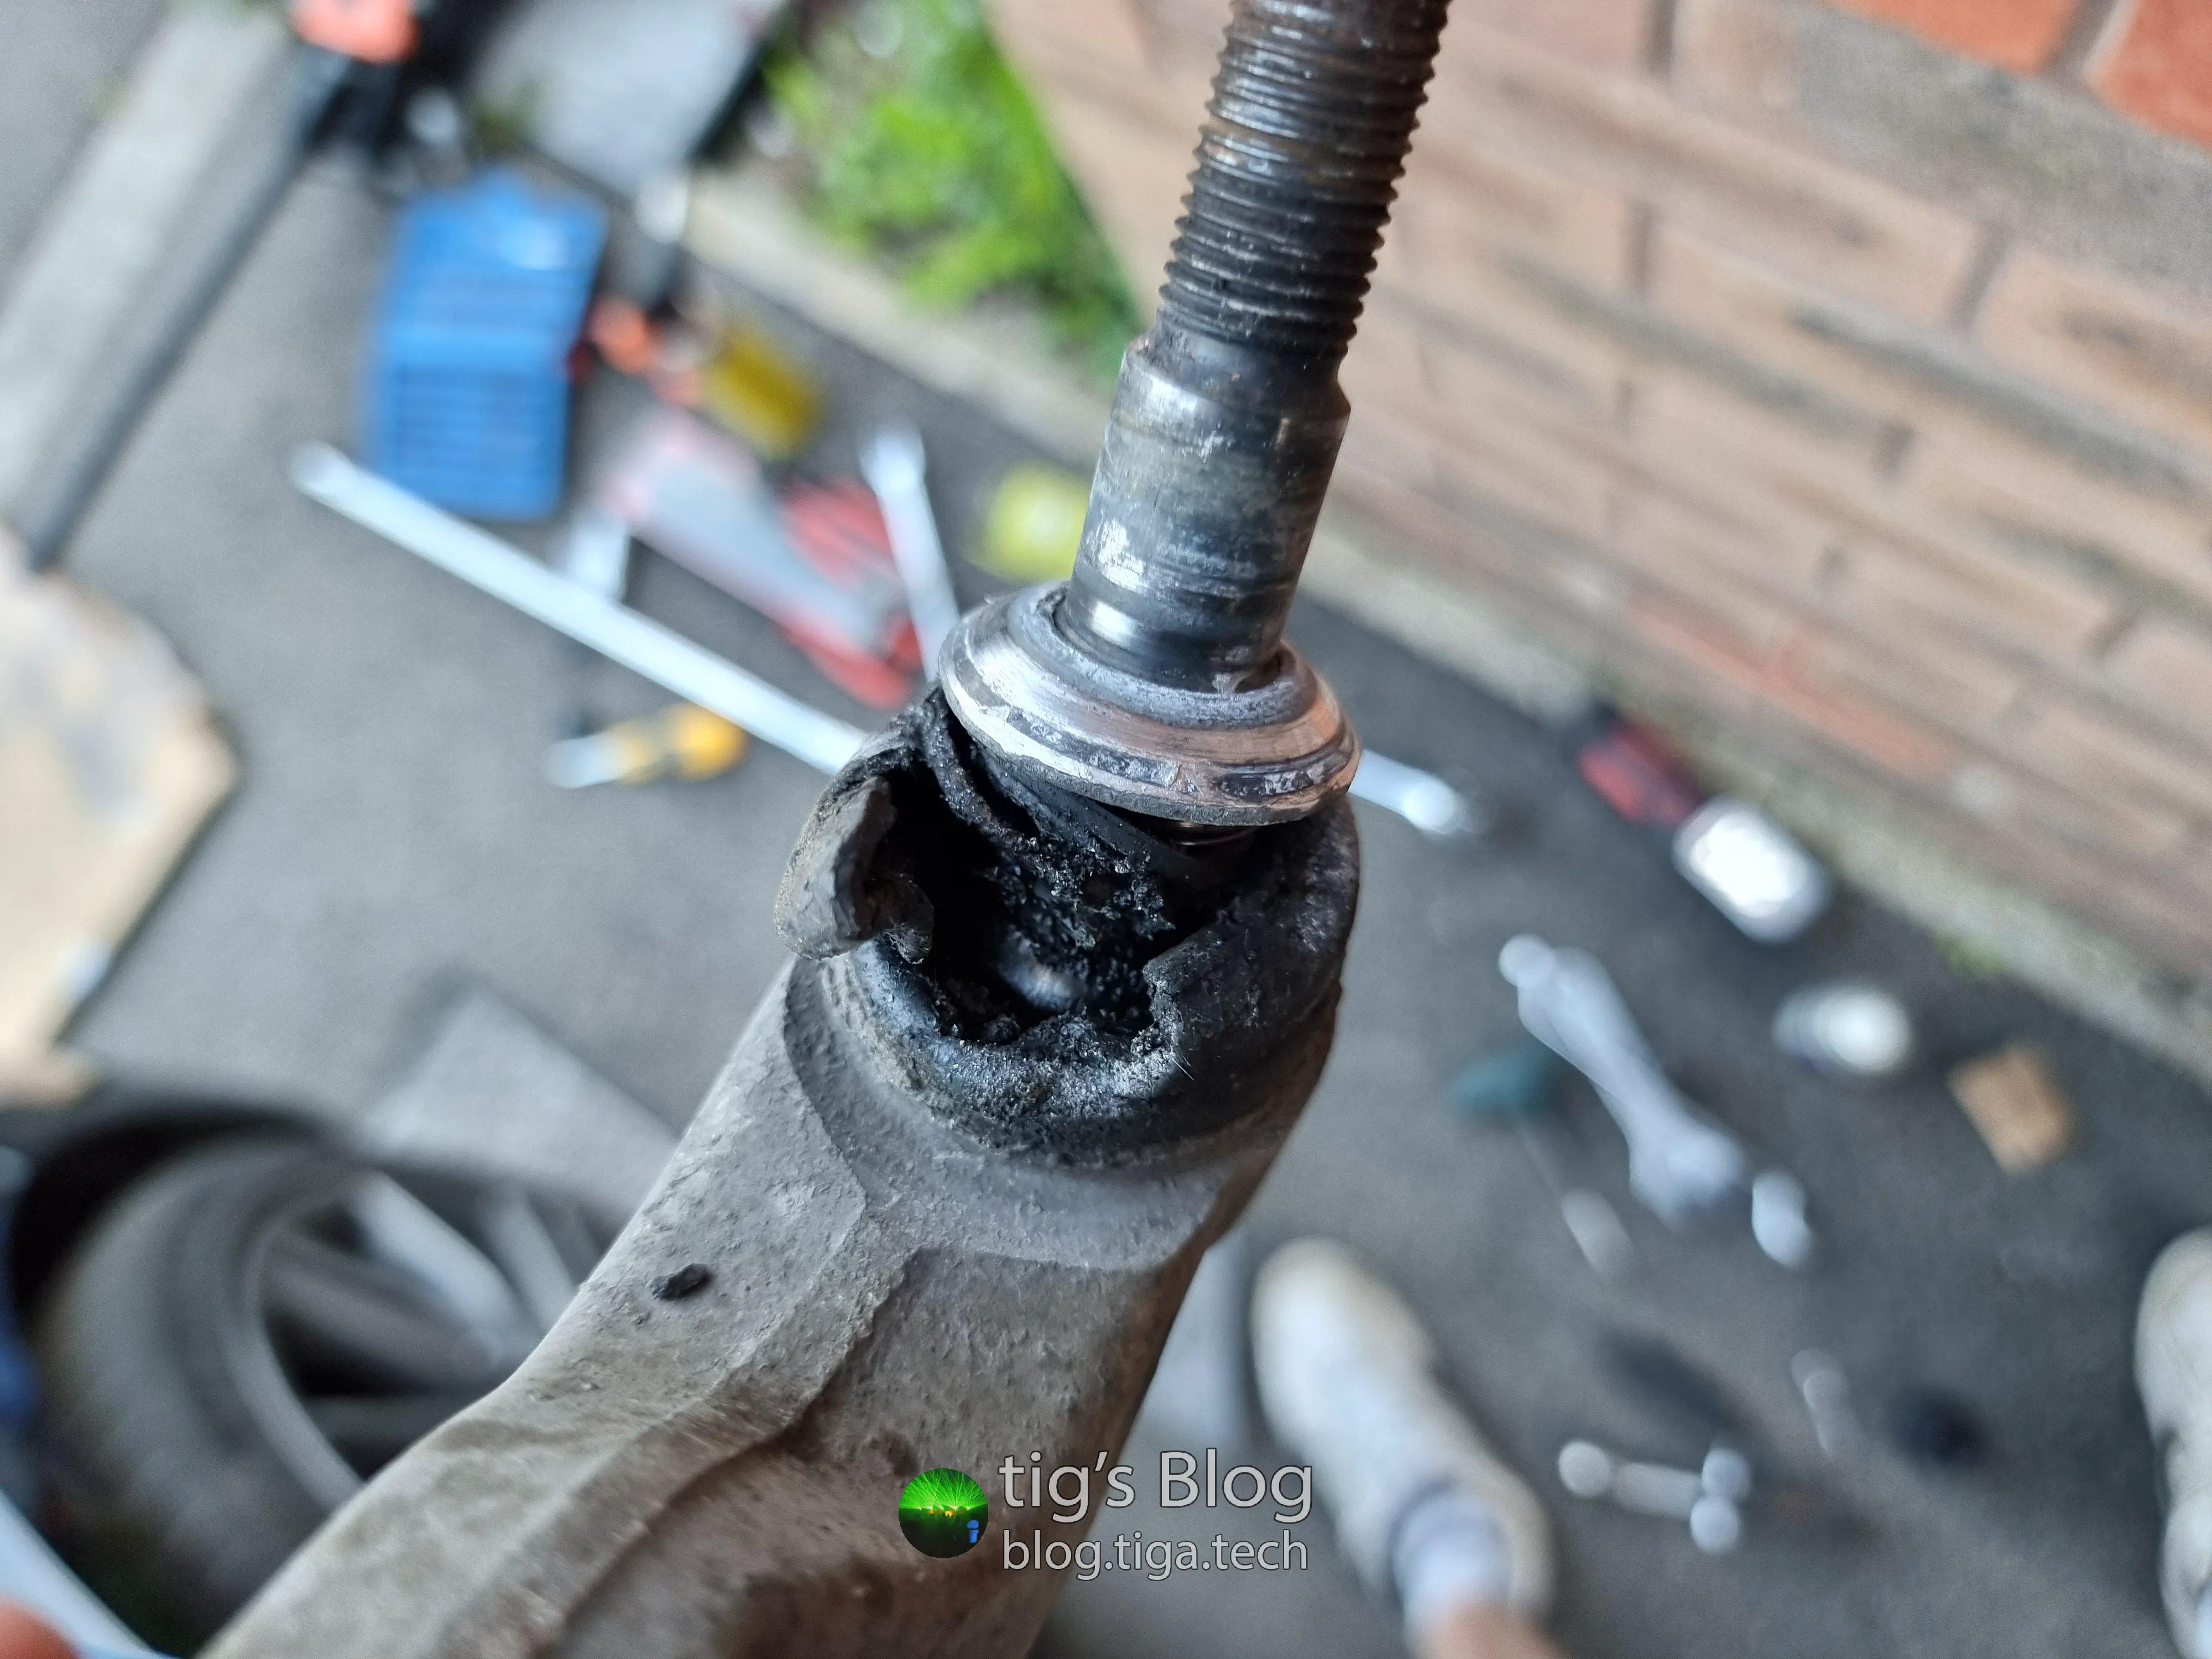
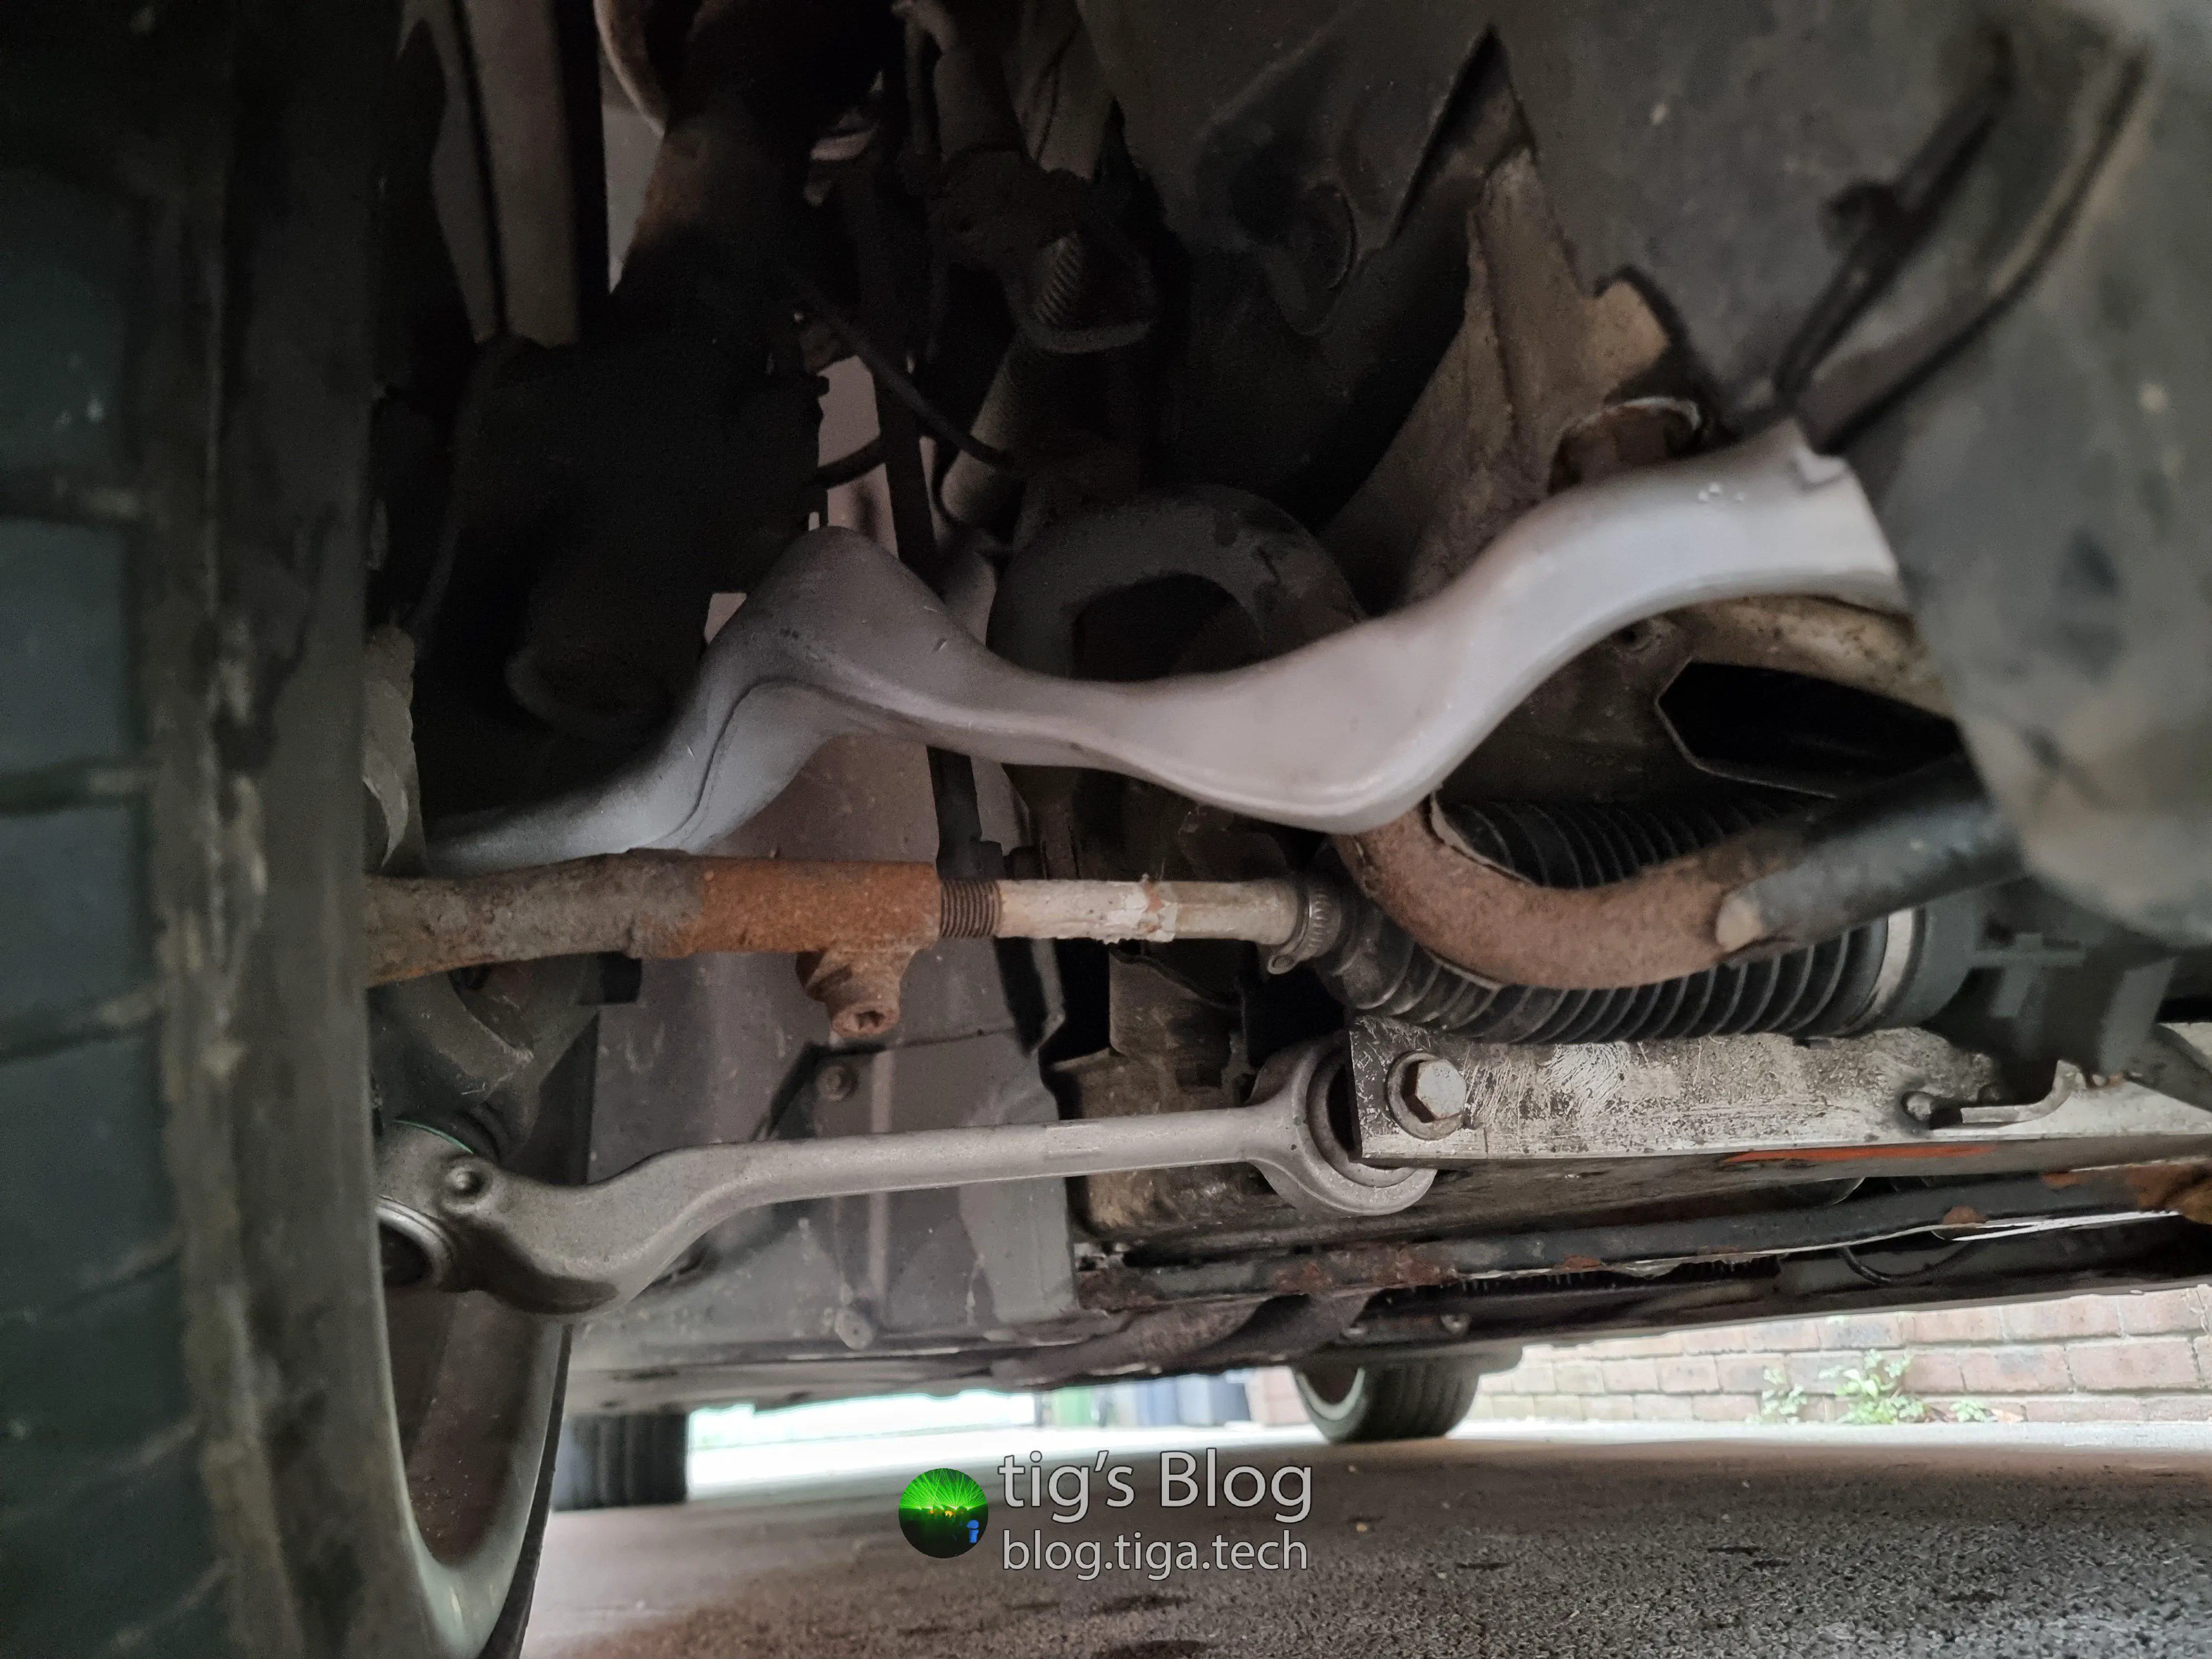
Offside Front Thrust Arm#
23/12/2024
For a few weeks, I’d noticed a slight wobble at 60 MPH (~100 km/h) and above and heard knocks over bumps from the OS/FOffside Front wheel area. After raising that corner and poking at various components, I found excessive movement in the thrust arm’s1 inner bushing:
I was to be driving some distance the following day to visit family over the holiday period, but after seeing this I wanted to get it replaced ASAP, not only because there are some fantastic roads around where my parents live.
Luckily it’s a super simple replacement with nothing but two large bolts to deal with. I picked up a replacement part (albeit not one from an OEMOriginal Equipment Manufacturer — A company that makes the OE (Original Equipment, i.e. genuine BMW) parts, just without the BMW logo on them.) from a local distributor and got it replaced in no time.
The End.#
That’s all for now, but I have plenty of plans for future maintenance and upgrades. After all, I did choose to buy an almost two-decade-old high-performance BMW, so there’s no doubt more work will be waiting for me down the road.
I always welcome feedback on my posts, please contact me if you have any. I’m also happy to answer any related questions if I know the answer.
Left 9: Thrust arm
Left 14: Control arm
Right 1: Damper (shock absorber) strut
Right 2: Wheel hub carrier
Right 5: Wheel hub & bearingSources & part numbers: Left, right. ↩︎ ↩︎ ↩︎ ↩︎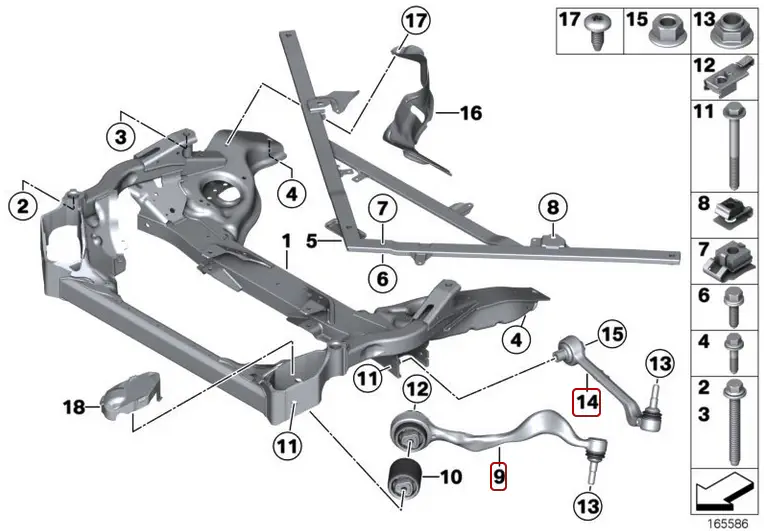
7: Cylinder head ⇄ T-statThermostat hose
8: “Mickey Mouse” flange O-ring
10: Radiator top hose (a.k.a. radiator ⇄ engine feed, connects to the OFHOil filter housing)
14: Radiator ventilation hose — Consists of black plastic “hard” pipe and rubber hose. Not numbered: AT/DCTAutomatic Transmission/Dual-Clutch Transmission oil-to-coolant heat exchanger — Square-ish block with two pipes, below and to the right of part #12. Unique to AT/DCTAutomatic Transmission/Dual-Clutch Transmission vehicles. See this separate diagram for more info.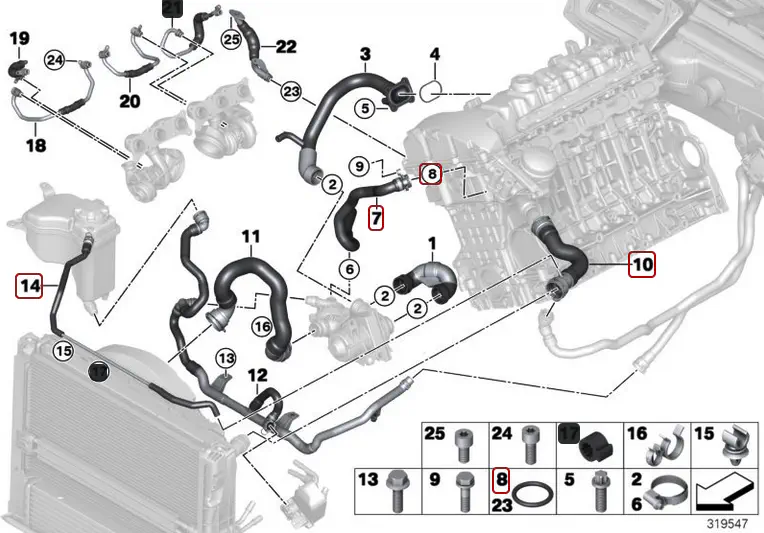 Source & part numbers. ↩︎ ↩︎ ↩︎ ↩︎ ↩︎
Technically this is out of order, with the radiator hoses being completed almost last of all everything else I did during these couple of weeks. However, since it’s what kicked all this off, it’s going first. ↩︎
There’s discussion of various ways of DIY’ing a repair for the radiator vent hose in this Bimmerpost thread. ↩︎
Left 1: Oil filter housing
Left 4: OFHOil filter housing ⇄ cylinder head gasket
Left 5: OFH/OCTHOil filter housing & oil cooler thermostat housing mating surface gasket
Left 9: Oil cooler thermostat housing
Right 1: Oil cooler, air-oil heat exchanger — Essentially a small radiator.
Right 7: Oil cooler pipe flange O-ringsSources & part numbers: Left, right. ↩︎ ↩︎ ↩︎ ↩︎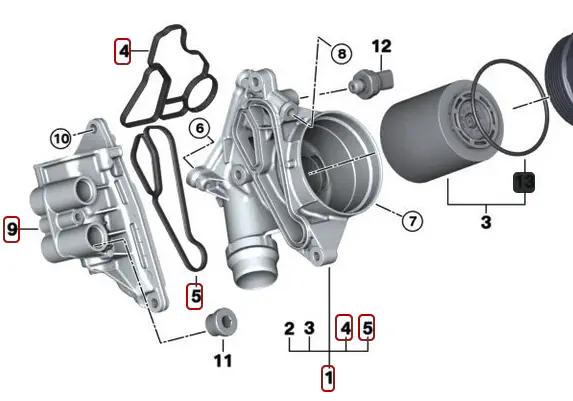

43mm ODOuter Diameter, 37mm IDInner Diameter, 3mm C/SCross Section. Viton rubber is strongly advised due to its resistance to oil and ability to withstand high temperatures and temperature fluctuations.
Many thanks to the great folks in this Bimmerpost thread! ↩︎ ↩︎ ↩︎https://familyguy.fandom.com/wiki/Wacky_Waving_Inflatable_Arm-Flailing_Tubeman ↩︎
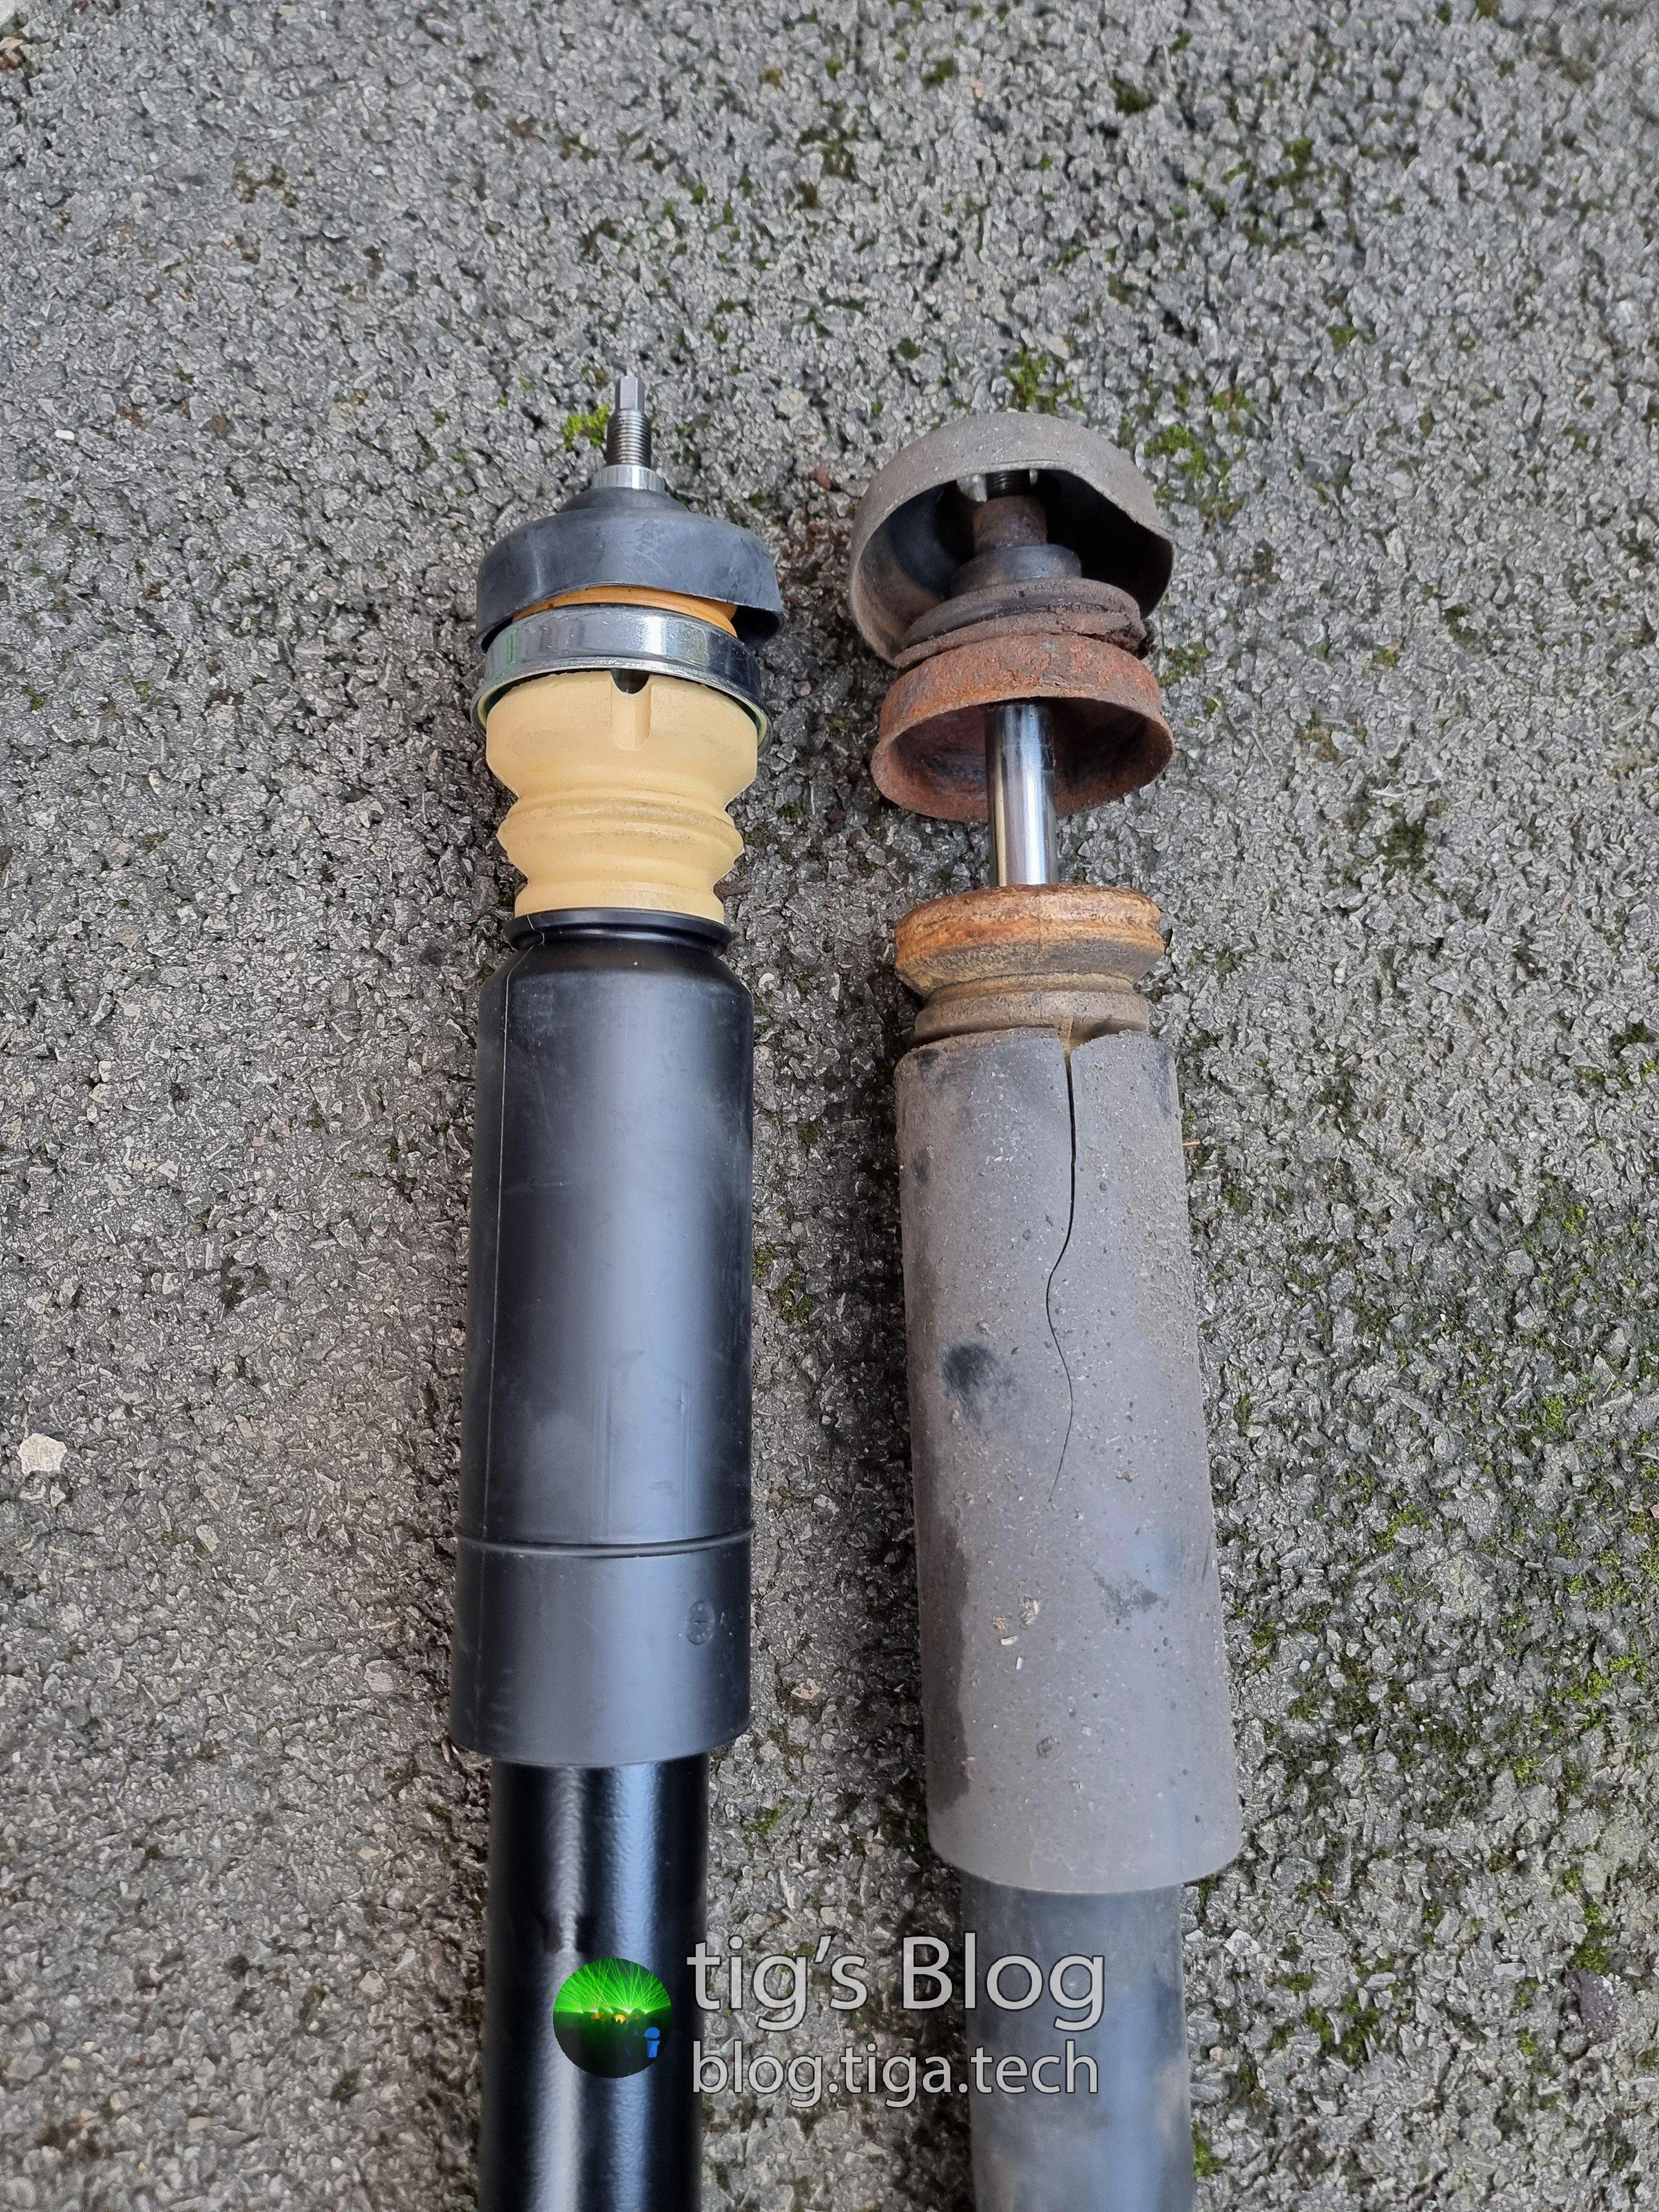
1: Rear shock absorber
2: Lower shock mount hex nut
3: Bump stop & dust cover
4: Supporting cup
5: Rubber sealing grommet
6: Lower guide support
7: Upper guide support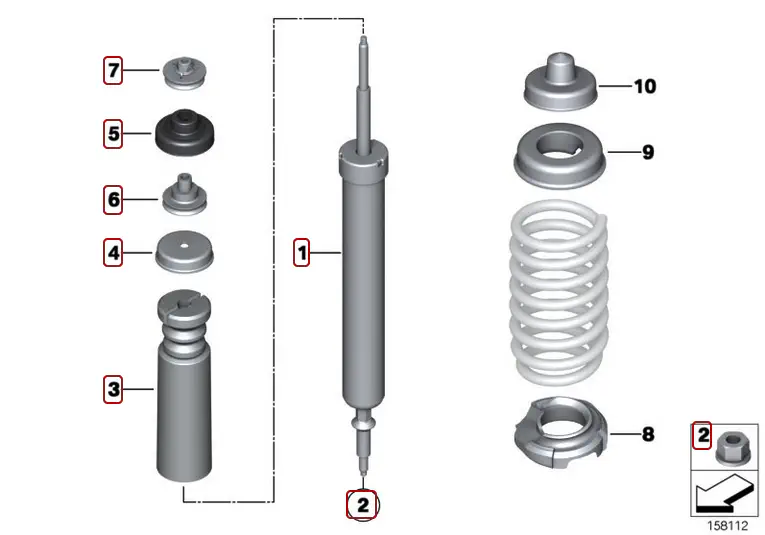 Source & part numbers. ↩︎ ↩︎ ↩︎